Arthroscopic Bankart Repair for Anterior Shoulder Instability Using a Posterolateral Portal
Transcription
OVERVIEW
Hi, my name is Matthew Provencher. I’m the Chief of Sports Surgery at Massachusetts General Hospital and I'm here today to demonstrate arthroscopic anterior instability repair in a patient who sustained an anterior dislocation after a wrestling injury. This surgery is performed arthroscopically and this repair actually uses both knotless and knotted fixation to illustrate multiple principles of how to do both types of techniques. It's very important to meet the patient in the holding room area and ensure that the operative limb is marked, and that you clarify expectations and postoperative plan for the patient. We also ensure that we have all of the postoperative gear available, such as sling and/or ice machines, or anything else that you may choose to use for the patient.
The patient is brought back to the operating room, undergoes a general anaesthetic. They may or may not have a interscalene block. In this patient, this patient had a interscalene block obtained by the anesthesia. Pain service here at our facility, it was done under ultrasound guidance. After that is performed, they then come back to the operating room where they undergo a light, general anaesthetic. After the light, general anesthetic is obtained and all lines are secured for the patient, we place the patient in the lateral decubitus position. As you can see here, we're using a bean bag and arm-holder to help position the patient.
The next step is to confirm our patient and are surgical time out. Once this is done, we start with our diagnostic arthroscopy and the steps you'll see here. We perform a very comprehensive arthroscopy, looking at all of the structures in the shoulder, both from anterior and posterior. Following this, we then switch the arthroscope to the anterior-superior portal. Portal management is critical for this case. In order to have a successful arthroscopic journey, you need to make sure that the portals are made in the correct position with the correct trajectory, and also the correct cannulas. Once we get the cannulas in position, and we use two anterior portals and one poster portal, I then put the arthroscope in the anterior-superior portal. This allows you to view directly down the front of the glenoid, so that you can clearly see where this anterior bankart tear is, as well as the capsular injury, to start preparing this for eventual anchor repair.
With the arthroscope in the anterior-superior portal, the next step we're going to do is start elevating up the tissue and preparing the bone labrum interface for final anchor repair. It's important to take your time with this step in order to make sure you have a very good interface preparation, a good bleeding, bony bed for which this labrum can heal. At this point, we are now ready for our anchor fixation and you can see we're going to start from the back with a percutaneous posterolateral portal. It's very important you have options for percutaneous placement of your anchors, as well as your sutures, as well as various cannula positions, to make sure that you can get all the way around the glenoid easily and provide fixation wherever the labral tear may be.
The posterolateral percutaneous portal is identified first as demonstrated here, and we'll put in the anchor at the six o’clock position, or just posterior to the six o’clock position, and start our anterior repair from the back. We will then put a double-loaded suture anchor in place and do a variety of suture techniques, both with horizontal and vertical type of suture techniques, but you can use all different types of configurations to repair the capsule labral tear at the bottom of the shoulder where we are, at about the six o’clock position. This step also is important because it involves a tissue shift.
With your arthroscope still in the anterior-superior portal, we’ll place two additional anchors. These are knotless anchors and they're done with similar steps up the front of the shoulder doing a progressive inferior-to-superior shift of capsular label tissue. Once this is done, we then probe all of the repair to ensure that we have a solid construct. This basically completes the repair and we close the portals with absorbable suture, put a standard dressing on, and a padded abduction sling.
CHAPTER 1
So this is the lateral decubitus position, which is how I do all of my glenohumeral instability work. Here is the head positioned in neutral, neutral neck, is intubated. You got to make sure there's no pressure on the ear and that the head is a very neutral- eyes taped and that there's nothing here on the ear here either. We then use a drape here, which is U-draped just like this. You can come over here, I can show you this one area right here. This is an important area. We just do a little bit of redundancy sweep. We grab a couple folds of the drapes so that doesn't have water come down through here because it's not good to get water down through this area. The other thing is, here's the bean bag right here. We have an axillary roll two inches, two finger breadths below the center of the axilla all the way up, so a little axillary roll goes here. Can be a gel roll, or a small one-liter bag wrapped in a towel, and that goes right here.
And then we have the beanbag position here. Our boom is utilized so that this is for direct lateral translation, and then this is for- the white one is for about 40 degrees of balanced suspension in abduction. So 40 degrees abduction, 15 degrees of forward flexion, so I'll just hold this for a sec. The position the shoulder is going to be something like this, so 45 degrees, 15 degrees forward flexion and that's where we’ll put the arm. We’ll also put a lateral strap right here to the red. You bring the lateral strap up and it gives you just gentle lateral translation. This interface of the bean bag can be very sharp, so you have to put pillows under the legs here and here to make sure that these are all nice and loose, and pillow. Pillow. We even use heel stockings to make sure that there’s no pressure areas at all. And then we have the knee free here.
So the key is to have this all the way up against the axilla. Thumb neutrally positioned here. You can leave the towel in. So thumb in a neutral position and then you overlap the foam like that. Foam is overlapped and then the velcro goes over. The key is having this all the way up the axilla so we can get the lateral strap in place. We pulled the white with 10 pounds of balanced suspension, is about 40-45 degrees of abduction, 15 degrees of forward flexion as you see here. And then we’re going to put a lateral strap in place. Left shoulder, left’s marked. Everyone agree? Good, thank you.
Okay, so this lateral strap is very important because this helps you just with lateral translation of the glenohumeral joint. Hook, please. So blue goes to blue and bring it up again to the axilla, taking care to make sure that this is on the foam. You then with all these hooks here, you reduce the hook and boom to the sterile area, so you keep it sterile. Next thing is, this thing also is designed, so look here, to rotate. Relax, Gail. See how I can rotate this a little bit, but we want to keep it in a neutral position so now I can rotate the arm through that manner. Going to put this up here. We already know that he has instability and can we go up just a little bit on red please. So there's a handle there that’ll actually bring this boom up a little bit. You get this nice balanced suspension and see you have 45 degrees of abduction, 15 of forward flexion, and then a balanced lateral translation here. That just opens up the joint gently. Be really care with this, make sure it's on the foam. And I take it off as soon as we're done, but it’s worked out very well without any issues and it’s just a light amount of traction, 10 pounds.
CHAPTER 2
So now we’re going to mark the acromion. Here’s the lateral edge of the acromion. Here’s the posterior corner. And with the markings here, I stay lateral on the acromion and you can see here's the soft spot and a visor area. Here’s the AC joint. Here’s the coracoid, right here. Here’s your standard. So what I do for the standard posterior portal, in the lateral position it's level with the edge of the acromion, see right here. You bring this out. It's about a centimeter or so off the posterolateral corner and directly there. So there’s a standard posterior portal. This is a beach chair portal, something like that, so you can see the difference and arthroscopy is a game of millimeters. If you are off by a few millimeters it can make things very challenging. Here's an anterior-superior portal, which is literally right off the anterolateral edge of the acromion. And then we have a mid-glenoid portal right here. Mid-glenoid, anterolateral. And then we have also have a posterolateral portal, which is about 4 centimeters off the posterolateral edge of the acromion. It’s going to be something like that, and I'll show you how we use that, but this is a very critical portal to help get our anchors where we need to put them.
CHAPTER 3
Okay, knife please. So just make a small incision. I put my hand under here. What I'm feeling here for is the glenoid rim. There’s the glenoid rim. Glenoid rim, glenoid rim. I’m just going to poke through gently, the capsule. Scope. Pump in-flow. And so here you can see, there's the labral tear, anteriorly. There's a nice view. This is what I like about the lateral position. You can easily get all the way around the shoulder joint; you can get access to everything. Here's the biceps, a little bit of cuff fraying there, but the majority of his issue is in the front here, and his main problem is instability. He's got a pretty extensive tear, in fact it's already- it's basically truncated in half from there to there, but we’ll tack this back down and repair the tissue and it’s also torn off in the front here. So he had recurrent anterior instability as his main issue. He’s got a little fraying of the biceps as well, but will probably leave that alone.
Next thing we do is bring in a needle from an anterior-superior portal. Might come a little bit more lateral than that, just to be high enough. Okay, this one is high in the rotator interval, but an anterior-superior portal is demonstrated here. These four portals are my specific portals for anterior instability repair. So the standard posterior portal for the beach chair position, which we discussed. We have the anterior-superior portal, which is where I'm going to put my camera to do the majority the repairs I’ll show you in a- or the majority of visualization for the anterior repair. Mid-glenoid portal right here, which is going to be the working portal with an 8 millimeter cannula. The 8 millimeter cannula will accommodate most all of the instruments and then this posterolateral portal is the fourth portal right here, and this is really a workhorse to get anchors in the inferior position of the shoulder.
So at this point, I like that portal and I’m just going to make it a big enough stab incision to accommodate the camera. It doesn't need to be that big. Switching stick. The switching stick has a handle on it, so you can- hold that for a sec, so you can take the handle on and off the switching stick and help put it in place. I keep the spinal needle in there while I'm putting this in. And the other thing is, we call this skin-capsule distress, but if your skin and capsule- you can still do this wrong and get it in a wrong trajectory, so have to make sure you still at the same trajectory. Here's the whole tear up the front here and I'm now feeling there’s whole labral tear. It's all healed medially down this glenoid neck here, and there’s your whole labral tear right in here.
So, once we have this made, now we will dilate, so could I get a dilator, please. Hold that. So we take this off, load another stick up in a second. We’ll keep the switching sticking in here, but I dilate the dilator, which is just as you can see here on the screen. It just opens up and dilates the tissue a little bit, so you can get in instruments and the camera a little bit easier. And there's the dilator. Right there’s the sub-scap, the shiny white fibers. And so what I'm going to do is come in from this mid-glenoid portal, which is the middle of the glenoid, but you can see it's a much shallower trajectory. There's a separation by a few centimeters in at this angle here and it's just lateral to the medial border of the coracoid. I’m going to come a little bit more in this area here, just so I can make sure I can get this in. What I'm looking for is a trajectory of the cannula to be able to come down here and do all kinds of work. And so I like that type of trajectory.
Knife, please. So I only make a superficial skin incision here because this can get close to the cephalic vein. It has to be big enough to accommodate an 8 millimeter cannula. We then take our switching stick. I keep the spinal needle in so that we can get parallel trajectory, and I'm making sure that when I come in I'm still not getting any skin-capsule distress. In other words, I've kept the same trajectory as the spinal needle. You don't want to be coming around corners and coming around soft tissue corners to make it harder. So I’ve left this switching stick in while we put the other one in. You can see now, we're bringing the cannula. This is a screw-in cannula and we'll pull that out. Now what we do is we get a closed-circuit system. If you have a pump that has both in-flow and out-flow, I really like this, especially in the glenohumeral joint and shoulder for that matter, because it really provides a nice closed circuit and controls the pressure very well in here. And it actually uses much less pressure and much better bleeding control. And so here's his bankart tear, and now we're going to come and use this switching stick, which is right here, and switch up our camera so we can now work in the front.
CHAPTER 4
I use a pedal control for all of my shavers, especially in the shoulder joint just because you get instantaneous control of the device. You can see these very small structures. You want to have precise control and be able to turn it on and off at a drop of a dime. He's got a little bit of a beat-up biceps, but I'm going to leave it. He’s got a little bit of inflammation here and you can see this is a nice way to do it, just up against the capsule. So at this point, we're going to now just double-check the shoulder, make sure we don't have any HAGL tears. H-A-G-L, humeral avulsion of the glenohumeral ligaments, and so we’re making sure that these ligaments come in very nicely to the shoulder here. Here's some good pictures of this and good demonstration that there are no ligament tears off. And then the last thing I'm going to look at is coming up around here. There’s the majority of his cuff. He just had that very small abrasion at the top, but now we're going to look up here and see if anymore HAGL tears... He does have a very small, right there, Hill-Sachs injury. It's almost a superficial scuffing. That's from him coming out for chronic instability events.
Now we’re going to put the scope anteriorly, which is where now I can see very nicely down the anterior aspect. When you're coming in here, you want to make sure that you don't gouge the cartilage. This can gouge cartilage and do what we call a melon-ball scooper biopsy of the cartilage in the glenoid. We want to avoid doing that, so when I put it in I just use two finger control. There's his labral tear we looked at, and now we’re going to prep this from the front. Elevator, please. And so this is a elevator device, you can see it’s sharp at the end, but then it's smooth here so it doesn't cut the labrum. In other words, it doesn't say incite radial tears in the labrum, so it's just sharp on the end of the spoon. The other thing is, this is an interchangeable device and I'll show you a few of the different elevators that can come in here to be part of this larger elevator construct.
So now we come in here through the mid-glenoid portal, and you can see I'm working everything through the front. Now I'm going to elevate this tissue. And so the key of this is, is once you find the labrum tissue- you can see how the circumferential fibers are here, and what I'm doing is just kind of gently rocking up and down the shoulder. I mean rocking up and down this device inside the glenoid right up against the anterior edge, making sure that I'm preserving the integrity of the circumferential fibers of the labrum. Are you elevating to disrupt the scarring? That's exactly right, so this is healed medially and in an ALPSA configuration. An ALPSA being an anterior labral periosteum sleeve avulsion. Long word for something that it just means it's healed medially down the glenoid neck, which is very typical. What happens is when it- here’s the inferior band of the glenohumeral ligament, right there. You can see that pooching out of the ligament right there. That's the ligament and it's tied into the labrum. And so we're basically subperiosteally elevating up the labrum, which is scarred and healed medially down the neck. So the labrum, in chronic instabilities, is often healed and scarred down the neck. Can I see a shaver now, please.
So this is a small 3.0 shaver, and I use a smaller one than a bone-cutter shaver because it actually fits in this interface, which is a pretty tight interface, much better. The other thing I do is I spend a lot of time on this preparation. So you can see all the scar there, that is not enough yet to accommodate a nice healing repair, so I'm going to spend a little more time on this and you'll see how I use this 3.0 kind of bone-cutting shaver, if you will, to prepare the glenoid bone down to a nice bleeding surface. Here's a piece of cartilage there. That's a piece of cartilage from the shoulder, right there. See that?
Okay, so now what we're going to do is we’re going to continue to prepare. Everyone asks about the axillary nerve in this position, okay. You always have to be thinking about it because it's close, but arthroscopically you have to know the area. It's about- the closest area is right about there, the 5:30 position to six o’clock position. The axillary nerve is 12.5 to 15 millimeters away from the glenoid bone. So again the axillary nerve is going to be deeper to this. It’s got some cartilage pieces that have gone in here. There’s all kinds of stuff that can end up down here. Cartilage pieces, bony fragments, all kinds of stuff. And you can see that cartilage piece right there. And so now we’re going to finish up elevating and then rasp and then we'll do some more bony work with the shaver, but it's actually a bonecutter shaver. The key here is you have to get down to the subscap fibers. So now I'm seeing those subscap fibers and you can see why looking down the front is so nice for this case, to be able to see and work appropriately.
So there's that subscap area. This is the posterior side of subscap muscle and that's a safe side, except if you get all the way to the axillary nerve, which will be a little bit through that subscap muscle there, but I know I've adequately prepared it when I see that subscap muscle and that capsular area, okay. Bone-cutter, so now we have it elevated up enough. Now we’re going to do a bone-cutter shaver. Change it up to the rasp, please. Now we’re going to bring this back in, and this is again a 3.0 bonecutter shaver. You can see it's got a sharp end, but it almost acts as a Burr. Okay, but this is a bone preserving case. I just want to rough it up and you can see how I can easily rough up the bone. And we got areas here, still scar tissue attached to it, and this is going to allow for a really nice- just sort of light decortication, a really nice bleeding surface.
And so now this is another instrument, so this again pops in here, but you can see that this is a two-sided rasp that's angled. And then this will come in to roughen up the front of the glenoid. So here's our rasp now inside the shoulder, Tisha stabilize scapula. When you’re doing this it's nice to have someone to stabilize the scapula because you're pushing pretty hard against the glenoid. And you don't touch the humeral head, so you got to stay in control and we elevate this area just like that. You can also turn it around this way now, so you turn it 180 and it comes nicely around the corner to the end of the tear, right here. You want that nice preparation of bone. Alright, good. Then again, just double-checking- yes we're down to subscap. We haven't violated subscap, but this is the tissue we're going to repair, right there. Just like that. Now that we have it freed, it flows nicely up to the glenoid surface. It's free and there's our anatomic repair.
CHAPTER 5
So now we’re going to start with the repair. Next thing we’re going to look at it is we always- I always start my repairs from the back. Tisha can you do a little more, just lateral translation. I always start my repairs from the back, so this is where the posterior portal was. You can see where the camera came in and I've got the switching stick in here, just to hold the place. One of the nice things I do is start all my repairs from the back. I think- is that you really get this capsule in the front. It's really just easy to get to, so I'm going to use this as a portal back here with another yellow cannula that- we got a second one. And we’re going to do a repair. So now we're going to pull this back just a little bit and put an anchor in from the posterolateral portal.
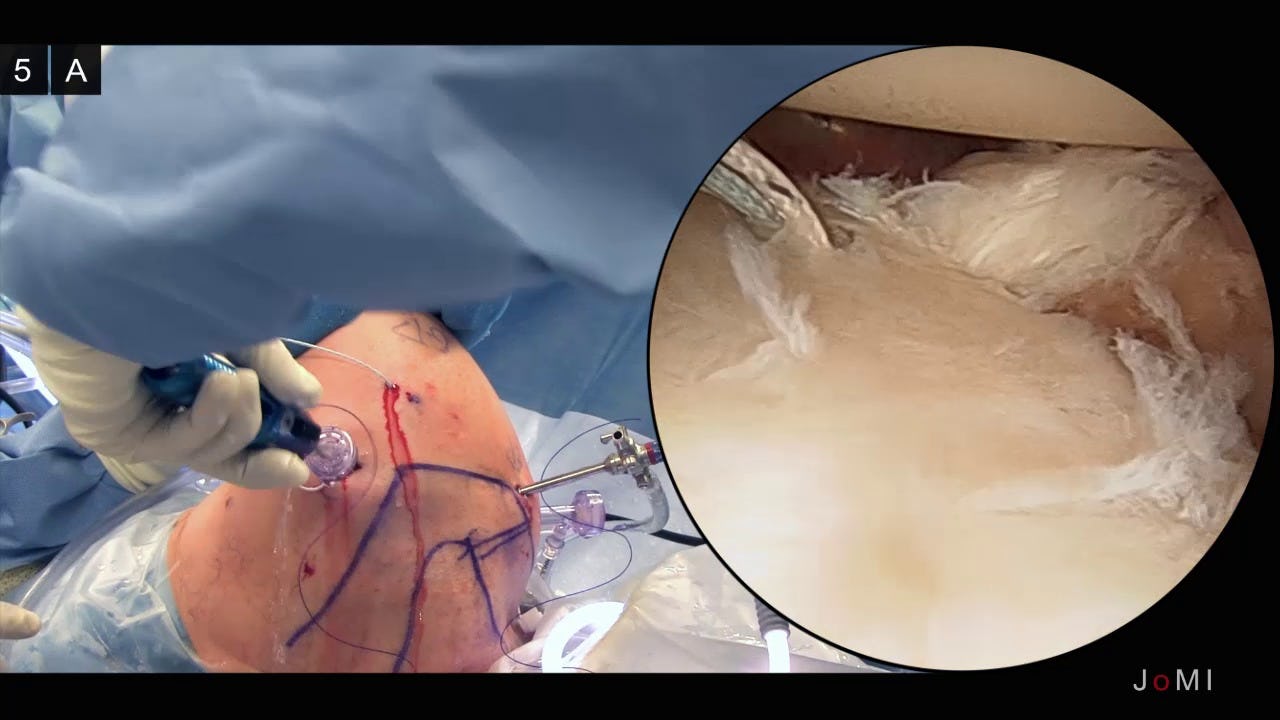
So here's the posterolateral portal. Again, it’s 4 centimeters, approximately, off the posterolateral edge of the acromion and the key is right here. So you can see how I'm coming in the capsule up high here. I’m coming in up high and it gets down very nicely to the bottom of shoulder, and I'll be able to lever that in and move the humeral head out of the way with that positioning. I'm going to try just a little more out that way, just so I can get a little lower. So you can see how that comes in really high up against the humeral head. It's way different seen here from the posterior portal. So you can't- here’s two different trajectories. This is the one that puts the anchor in; this is the one that's going to do our hook repairs of the labral tissue. So now we take a knife. Small stab incision, about half the width of the 11 blade. Knife back. Ah, yeah. Trocar. So now here's the anchor-inserter device. It’s got a use for percutaneous- I use a sharp inserter stick and you can see that sharp inserter stick, but this is accommodates a 3.0 millimeter anchor.
And so now we're going to come in here, through the small stab incision we made. Tisha pull back the needle just a little bit. Keep it there. That helps us get the trajectory. Again, collinear with this needle, and now we're going to make sure we come into the right position up here. And you can see I'm just poking in collinear with that needle. Now I’ve got this in place. At this point, I’m going to take the spear out. Careful, it’s sharp. Cover the hole. And now what I’m going to do is walk this down to kind of the bottom of the tear. And now you can see how I can get back to the 6 o’clock position and actually drill backwards. Go ahead. I didn't use a mallet so that this thing stays stable, and I hold the device while- and will bring it back this way so you don't hit. Don't worry about the shoulder, I got the shoulder. Adjust a little bit, but again my trajectory is still not right. I want that trajectory right there. And the last couple millimeters, getting hard like it just did in that system. It’s a good drill, just got to watch coming out. Spin as you come out, spin as you come. It’s a little easier. There you go, and now we’re going to take- hold on let me see the anchor.
So this is a compression-fit anchor, 3.0 millimeters in diameter. It has double-loaded, through a suture eyelet, 2 number-two high-strength sutures. So this gets introduced and now we can look up here to make sure this is going in the right trajectory we want. And we stop right there. As soon as we get that black line close, that black line has to be buried to the level of the cortex. So we watch that as the gold standard. Keep going. A little more to make sure that's buried. Now at this point, we take this off, twist it because it's an interference fit, and now we have both of our anchors in place at the six o’clock position. I'm sorry, both of our sutures coming out the six o’clock position. Now we’re going to put a cannula in the back. So I’m going to switch this around. Yeah, go ahead make the incision just a little bigger to accommodate a yellow cannula.
Good. And one thing I want to do here is I want to make sure that I can get inferior now. So I want to make sure that this is really easy to do repair down here. And I think this is an area that is stretched out and injured. This 5 o’clock area, this six o’clock area, and this back approach, as you get this anchor nice and low, is a very nice way to do it. So now we’ll dilated it, but this approach from the back, and starting all anterior repairs kind of paradoxically from the back- you think about it that way, gives a very nice repair technique to attend to the areas that have been torn with pathology.
There we go. So we’ll introduce this and then we’re going to take a hook right. Take that out. Good, and you still got our out-flow on here. No, leave that on. We got it, good. Yep. And so there’s our cannula right here. We have are sutures out percutaneously. Now we have this hook right. Going to come in the capsule, pierce the capsule, and come out the labrum at the bone interface. Common mistake is to come in and then over rotate. Well, if you over rotate you can't- that tip won’t translate out this way. You need to poke, come in, and translate that way. That's the key, but if you over rotate you can't move that way. So just a gentle supination maneuver of 20 to 30 degrees. This then also feeds with wheels, the suture device- the suture through the device. And this is a high or- this is a number one PDS suture.
Okay, so now we’ll come in with the hook. Tish, some lateral translation. So, Tisha is going to give us just a little bit of lateral translation. What I'm looking at is translating the tissue from front anterior to posterior. I’m going to poke the tissue. That's a little big. I’m going to poke the tissue. Rotate, translate back, rotate. So I'm under it all right here and I come under that whole tissue and there it is here. And so now we're going to pass enough of this blue number one PDS into the shoulder. Every time I'm coming out I'm always investigating how good the repair stitch was. When we come out here, we grab it with a hemostat and we go in line. We don't want to go this way, because that way we'll cut it. You have to go in line and just pull it out straight. We then use a loop-grasper, which is just this. One of my favorite instruments in the whole wide world. And what we're going to do is we’re going to associate one stitch of blue and one stitch from the repair construct.
So I have one stitch from the anchor and the blue. And so we know that those will come back up the cannula in an associated fashion. Once I get here, I then need to manage the suture. I pull out the blue end; give that to Tisha. And then the next thing we need to do- if you look up here that's not correct. That's going to unload the anchor because I'm pulling through the anchor. I need to pull the other way. So before I commit to taking this out, I stop with a loop here like this and figure out which way I need to pull it so that I don't pull it out of the anchor eyelet. That's called unloading the anchor. We then just make a simple overhand knot, pass this, pull it really tight, and now we feed it through the shoulder. Tish, little lateral translation. And you can see that that suture is going this way. It's taking the high-string suture with it, at this point the tiger wire with it. We'll take that off. Uh, oh. What happened- oh, there it is. It was just a little tangled up at the end.
I'm going to take this one out because I don't need it. I had it in there just in case something happened, but there's my first repair stitch right there, right like that. So now I’m going to go grab the other end, so we can now do a repair. Now one of the things- Tish let’s switch. One of the thing you have to keep in mind is that what goes on inside the shoulder needs to be respected outside the shoulder, for suture management. The post limb is always in the capsule, the non-post is on the glenoid. We shorten up the post to about 6 inches. At this point, we put our Webster needle-driver on, Webster and the needle driver. So then we do the loop here. We go under one, i.e. just the post. Bring it around, under both, which is both the post and this. Under one and then down to this triangle we just created right there. Down to the triangle, okay.
So then what you can see here is, I tighten this. You get locking areas both close to the labrum and then further away from the labrum, so it's kind of a double-locking on- the more you push down, the tighter it gets. So at this point, we're not going to touch this end at all. You leave that end alone, that's the non post limb and you just cinch this down. You pass parallel, in other words these limbs are going down parallel. One of the things you want to do is make sure you cinch this in the right position. And so here you can see, I want to push this over a little bit to get this in the right position, so it's optimized biomechanically. So I’m going to push that over just a little bit. There you can see the knot, and now we’re cinching it down. Progressively cinching this down and there's the bottom of the tear and the bottom of knot is now secured.
Just want to make sure we're getting there. It's not fully down yet. You’re going to keep bringing this up a little closer just to help me pull. And now what I want to do is I just want to kind of rock back and forth like this, and this kind of just takes slack out of the system. Basically, now we just have the soft tissue there being held. Now we pull both with a knot pusher on the knot, and then bring this back. Now we’re going to do a couple half hitches. That was just a half hitch like that, and we push down the same post. Here you can see that half hitch going down the post. Now we’re going to do another half hitch. Bring this back, this time over. And we’re going to push this down and this is when we flip post, so we're going to push past actually and flip post on this one. So the laden in knot science, it’s hard to see it all right here. I would encourage you to practice on a knot board if you haven't played with knots, but that was a basic gist. It's not only alternating post, but you also alternate half hitches. In other words, you go over-under-over-under, and you repeat those forever.
There’s a nice little trick here where you put a crochet hook through a cutter device. There's the cutter device right here. Go ahead Denton, this is Denton’s favorite part of the case. So now we have that easily fed in. We’re going to come down and this automatically gives you a couple millimeters at the end of the knot, if you bring this down to the end of the knot. And it automatically cuts it and leaves it like that. So that's our posterior- posterolateral approach.
And now we have one anchor in place and we’re going to probably put two more. Now we’re going to use a knotless configuration, so we’re going to do a hook to the left. We're going to pass what we call a labral tape, so I want to get a hook left because I need to come into the capsule and out the glenoid. You always start at the capsule, so this is a- here to left. So the hook should be to the left, where as the first anchor we did we started in the capsule down here and came out this way. So that’s a hook to the right. Left and right is where the hook exits. So now we're going to use the hook to the left and pass first.
This label tape device is a knotless fixation device, so we don't have to tie the knots. I showed you how to tie the first knot inferiorly, but I'll show you a couple other constructs in this hybrid repair. So we’re going to bring this hook in, anteriorly. A nice thing to do here, see how I'm going backwards with it, so I can kind of get it in without capturing any tissue. And what I want to do is probably start at the last- the area of the last anchor. And so you poke perpendicular to the tissues. So see I'm just translating my hand, translating control of it- you don't want to do this. You want to poke perpendicular tissues. I’m going to poke, you feel that poke through. And after you get through, then you can translate out of the shoulder a little bit, so I'm pulling a translation. I rotate my 30 degrees of supination and I come under the label complex.
Now we’re going to feed the stitch in. Why don’t you go ahead and grab Crab Claw. Once this comes out here, again you grab it with a hemostat. You don't want to go this way because that'll that'll cut it. You want to be collinear and pull this way. You don't want to cut the PDS. So now Guillaume is going to go in and grab this blue, and we’re going to load up the labral tape. And so here's the label tape. It's a non-cylindrical suture. In other words, it's a small flat, just polyester-blended tape and it has really good holding characteristics in soft tissue and capsule. So we’re going to go around the labrum like this, and it’s going to be a nice flat construct on there, and then it's going to be held in a knotless fixation device that gets sunk into the glenoid.
So what we’re going to do is the same thing here. We're going to do a simple overhand knot. Pass this like this, pass a few inches. Pull nice and hard, Tish. Harder than that. Okay, good and now we’re going to load this through. Go ahead. Hold on, if it gets caught you can go back and reset it. Did you do a dilator stitch? Yes, I did. Okay, good. So what happened is, the tape because it's so robust didn't come all the way out, so I just had to go down and retrieve it in the cannula. And so here's what we have for our labral tape coming out. Okay, so now we're going to drill, and we have to put this in a position where we're going to get a good repair. Do we have the right drill, the short one? Okay, so what I do with this is- I want to get a nice robust repair, so that's where that stitch is coming out right there, so go ahead and take the spear out.
The other thing is I want to make sure we're just at the edge of the cliff, maybe at 1 to 2 millimeters on the face of the glenoid. I’m always looking at my other anchor. I don't want to pop that one out with another drill, so I want to move far enough away and at an angle that’s going to be good for this. So you can see I’m bringing the angle up a little bit. Drill. Mallet first. Mallet. So we mallet it first just to hold it in position. Good, drill. I'm watching the drill go down. Okay, good. Come on back. Okay, so there's our hole, and I just want to check to make sure we have a good hole, which I think we do. We can sort of see that right there. Right there, there's our hole right there. Okay, so we have a good circumferential bony hole.
So here is the anchor. It's an interference anchor. The tape is going to pass through this eyelet. And then this device is going to go and be malleted down over the eyelet to seal the tape in place with the eyelet. So this device seals the labral tape with the eyelet. It comes with this loading orange tab and so we basically just pass a short distance. The shorter you pass the better, makes it easier to pull through. Pass it through and then what we do is cinch it up, so it's nice and even. So I pulled it, pulled it, and hemostat please. And we hemostat it as we go down the shoulder. I don't love where that stitch is coming, so I'm going to pull it down here a little. I don’t know why it’s caught there. There we go. And then we’re going to put that in the hole right here.
So once we’re in the hole- back up a little bit, Guillaume so you can see that. So that's the tape that’s going to go over there. Take- undo this tissue, right here. Pull each of these, individually. Now we take that off. We’re going to pull these individually, and what you see it happen on the screen is, you can see how it tightens it down. See that, right there? Tighten that. So you can see how it just tightens it a little bit more. So once you get it to optimal tension, next thing you’re going to do is mallet it, so that the plastic implant- this peak plastic, yellowish implant comes in contact with the bone. Once you're at the bone, you take off this little orange tab, right there. And now you mallet the interference portion, all the way down the black line.
Keep going. You’ll start hearing the pitch change. Keep going. You’re just going to make sure this goes down deep enough and there you go. And now we take this- six counterclockwise turns to unload the device, and we pull it out. These are open cutters. It will go down on the tape and cut your suture. We load these in over the top, so now we got them in like this. We don't to cut it early, so you just kind of just gently close it. Bring it down and you can also doing one at a time, if it's more comfortable for you. And you’re basically going to go all the way down and cut. Now, I have cut the other suture accidentally, at times. Don't go in there and cut that, but you can see- can I see a probe, now? You can see how really nice that looks. How robust the repair is and how solid this construct is.
So we’re going to put in one more, so can I get a hook, please? We’re going to do one more labral tape and knotless. So we’re going to use the same hook to the left. Come in backwards. Go backwards, here. What I like doing is kind of- you see how this pulls this out of the way. I want to see where the tissue is and that's the type of stuff. I want to bring that stuff up there to re-approximate the labrum. That’ll be a really nice repair at the end, something like that. So- but I know it's inferior translated. We got to go up here. So what I’m going to do is I’m going to start almost- just a little superior of the prior anchor. Okay, so it's a poke and then it’s a- translate out. I want to go deep enough to make sure I capture tissue. You can see that there. That's that area- that cartilage we sort of took out, and that's where it's going to come out. Suture distress, right here. Alright, come out with this. Hemostat it again. Take the device off. Grab- go ahead. Tape. So now we brought this out. Now, we’re going to load the tape.
One thing to help is you can also put a dilator stitch on. So you can put one additional stitch, one additional knot to dilate first, and then you can pass the tape. So you get a dilator stitch, followed by the tape. Okay, go ahead. See it as we go. And so use another short push-lock. Massage it through. Very good. Take the blue off, get rid of this, and then we're going to drill. So I put this right about something like there. So we mallet this in position again, so we don't skive- that's skiving across the glenoid. We don't want to do that, so we mallet this in position, once I get it because I'm going to angle it up a little. Yep. Drill. Now, I feel pretty confident that’s not going to go anywhere, but I still get a solid hold. I’m going to put the drill in; drill nice and gently. Go ahead. Good, so now we have a drill hole. I’m just checking the integrity of the drill hole, which looks good.
It's a contained drill hole, in other words there's no blow out of the bone. Even these stitches up like this, pass a little bit through, pull this, and I were going to come down and put it into our prior hole. I wanted that- you don't to cinch this up, so I call this the garbage bag principle. You want to make sure you cinch the tissue up where you want. So I’m going to, you want to- once you cinch tissue down, you cinched it down- but you want to make that in the best biomechanical position possible. Wherever you grasp that garbage bag is where you're going to end up cinching it. I like that cinch better. There's my hole. I'm going to pass this this way. Angle it up the same trajectory I had for the drill. Tighten each of the sutures. Go ahead and mallet. We’re going to mallet it in. We’re going to stop when we see the plastic contact the bone, which is right there.
Tish, hold there. Hold there, Tisha. Scope. We’re going to pull both. Take off the orange. Make sure you’re appropriately tensioned. Go ahead. Go. Keep going. Good. And now I’ll do six counterclockwise turns. Pull that out. Test it. Solid with the repair. Very happy with that. Probe. Go ahead and load this up. We’ll see- here's a final repair. Very solid. Very solid, right there. Put these sutures all the way down. You don’t want to cut your prior sutures, so you just put it right next to it. Cut, squeeze. Both out. And you have a few strands right there, almost looks like tissue. Good. So there’s our completed repair. The humeral head is nice and centered. Good.
CHAPTER 6
So at this point, we’ll come off the balance suspension and I take out our portals. These are the portals we’ll do. Just take him through a gentle range of motion. I’ll take this off, being careful just to remove this. Just bring that off the field. Take the strap off the field. Undo the velcro. So now what we’re going to do is test his motion. You can see, he gets good 80 degrees. 70 degrees- 80, 70. I can’t sublux him at all over the front. So, really solid, nice shoulder repair.
This is how we assess abduction external rotation. Neutral, external. Neutral. Here’s abducted internal rotation. So you can see, he’s got great 80 degrees, which is exactly where I’d want it after this repair. Neutral, and an internal of 70. We’ll just close the wounds with a- I use an absorbable stitch, but you can you whatever you like. Some people just use skin glue, that’s also acceptable. We’re going to put him in a padded abduction sling, as well as cold therapy device- cold compression therapy device. He’ll wear the sling for about 5 weeks, and then full activities, unrestricted, at about 5- maybe 6 months, depending on what he’s going back to.
DISCUSSION
So there are two ways to do this instability repair, in terms of patient positioning. This can either be done in the beach position, or the lateral decubitus position. Personally, I prefer the lateral decubitus position. Although I do surgery in both beach and lateral decubitus, but for instability and work inside the glenohumeral joint, I really prefer the lateral decubitus position because as you’ll see in the video it just provides nice access to the front, back of the shoulder, and superiorly. The reason being is if the tear extends posteriorly, or there’s a more extensive tear, you can get at that very easily while you’re in the lateral decubitus position posteriorly, and with this posterior percutaneous portal.
In addition, it also allows you the ability to easily start your repair really at the bottom of the shoulder, which is the six o’clock position. I think it’s very important that we attend to the bottom of the shoulder, the bottom of the capsule, and this anterior-inferior labral and capsule injury that is important to repair to get optimal results.
One of the questions that often comes up is how to manage a Hill-Sachs injury. This is probably a lecture on- in and of itself, and we probably don’t have enough time to fully address all the factors that go into whether or not you need to address this- a Hill-Sachs arthroscopically, open surgically, etc. With this patient, I knew that he had a pretty small Hill-Sachs, if any. Really was just an anterior labral tear with some corresponding capsular stretch and injury. So that is the pathology that we wanted to anatomically address and repair. The issue is if you have a bigger Hill-Sachs, what to do with that, and there’s been a lot of things advocated for this. A lot of times how I will handle this is- if it’s big enough and the Hill-Sachs is big enough, what you also have is glenoid bone loss. In other words, the glenoid is injured, as well as the Hill-Sachs, and you probably have to address the glenoid with some level of a bony procedure. And some would say that by addressing the glenoid with a bony procedure that this makes the Hill-Sachs obsolete, it doesn’t mean anything at this point.
Now, the other thing is if you get into the shoulder and you’re arthroscopically repairing this, and you see the Hill-Sachs is bigger or might be underappreciated, then you might have an option of doing what’s called as a remplissage. Remplissage is a French term to mean ‘fill’, and Eugene Wolf, out of California, has done a wonderful job popularizing this technique in order to tenodesis in the infraspinatus tendon. It’s almost like doing a rotator cuff repair into the defect, or the back of the rotator cuff gets filled into the defect with an anchor and you basically recenter the humeral head, fill in the anchor, and hopefully prevent engagement of the shoulder. And so that’s something you can always have in your back pocket, if you need to pull it out and have a remplissage option. If for some reason you’ve underappreciated the Hill-Sachs, it’s bigger than- it’s bigger and increased in size from when the patient first presented in your imaging studies. And these are- a very complex topic, but that in a nutshell is how I would manage this.
So I often get asked, you know- what do you do? How much do you repair? Do you just repair the labrum? Do you repair the labral tear? Do you have to take some of the capsule? We know that just having a bankart tear, biomechanically- like we got all the data. Biomechanically, if you just have the bankart tear, that’s not enough to get dislocation or instability of the shoulder. You also have to have a capsular stretch. So almost all of my patients have some level of capsular stretch, and with that I think it’s important to address surgically. And so as you’ll see in the video, we poke the capsule and do a shift from inferior to superior, or a south-to-north shift, in order to repair that tissue and shift the shoulder capsule-labral complex back anatomically where it needs to be.
Yeah, see- another one of the things I get asked all the time is, how do you get access all around the shoulder? And the posterolateral portal has been a workhorse for me for all instability repairs, and honestly it’s really been the portal for me that’s changed my surgical approach to treating instability. And why is that, because it just makes it easier to get access to areas of the shoulder that were traditionally hard to get good anchor trajectory without the anchor sort of skiving off, or the drill skiving off, or other things happening, or cartilage injuries. So this has been a really workhorse for me.
There have been a few people that have described it in the past, but my good friend, Tony Romeo, who’s in Chicago, Illinois at Rush University, and myself, I think have really worked hard to write this technique up, do some studies associated with it, show it’s safety in terms of associated nerves. And the portal, as you see clearly in the video, is about 4 centimeters right off- directly lateral off the posterolateral edge of the acromion.
One of the important things to keep in mind when you’re doing any surgery is that it’s an intervention. And with intervention come potential complications, so one of the things we always worry about in shoulder instability and probably the number one complication, if you look percentage-wise, is the shoulder coming out again or it not feeling quite right, or feeling a little loose. So it’s important to have attention to surgical technique, anatomic repair, and addressing all of the areas that might be associated with instability, including the capsule, the labrum, potential bone loss, potential Hill-Sachs injuries, and other things that go into it. So once you have all those addressed in trying to minimize your chance of recurrence, the other complications from an arthroscopic intervention are actually quite minimal. There can be some reported paresthesias from the arm position or- that go down the arm and there can be some numbness and tingling. The good- as long as you have good attention to detail and positioning, and good padding, these almost always go away in a short amount of time. There may also be a rare chance of infection, stiffness of the shoulder, decreased motion.
And then the other thing we all worry about, and that’s certainly always my concern as an orthopedic sports surgeon, is trying to get people back to what they want to do. And you might not be able to get back to every little thing you want to do, especially- potentially some high risk sports where you might not be as comfortable or as confident with your shoulder to go back there.
Yeah, so if I were to isolate a few pearls and pitfalls for this procedure, I think with my experience- my learning curve has been very steep in the beginning and now, the opportunity to fine-tune things, it really makes this procedure quite fun because I think we can really make an impact in terms of our outcomes, if this is done well. So one of the pearls and pitfalls, I think it starts from your first encounter with a patient. That means ensuring you have taken an adequate history, a really good physical examination, understanding what their instability profile is, and then getting adequate imaging, so that you don’t get caught in the operating room not having identified certain injuries, lesions, and, especially, glenoid and humeral head bone loss.
With that, if you look at some of the technical pearls and lessons of some of the things that I’m showing, there’s clearly many ways to do this procedure, but I think having a reproducible framework in your mind with an ability to get access all the way around the glenoid, put anchors in, have the ability to be able to get your tissue hooks in, and translate the tissue and labrum adequately back to its anatomical position; I think your success rate is going to be quite remarkable.
So post-operatively for these patients, we- before the surgery I think it’s very important that your patient understand the expectations. So we all give them a pretty standard physical therapy handout that goes through their timeline, so they need to be comfortable with this. I use a sling for approximately 5 weeks, and then full activity is anywhere from 5 to 6 months. One of the things that I really like to do is wake the shoulder up really early. And that’s not necessarily motion and stretching right away, but- waking up the scapula, waking up the muscles because just with surgery, the body naturally shuts all the muscles around the shoulder, especially the scapula. And starting with engaging, even just a low rowing- low bands, just gentle rotations can really help wake up and start the muscles stimulated around the scapula. And it’s really the dynamic control of the shoulder that’s most important when you’re trying to get someone back to play, or back to work, and why it’s so important to get the muscles activated early.
The outcomes of arthroscopic instability repair if you look, overall in the literature, have been very good. There have been some challenges, in terms of long term outcomes, recurrence, recurrent instability, but if you look at a group of patients that’s well-selected for the arthroscopic procedure, the outcomes overall are very good. So I think again, your selection comes down to a good history, a good examination, and good imaging, making sure they’re well-selected for the arthroscopic procedure.