Femoral Resurfacing with an Osteochondral Allograft for Osteochondritis Dissecans
Transcription
INTRODUCTION
Hi, my name is Matthew Provencher. I'm the Chief of Sports Surgery at Massachusetts General Hospital, and I'm here today to illustrate a surgical procedure of open osteochondral allograft for late onset osteochondritis dissecans of the knee. The first step in the procedure is to meet the patient - ensure that they understand that surgical procedure. And the biggest thing is to ensure that you have the fresh osteochondral allograft prior to any intervention with the patient. That includes IVs or anything else.
Next part of the procedure - after the patient is brought to the operating room, they’re placed supine. They undergo a light, general anesthetic, and they also elect for a block from the anesthesia pain service. We do these via ultrasound guidance, and this patient had a femoral nerve block. Once the general anesthetic is obtained, a well-padded tourniquet is placed on the thigh. This is utilized during the case and then taken down as soon as the case is finished but prior to final wound closure to make that sure we have good hemostasis.
CHAPTER 1
The first part of the procedure is to perform the knee arthroscopy. This is confirmatory to make sure that the lesion is as expected. Usually, I've done this ahead of time with a prior diagnostic knee scope to ensure that this lesion will be suitable for a fresh osteochondral allograft. We can also provide some measurements and to ensure that there's no other pathology in the knee.
After the diagnostic arthroscopy demonstrates confirmation of the lesion, we then perform a peripatellar mini-open approach to the knee. This - this lesion is on the lateral aspect of the medial femoral condyle, and so, we make this in a medial parapatellar approach. And you can see, we just need to gently translate over the patella. We don't need to fully evert the patella. So the incision is just gently through the capsule, making sure that we don't injure any of the cartilage with the knife.
The next step is to identify the lesion and then size the lesion with the osteochondral allograft sizer set. Following the initial sizing, what we will then do is ensure that we have our fresh osteochondral allograft, and I'll bring this on the table and take a look at this to make sure that this will be suitable for transplantation into this patient. The next step is to then drill the recipient. In other words, we're going to drill the area where we're going to transplant the bone in place.
Next, we then harvest a suitable, identical plug from a near identical location in the donor condyle. After we've harvested the plug from the donor condyle, we then have to size it to match the area of the recipient. At this point we do the final measurements for the plug, and then we have to make sure we do adequate pulsed lavage to ensure that the marrow elements have been minimized in the subchondral bone of the osteochondral donor plug.
Next, we implant the plug in the same location, position, and orientation as it was harvested from the donor into the recipient. In some cases, additional fixation may be utilized - and here we have a bio compression screw that we’ll demonstrate - to ensure the plug has adequate fixation. You may really need to consider this and certainly have this in this type of case where the plug is right up against the notch and almost uncontained such as - is the case with an osteochondritis dissecans type of lesion. At this point we ensure that the knee glides smoothly and that the plug does not go anywhere and that the edges are all very smooth, and then we start an irrigation, followed by layered closure. The final step is to do a dressing - place the patient in a range-of-motion brace. And then they go back to the postoperative care area where they will be fitted for their CPM or continuous passive motion machine, which they’ll utilize for several weeks postoperatively with progressive range of motion of the knee.
Okay, so we have a 16-year-old female who has a little bit later osteochondritis dissecans, later in- later presentation osteochondritis dissecans injury. She presented with recurrent pain, swelling, and mechanical symptoms. So we're going to start first with the diagnostic arthroscopy. I have arthroscopic pictures that were sent in when she was referred to me for the osteochondral transfer, but I always scope first just to make sure we have correct intra-articular diagnosis and that the knee can accommodate the graft. And so we do this with a minimally invasive knee arthroscopy first, and then we commit to the open incision to do the fresh allograft. The reason for the fresh allograft in this case is that she has - with - with dissecans - not just the cartilage is affected, but the underlying subchondral and cortical bone is affected.
So you can see this is the - this is why it's so cavitary and why we go to an osteochondral. She did have a prior debridement and a prior microvirus, but you can see she's filled this in, consistent with the MRI of just a lot of fibrous tissue - but it's a big large cavitary defect that we'll - we’ll address from an open fashion. This is just a confirmatory scope. Flex up a little more. It's also to help us clearly outline the borders of this injury, and you can see it's a little bit uncontained. In other words, it comes right up to the notch, which is pretty classic for a dissecans lesion. It's even extending up here. It bubbles up and undermines some of the cartilage. So, you can see that it's going to come up in here much further than - tha would meet the eye on this basic arthroscopy because of what's going on underneath the bone here.
And here you can see we're already in the deep bony area, deep subchondral bone - deep cavitary. Here we come down the gutters here. Here's the medial gutter. There's a med - small medial plica. She does have normal patellofemoral joint. Extend a little bit. She does have some hypertrophy and swelling of the synovium. It's not horrible, but you can see some of the areas of where she has some issues. If you just look down the lateral compartment here, the trochlea looks great. There's good seam, right there. And then, here's the lateral side. Let's come up to figure 4 just to look at the lateral side.
You can see here's the lateral meniscus and lateral side, which looks excellent - very good 16-year-old cartilage and meniscus. The ACL looks beautiful - a little bit of inflammation of the notch and also some inflammation of this synovium right here. And I'll come back in the medial side. How we looking down there? Good. There's some more inflamed synovium, and there's the large lesion. Watch the probe, please. Button’s fine. Put the scope in. We’ve gotta flatten - take it out of valgus. See how the thing is valgus? Here's the issue. Extension valgus. Little flexion. There you go, good.
As you can see, we have the knee in almost twenty degrees of flexion. You can see that's just where it's starting to - to come into contact here as we flex it up a little more. It's now at about forty degrees - maybe forty-five degrees or so - a little more. And now we look at the image here, and you can see that it's now no longer in contact beyond seventy degrees. So this is a lesion - come back all the way up to extension. You can see the knee come all the way up to extension. This is a lesion that's affected in full extension - so when she's walking on this thing fully in extension. There you can see how it's pooched out here on the cartilage, and this lesion is a little bit more than - than meets the eye. Okay, a little flexion. This is all abnormal cartilage here. So we'll just do a gentle - we'll just do a gentle debridement here. Small flexion. So you can see how cavitary this injury is. So we'll sort of just stop there, but that just shows you the cavitary extent of the lesion that we have to fix. And it's almost uncontained. Although what I'll do is we'll probably center the circle, something - something like that cuz that's all the abnormal tissue. Probe, please.
And so at this point, now we'll kind of finish the arthroscopy. We'll let the water and scope fluid… You can see this deep cavitary injury that's well below the cortex extends all the way in here - all the way down in here, deep. You can see these deep - deep bony injury. Okay.
So now we'll go to open. Before we - we'll stop the scope, we'll leave the trocar in just to drain some of the water. Scope off please, and we'll keep the scope up so we can take some final pictures. I always leave the scope on the field and just available just so you can take some pictures at the end.
CHAPTER 2
So, what we're going to do here - here’s kind of midline right here, but we're going to go just medial midline. She also has a prior incision here, where she had this debrided from an open manner with about this level of incision already, so we're going to extend the incision a little bit more. Ruler, please. Four-by-fifteen. So you can see our incision is about 7, 8 centimeters in length. Typical BTB harvest is about 8 or 9 centimeters in length, so it's almost like a BTB harvest - just slightly more medial. If you - if she didn't have an incision here, I may incorporate this portal into it and move it over here a little more - more medial - but since she doesn't have - since she already has an incision here that's this long, you can sort of see the hypertrophic scar right there - from here to here. And that has obligated me to use this incision. Knife, please.
So we come down through the fat, and then here's our retinacular fibers. So then what we'll do is we'll just do some gentle - nice, gentle, soft tissue windows here. Maybe just some small penetrating venous bleeders here - just get those under control. You can see there's the prior - there's the prior portal right there through the retinaculum. Now what we're going to do is go through her retinaculum tissue here. We're just gonna come just parapatella. Some people have described coming transpatellar, but here's her parapatellar area. We'll take the retinaculum just in a fa - full layer here. Here you can see we’ve already got some of the scope portal through this already. Now we're just going to kind of take this up and down inferiorly - superiorly and inferiorly to complete it. There's our prior incision, so the patellar tendon is right here. There's the edge of the patellar tendon - just by feel. Here's the prior scope portal, and that's what we'll marry up right here. So, although we had a different skin incision, we're now marrying it up with the scope portal. Knife please.
Now when you're making this knife incision, the things you need to worry about are coming down to the meniscus and staying out of the meniscus tissue. I come up a little bit up here - just trying to stay out of the MPFL - MPFL attaches in the more superior portion - but just making sure we have enough leeway. And then I come down to tibia here. And then here's the front of the meniscus. You just have to be a little careful of that. At this point, we now, open this up with Mayos. Pickups. One of the things I do is just a little release in the front here, which can help - little release in the front just under the retinaculum here - just a little spread type technique. That can help open up and free this - free this tissue. And also release just a little bit of the fat pad. Some people advocate releasing a little more of the fat pad to do less scarring. Not - not sure of the right answer, but if do - if you are worried about scarring, I would - come up here, please. I would certainly look at that. Suction please. And then z-retractors.
So at this point, we get our z-retractors. We have a small open knee set. Now we can see where we're looking. And one of the things about this side of the condyle is if you have just an osteochondral lesion - not dissecans - your trajectory is straight on like that. So you can see you have a really nice trajectory. Look at this trajectory with the dissecans. You can see you're a good 20, 25, 30 degrees off the axis, so you have to - you have to respect that. What's also interesting is how much bigger it looks on the arthroscopy versus in real life.
CHAPTER 3
So can I see a fifteen, please? She's a small - she has a small knee. So dissecans is more medial because it is - the typical location is the lateral aspect of the medial femoral condyle. So right here is the lateral aspect. Medial femoral condyle. So the d - dissecans is the issue because it is - we don't know exactly why some people didn't get the vascular result or repetitive microtrauma.
So, if you can see this here, this is a 15 mm sizer for a 15 - a 15 millimeter defect. And you have a recipient end and a donor end, so you can size both. The recipient is obviously a little smaller because this donor accommodates for the width of the cylindrical saw to harvest the plug. So you can see that this accommo - you almost get a strong view of that. This differential accommodates for the cir - cylindrical saw. So this is what we're going to size with - is the end here. It's got a concavity to it. And so, I spend a lot of time sizing this because this is really the crux of the case. And so here's the recipient. So what I'm trying to do is see that I make sure that I've got the posterior cover flexion. So a trick here - I can put the Freer at the posterior extent of the lesion. There's all the cavitary stuff. Look at all this stuff right here. It's just loose bone in here - loose, necrotic bone. We'll debride and also put a - what I'm going to do is - we’ll also put a K-wire in to stimulate healing. You can mark the extent of lesion. And here's the key, so here's normal condyle. That's the normal there. This is where it starts getting abnormal, so. There's your - kind of your - extent inferiorly. I need a paper ruler cut at three - two centimeters, please. There's the top and bottom of the lesion. And that is covered by the 15 millimeters right there. And I like that, so we're going to go with the 15. And flex up just a hair. Can I get the guide pin now?
So now that I’m - the key - next key thing is to make sure you're circumferentially down on the condyle, okay? Okay, guide pin. And so what I've got is I'm looking right there to make sure that this is all circumferentially down. Want to make sure that's totally embedded on cartilage without any liftoff. And here you can see the trajectory. I'll show you in a second. And so, this would be more of an osteochondral trajectory - something like this - whereas this is what we have for a dissecans trajectory. Extend just a hair. Flex. And so I've got the bottom covered. I've got the top covered. Pretty happy with that. I come just a hair low.
So the next thing I want to do as - as I keep coming down here, I want to make sure that this sits flat. There's just a tiny defect area. Let me see this here. I may replace this once. Slide it up a hair superior. And you're feeling bone the whole way. Again, you don't want to drill out the back of the knee - just stay away from structures in the back of the knee. Flex. And so that accommodates that really nicely, and it's at - where it counts, at the margin here, it's really nice and flush, okay? So, I like that. I'm going to bring this back down. Extend just a hair. So you can see, just micro movements of flexion and extension are really a big deal. And see the reamer? We're going to go fifteen. So we're going to be fifteen, guys. Okay, so once you - once you're a fifteen, you sort of let your team know that it's going to be a fifteen. Next thing I want to do is kind of mark the twelve o'clock position here. So here's the condyle up and down like that. Okay, and so we're going to mark it kind of like that, okay? Fifteen.
This is the fifteen reamer. Okay, these are all different sizes and accommodate the size of plug. It's got depth stops, and what I - what's nice about the triangle depth stop is you can deferentially see how it's going down to make sure you’re penetrating flush cuz if you're not, you'll have differential - differential readings based on how you go down. So the triangle is very nice so you can get the same standard readings Irrigation, please. Watch your skin. Watch this. And then we're going to flex. Be very careful of the pin. Irrigation, please. Let me see a - can I just see a Freer or a protecting Gillies on the patellar tendon right here? Right here, good. Okay. Start spinning while you're off - up.
Can I see - before I do this - can I see the score? Cartilage score? So here's the cartilage score over here. Okay, you can see - very sharp. And that's going to go down. Do you have something to hook this into, Danny? The handle? The T-handle? And so this will just help protect the cartilage edges - just scores down all the way to the level of the bone, and now we get a nice cut. So you can see how this goes down. It's another good check just to make sure you've got a good s - cylindirical fit. Mallet. We'll take a mallet here. Score it. So here you can see the outline and scored area of cartilage, which is all the way down to the cortical bone. Ominus reamer in. Start if off the cartilage, spinning full speed. Let the guide pin guide you. You can see how I just deferentially go in. And see how things are progressing. Do you have a joke or another elevator, please? And so what's interesting is you can still see - I’m going to stop halfway here just to show you. It's interesting. Just going to show you - you got anything smaller? Thank you, perfect. You still see you have abnormal bone here.
Anesthesia. You still have a big cavitary area, right there. So you can still see, even at 4, 5 millimeters down, we still have some cavitary bone to deal with. So it's still not deep enough anyway even if we were doing it without the dissecans lesion. You can see we're probably at the 5 millimeter mark. If we start putting the triangle around 5, 5, 5. Irrigation. So now - you see that elevator. You have to be careful cuz this one have - give way really easily. And you don't want to be too deep - you just need to be deep enough.
And I think we're getting pretty close. Can I see that ruler, please? So we ream, and I'm going to show you here. We ream to approximately 6 to 8 millimeters, which includes the cartilage and the bone. And so that's where I've stopped on the triangles, but this is really how we do it - is we measure with a - a ruler like this. And we're gonna measure - we're gonna measure. Here's our - here's our hole. We're going to measure in three places at 120 degrees apart - something like that. Some people also measure it in 4 places at 90 degree intervals. But you can do this or this, and I usually - I usually do this one, the 90-degree interval versus the 120 degree. And so we're going to go in and take measurements here, here, here, and here to put in the allograft.
So here's our first one. Top is an eight. Twelve o'clock is an 8. Three o'clock is an 8. Now this is where it gets tricky because of the differential here. You can see we've got quite a bit of - quite a bit of loss. Do you have a K-wire ready also? Six and a half at 6 o'clock. And then out medially is probably 5 at best. And so, we have quite a bit of differential here. I mean, that's a differential. We have a delta of 3, which is a pretty good differential and is typical for dissecans. If it was in the center of the condyle, you could see how it would be much flatter, and you wouldn't have a big differential. Your deltas with a flat condyle are usually 0.5 to 1 millimeters. But this is where you have to plan a little bit more - the harvest of your plug.
So, this is a dilator. So, this sizes up the recipient socket by .5 millimeters and also just flushes the walls. First thing I like to do - sorry, I didn't do this - was scrape, inferiorly - scrape here, but you can see there is - there is the uncontained area right there. That's not contained by bony - soft tissue up against the notch. And that's the challenge with dissecans - is how to manage this.
Okay, and so what I'm seeing here also is - again, this is a has lines all around it, so I'm making sure I can go down at a straight fashion here cuz I know at the top and bottom it going to be 8 - drill - I mean mallet, please. And so, I've got the 5 up top, and it's all the way around. You see that dark black line right there. So just a gentle mallet, and now what we're seeing - can I get a knife, please? This is also another nice way to trim the cartilage in. While you have this cylinder in, you can trim excess cartilage up against the cylinder like this. Like this, okay? See how nicely that looks? And then we got that extra - small extra piece of cartilage off.
But now we're going to look at this here. So, we have 10, 9, 8 - 10, 9, 8, we're almost - it's about a 7. So, make sure I got the depth right. I'm okay with that. She has - we have plenty of subchondral bone. The cartilage - can I see a ruler, please? The cartilage is a millimeter-and-a-half to two millimeters - you have 5 millimeters of subchondral bone. I really try to decrease the amount of subchondral bone and bioburden that we put in of the - of the graft.
Now, we just take a small haywire here, 0.045, and this is just going to spear the ends. Now, she has dissecans, so she already has bone that's already been compromised on some levels. So, you really want to do this to get the - make sure you've got a good feeling response. We got the big center plug hole right there, which is where it was before. And I, like, make sure I get the periphery really well. It's hard bone there. I want to make sure we get that. Okay good. Then what we'll do is put a moist Ray-Tec in here and come to the back table and prepare, okay?
CHAPTER 4
So, here's how the allograft comes, and it comes in a - it comes in a medium. It's usually a bovine medium, but it can be - there are proprietary mediums from all the different vendors. It's at room temperature, so it's just on ice - not frozen. And so, here's what you have for the condyle, and it's a hemi-condyle. In other words, it's a medial condyle from a size-matched donor. So we send sizing x-rays with a marker on the x-ray to the graft company. In this case, JRF, provided our graft. And they size-match it based on a marker that we place on the x-rays to size up the condyles and some well worked out mathematical equations in order to size up the condyle relative to some measurements on the x-rays. So what I do is I open up the top here, but I keep this in the serum just to keep it moist and - moist and dry. And what we're going to try to do is harvest that same dissecans area to get a reasonable fit.
And so, this is a graft board. You can see this graft board here. Here's the condyle. Okay, posterior. Here's the trochlea, and so, the other side of the condyle would be here. And so, you can see this matches up. Our area of interest for this girl's knee is going to be right here. So basically, what we're going to do, is hold this in place, okay? This is a graft station board. A lunar lander is what it's also been called. And so, what we're going to do is work on this part right here. And so, can I get the - the brown sizer? Cylindrical brown sizer for 15. So, now we're going to take this, which is the - here, you can see this here. There was the donor. Here's the recipient. So we're going to size off this, but this differential and size, again, accommodates for the cylindrical saw, which you'll see here in a second.
So, we're going to size this up here. And so, I think the key here - can I see a Freer, please? And this is the tricky part of this - dissecans - is you actually have to be uncontained on the harvest as well - just like you're uncontained in the defect here, you have to be uncontained in the harvest of the donor. This is very important point. But that's the uncontained area here, and it almost fits perfectly like that - but we have twelve o'clock here and down bottom here accommodated. So we're going to try to do something - Robert, can you see that - can you see that little gap right there? Yep, so that gap right there is key. So, you can see it's a little bit unconventional in that you do want it almost uncontained in a way. This is bone that we don't really need to reconstruct. We need to reconstruct this part of it. And so, this will be our kind of harvest trajectory if you will.
So here's contained. Here's uncontained. Contained is full circumferential 365 degrees cylinder, okay? Uncontained is something like that. So, your cylinder - it ends - it ends in a flat line here, okay? So you don't have - you're missing that. You're missing that portion of a cylinder. You end up with just this. So you're missing that extra usual circle if you will. So we kind of cut it off here because that's the uncontained area. Okay. So, here's our twelve o'clock. Here's that, we'll put a dot there. Here's here. Now what I want to do is get this lined backed up. Now we're going to go right here. This is going to help me outline what I need. So you can see, where this is going to come around here. And here. And there's the uncontained area right there. Okay. So there's that flat uncontained area. And that's the tricky part of dissecans - is you're missing a little bit of that circle area right there, okay?
And so we'll just mark that with this. We just want to do a gentle score, and then we'll go free here. So I got a double guide. It’s up against my hip here for stability. Irrigation down. So this is - this is tricky. If you wanted to reposition this and use this metal cylinder holder to hold it, that's what I recommend. I - for me, I like doing these free, but you've got to be really careful. Start slow. Get a sag saw ready. And so what I'm checking here is that I do have an uncontained area on the lateral aspect of the condyle here, and that uncontained area is right there - just like we had on the sizer. So now we're at 10. It's a nice cylinder line on there. Again, irrigation, please. Occlude that - thanks. And so we're coming down nice circumferentially. Irrigation. We use irrigation to not get too much heat. It prevents cartilage necrosis, chondrocyte necrosis because this is a fresh condyle. And so now we’re at 20.
Okay, good. So, now what we'll do is run this back a little bit. And so here's what we have in terms of the cartilage unit right here, and you can see how it slopes. You see how it slopes, and it's just going to be a little bit uncontained right here, which is good. Okay. Now we're going to take a sagittal saw and cut this piece out. Just going to use a standard sag - you can also get a longer blade, which actually works a little bit better. So I'm always thinking, "If I need another graft - say this one doesn't work - I always can harvest a second condyle area if I need to.” There we go. Freer. What you see is you just see the plug kind of extrude when it becomes loose enough.
And so what we'll do is we'll put this - so there's our harvest site. You can see that it's basically uncontained. And so here's the area that's uncontained - just like we have on the recipient, okay? So that's what we mean by our uncontained area. So we're going to put this back in the serum. Give it to Denton in case we need to do another harvest. We still have at least one or two plugs we can harvest from there. And now, I've got the twelve o'clock position right here. So I've marked that on the graph, I've marked that here - my twelve o'clock position.
So now, what we have to do is put this in this holder. And what we do is - you can put it either way, but you have to - before we do that - sorry, we're going to put this in a - can I see the ruler, please? And we're going to measure our - measure our measurements. So Denton, what are our measurements, again? So at 12 o'clock, we said seven. It was seven or an eight. Seven. What about 6 o'clock? 6 o’clock, six and a half. And 9 o'clock, five. Okay, so now we're going to take this, Yom, go ahead and give me some marks here while I hold this. So, now we're going to take our ruler. Can you see that? We're gonna put this at a seven. Right there. Okay. That's 12 o'clock. Now we got 3 o'clock - is also going to be a seven. Good. 6 o'clock is going to be six and change. Right about there. And then, over at 3 o'clock, we'll be five and change, right. Good. So, now we've got these - we're going to marry up the dots here. And so that what we’re - that's what we're going to put in. We're going to put that little disk in the right position and right orientation, okay?
So now what we're going to do is take it this way so we can now cut it, and we're going to put this so we have this cut perfect so we can put this all the way around. I got to fix it a little bit, but you can see how we're going to make this cut perfect. I keep my hand here to protect the plug so it doesn't go anywhere. So, there we go. We got it all flush, flat. So take this - make sure we're good to go. Let's take a little bit extra off. Right there I can see just a tiny high spot. Now what we're going to do is ruler - ruler again and just see sort of where we're at. A little big at seven, and that's a little big at six-and-a half. I'm going to take a little more off - just a hair. Especially at the - especially where I have it differentially up here. I have it differentially up at the 3 o'clock position where it's the highest. Okay, good. That’s a good seven. Seven. Six. With the cartilage surface - is 5 and change. Okay, I'm loving that. Now we're going to pulse lavage. Can we get a basin? And now we're going to pulse lavage.
Pulse lavage is important to take out some of the marrow elements that may be present in the subchondral bone. Okay. So now you can see how the graft is really - the subchondral elements are - it’s just really this nice pale white - almost a washed subchondral bone if you will. Okay. So, now we're going to put this in place. We'll leave that in the bin. Teisha, you have the graft up here.
CHAPTER 5
So you can see already - look at the nice clot formed here in the base of this. That's what I want - infiltration of her own marrow into this bony fragment. Can I get a knife, please? Just want to clean out a little of the base. The area of the uncontained that we matched up - see that uncontained area right there? I just want to debride a little more of that. Knife please. Thank you. Pickup. Dilator, please. Mallet. So I dilate one more time. Teisha just reminded me. Thank you. But it also gets your trajectory of the graft. Double checks your depths. You can see here 10, 9, 8, 7, perfectly. Good. Okay, graft please.
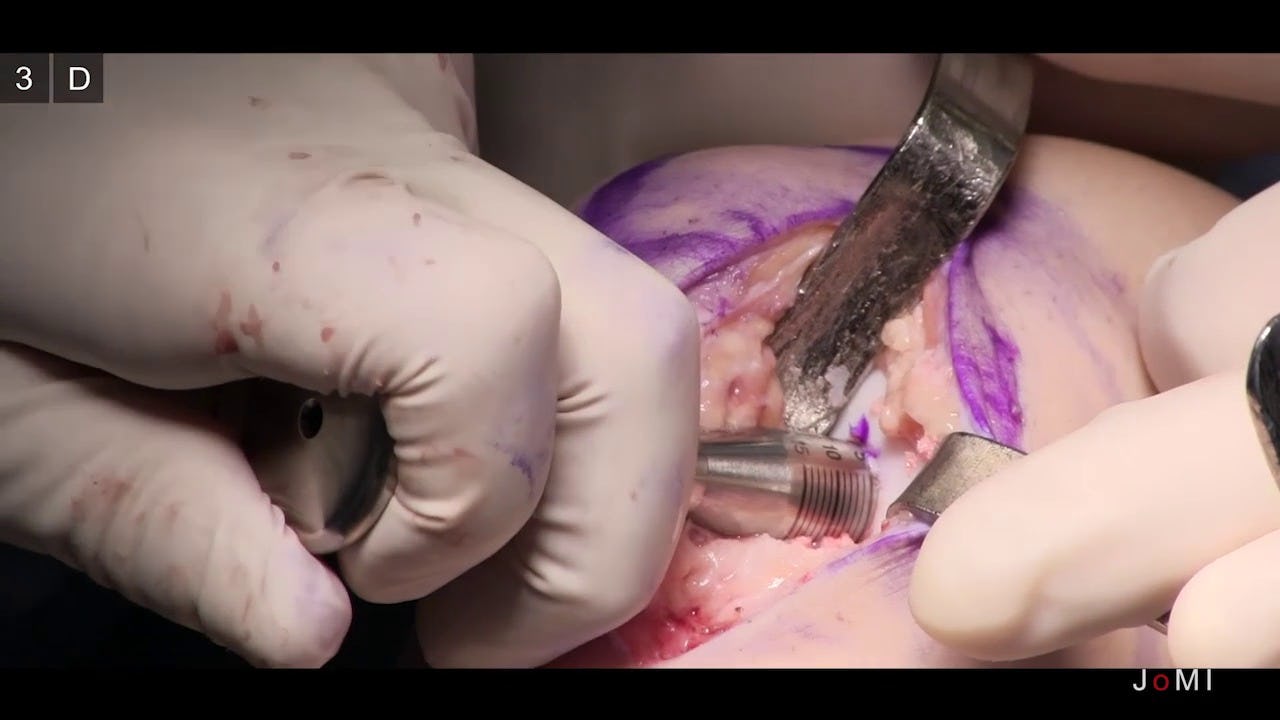
Using that dilator, I think we're going to be able to fit this is pretty quick - pretty easily - knock on wood. Alright, so before I take this graft, hold on. So I take this bag out like this, okay? Because these little disks are like - it can be like poker chips on a poker table - fall off. You just got to be careful. So there’s the area we're going to put this in. Keep the bag here. There's our twelve o'clock position. Twelve o'clock. We're going to marry that up with the twelve o'clock position. And then we hand press fit this. Freer. And here's the tricky part. Flexion a little more. A little more flexion. Good. So, it’d be much easier to have a straight on trajectory like this. We'd be done. It's just this angle of 20 degrees off the axis that really makes this a challenge because of - we're fighting the notch as well as our instruments.
There we go. Don't move. Don't move. Don’t move. There. Tamp. Now you got it seeded, and you just take an oversized tamp. And you don't want to do this too hard - but just enough. That goes all right there. It really wants to go in and fit nicely - I can tell. That's why it's being so stubborn. It's a good sign. We got the right fit. Flexion. Flexion. There it is. So now we're in - just felt it in nicely. So now we've got it most of the way in. We got our twelve o'clock lined up. Flexion. I need to deal with this back here because you can't have it catching with oversize. And that's it. Back down. And there it is.
So now we have a really nice circumferential fit. You can see it's uncontained here. It's almost stable enough to hold. So just cuz this is uncontained, I’m going to use the Bio-Compression screw, okay? You guys have a good view of that? How nice and flush that is? I mean there's virtually no step off. It's recessed by maybe a quarter millimeter - lined up at the twelve o'clock position. And that's how we got the differential of three to match. Here's the area that's uncontained over here, and that's right on the edge of the notch. Okay. There's the uncontained area from there to there. And so that's why I'm gonna use the Bio-Compression screws. I don't want this to come out.
So let's use the small Bio-Compression screw. We're going to do center K-wire. And this is done in a cannulated fashion, okay. Drill. Yep. Irrigation, please. So here's the depth stop on this drill, and you can see that you get sixteen out. Depth stop, okay? Go ahead. Now we're going to tap. Get the Bio-Compression type screw. It's a plastic screw. You don't want to break it. So the key on this is you want to go deep enough cuz you do not want to leave this screw proud at all. It needs to be recessed, so I go quite a ways on this just to hold it in place. The good news is none of this is spinning. It's not recessing more. So I'm very happy with that. And again, I only think you need this if you have an uncontained lesion.
And so here's the implant. So it’s a 16 millimeter by 3.0 outer diameter, but the inner diameter is less. And it's a compression screw. You can see that the reason this works is it compresses through this area right here. So it grabs deep, and then it compresses with a variable pitch - these - through this shaft that's opened up right here. Okay. So now we're going to come in same trajectory - let the screw find the way. And we recess it. There’s a good tweak. Good. So there's our final product.
CHAPTER 6
Tourniquet down, please. So just - we have to just find some bleeders. I know there's this area in the fat pad that will bleed. And so I'm really happy with that bit. Those again - the summary of the main points of that: it's uncontained, you have a big differential demonstrated here, okay? Usually, our differential is 0.5 to 1 millimeters, but we have a differential of 3 from medial - I'm sorry, from lateral, which is the 5 to the medial of 8. The other thing is it's - the angle of this is 20 degrees off from our normal. You can see it's just harder to do. You have to get a little bit better exposure. And the dissecans - you have to know going in - if you have this typical dissecans area - you have a cavity lesion that's on that lateral side of the medial condyle - you have to have those - have those accounted for. Is her tourniquet down? Great, thank you. So that was nice. So, we just had some nice bony bleeding at the base. We'll just let that go.
And so now, at this point, what we're going to do is just close this. This is the edge of the patellar tendon right here. So here's the edge of the patellar tendon. We're just going to close this retinaculum to it with some 0-vicryl. And then just a deep closure - and there's her final incision. Okay, so. Now, I'm just going to make sure we have some good hemostasis. Irrigation, please. Just want to try to decrease chances of effusion. We can do this off the scope irrigation, I'm sorry. Denton, thank you very much. Great job. Takes a team to do a case like this, and Yom is my fellow currently. Denton leads surgical tech. Our anesthesia and excellent nursing staff - thank you everyone.
CHAPTER 7
Yeah, so this is a - a case of a patient who is a collegiate athlete that experienced knee pain, swelling, and their knee just wasn't quite working well while on the athletic field. The examination and imaging findings were consistent with sort of a late onset presentation of osteochondritis dissecans. And we see this sometimes in patients. They've had this injury for a while to the cartilage and and subchondral bone and sometimes deeper. It can be cavitary, and it's usually on the lateral aspect of the medial, femoral condyle. And it may have been there for a while, and something sort of just sets if off. And that can be athletics or daily life or something else. But it's a unique cartilage injury in that it's not just the cartilage, but it's also the subchondral bone.
So it's different from a osteochondral lesion or just a - a cartilage lesion. It's more a cartilage lesion with some bone injury underneath. What is also interesting and also very unique about this patient is that this patient had already had surgery, and they had surgery to try fixation of the fragment and to try incorporating the fragment that was native to the bone and - and allow it to heal. But unfortunately, as is - sometimes is the case with the older presentation patient - in other words, those over the age of 15 or 16 - with osteochondritis dissecans type lesions, they don't tend to heal that well. Some can, and I think it's a great way to do this is to try to get this to heal and try to get this native piece to heal as much as possible - but there are quite a few that don't go on to healing.
So, my first encounter with her was - actually, not this surgery. I had actually done another surgery on her, which was to do a debridement of the prior fixation because unfortunately, in her, the bone fragment and cartilage fragment didn't heal and it was fragmented. And so, we did a debridement. What is interesting is that sometimes taking this piece out that is fragmented in multiple pieces and nonviable bone and cartilage is that patients can get better and get back to their activities. Unfortunately, this patient was unable to get back to college athletics and still had swelling and pain. And that's why, after more nonoperative care, physical therapy, edema control, some activity modification, we then came to the decision of the fresh osteochondral allograft.
The discussion of a - a cartilage lesion of the knee is really very unique to the patient. And so, I - I do have an algorithm, but it - it's very unique and very tailored to the patient because they come in so many different shapes and sizes. And also, the patients have many different demands and goals for themselves after surgery. So, I - I really try to make it individualized and - from the patient's perspective as well as what we're finding from a radiographic perspective.
For this case, the lesion was fragmented. It hadn't healed after a very good surgical repair and surgical attempt at fixation, and so we had already decided that if the debridement and taking these pieces out had not gone well, that the next step would be to fill the cavity with some structural graft as well as cartilage restoration. And so, my approach for that is the osteochondral allograft, which is a fresh plug from a donor, which accomplishes both of those goals.
It is important, when you’re potentially thinking about a patient and indicating them for fresh osteochondral allograft, that they know that this is going to be a little bit of a process. In other words, we have to order a graft. And there has to be a donor available, and the donor tissue is only good for a couple weeks - so where you have a - usually, a pretty tight window because it's a fresh osteochondral allograft. And the reason we have a tight window for that - and it's about 10 to 14 days, depending on when we get the graft notice availability - is to preserve chondrocyte viability. Because after 4 weeks, the chondrocyte viability really goes down quite a bit. So, the graft is harvested. It takes about 2 weeks for all of the cultures to clear, and there are a ton of cultures that are done to ensure that this graft is safe. And so, that's already 2 weeks into the 4 week window, and so, then we have another two weeks at best to transplant this graft.
So, the patient, first of all, needs to understand sort of the timeline of this and that, when the graft is ready, they sort of have to be ready. And we also need to work with our tissue banks. There are multiple really good tissue banks around the country to get the correct graft size, and what we do is a special x-ray when they come in clinic with a sizing marker to make sure that we have the correct graft size and - and close to size match for their knee.
So, there are a number of different treatment options for osteochondritis dissecans. And what we've highlighted with this patient's history and what we've already done for this patient is several of the treatment options, and what we do is continue ramping up the options up to what this is: a reconstructive option for both bone and cartilage. But there are many options below that such as just debridement. We can think about microfracture, which is where you pick a subchondral bone, but for that you need an intact subchondral bone. She really doesn't have that, so you can consider what's called abrasion arthroplasty, where you abrade it and hope that some fibrocartilage scar comes in - but you've lost that subchondral plate in this dissecans lesion. The next options are a variety of cell-based, restorative technologies, and there are a bunch of different ones available for that. Some of those require that you have a subchondral plate. Others of those are available, and you reconstruct the subchondral plate. So there's a lot of different options for cartilage restoration. My go to for a dissecans and a cavitary lesion, however, is the reconstruction with an osteochondral plug, which includes the cartilage, the subchondral bone, as well as the cancellous bone to fill that cavitary lesion.
The other option, which may be a very good alternative, is to use the patient's own tissue, and that's called an osteochondral autograft, where you actually harvest from air - cartilage areas of the knee that are not as - do not have as much function or role in the knee. And so, some of those areas is the superior lateral, the superior medial area - actually, this hasn't actually been described as a donor area for one of the osteochondral allografts. In this patient, the lesion was pretty extensive and pretty big - that it would take several plugs to reconstruct this, and my algorithm for this type of larger cavitary lesion is to use a donated plug.
So - so one of the questions I get asked all the time is, you know, how long is this going to work, is it going to accelerate the pr - arthritic process, is arthritis inevitable - and honestly, we don't know a lot of answers to this question. We don't really know the long term natural history of lesions such as this. We don't know really long term data on the osteochondral allograft although some would argue that we have a lot of 7 to 10 year data that shows more than 75 to 80 percent viability of fresh osteochondral allograft. Now, those are all comers. It's not specifically for this type of lesion, so it's hard to say exactly for this lesion. We - we need to do additional work and additional research, but what I can tell you is that the literature would support a reasonably good function and long term outcome - in other words, 7 to 10 years in our literature.