Pancreatic Debridement via Sinus Tract Endoscopy
Transcription
CHAPTER 1
So we're here to do a video-assisted pancreatic debridement. He was involved in a motor vehicle accident about 2 months ago and suffered a pancreatic injury. He was managed at another hospital initially and was initially managed sort of non-interventionally, developed some peripancreatic fluid collections, ultimately underwent a pancreatic duct stenting, but in spite of that developed some big peripancreatic fluid collections just from leakage of pancreatic exocrine juice from the injured part of the gland. So he eventually got percutaneous drainage of those peripancreatic collections, and now eight weeks later he still has sort of a persistent necrotic collection. We'll show you the CT scan, it's about 7.5 cm by 5 or 6 cm. And then a second area that doesn't have a really significant collection, but continues to drain purulent fluid. So, given that he's eight weeks in and he's still having pain, he's having difficulty eating, and these collections have sort of plateaued out with percutaneous drainage, they don't seem to be getting any smaller anymore, we're going to do this procedure. There's normally two ways I consider approaching this. One is what's termed video-assisted retroperitoneal debridement, where we make an incision over the percutaneous drains, maybe a 4- or 5-cm incision, and then carry that down into the necrotic cavity and debride that. The other is what we're going to do today, which is termed sinus tract endoscopy, where we actually just dilate the drain tract and then we use a rigid nephroscope to debride the cavity. And the reason that we're choosing this technique for him is that he has a pretty narrow window along the drain path between the colon and the drain. And so with a cutdown technique you're in a little more danger, I think, of risking injury to any of the adjacent structures, particularly if it's close. That's number one. Number two, with the VARD of a cutdown technique, you're making an incision into an infected pocket of an infected cavity that may still be leaking some digestive juice. And I should mention he also has fistulas from his small intestine and stomach into this cavity. So even though that incision is small, the risk of wound complications is relatively high in that scenario and so with this technique we just dilate the drain and at the end of the procedure leave a drain in essentially the same hole. The risk of wound complications is much lower. And this is a relatively small collection, and so you'll see when we do the procedure that we can only debride relatively small bits of necrosis at a time. We can't pull out humongous chunks, which is a little bit tedious, but it's doable when you have a relatively small collection like this. So, the way that we'll do it, we'll bring him into the operating room, we'll put him to sleep, we'll put him probably in a very slightly left-sided up position, so partial right lateral decubitus position, and secure him there, and then we'll prep the drains into the field. We'll start with the upper collection, which is the bigger collection, and we'll - I prep and drape the whole abdomen in case of some sort of unanticipated disaster but I've never actually had to convert one of these to like an open surgery. We will then bring in fluoroscopy, and then under fluoroscopic guidance, we'll pass a wire through the drain, and then we'll dilate the drain tract using a dilating balloon. And so this is exactly like if you sent a patient to interventional radiology to get a drain exchange or a drain upsize, it's the same sort of mechanism. So once the wire is in, we pull the drain out. We use a dilating balloon that is actually part of a percutaneous renal intervention kit, that's typically what it's used for, and it comes with an integral sheath. You'll see all of this. So the balloon goes over the wire. We then dilate the drain tract up to 30 French, so that's 1 cm, and then the 30 French sheath that comes in the kit can be introduced into the cavity. So up to that point, what you've basically done is you've taken your percutaneous drain and you've changed your, whatever, 20 French, 24 French percutaneous drain for a 30 French sheath. Once you have a 30 French sheath, that's big enough to allow a rigid nephroscope through the sheath and into the cavity. And so we take this device, which, you know, I don't know who's watching this, if it's general surgery residents, maybe you don't use a nephroscope, but it looks maybe like a rigid bronchoscope, which you might be more familiar with in that it's a metal tube and you can work directly through the channel of the instrument and you get sort of one grasper. And what we do is run continuous irrigation through that, so that's similar to cystoscopy, so that kind of distends the cavity and clears out debris a little bit, and then we can grab the necrosis. And with each piece of necrosis we grab, we can't really pull it through the scope because that working channel is so small, so we'll grab a piece of necrosis with the graspers that extend beyond the tip of the scope and we take the entire scope and grasper out, drop the piece, go back in, and we do that for however long it takes to clean out the cavity. It is tedious but, you know, I'm basically - I think it's worth it to be able to debride these cavities without really any significant incision. Patients have very little to no surge response to this, and if it is really just proving, like, way too tedious to take hours, I always warn patients, you know, we just may need to repeat this more than once. Because the instrumentation, as an exposure, is pretty limited, you're just working within this cavity, we have to be really careful not to get into anything on the walls of the cavity, particularly blood vessels where we're in a really poor position to control bleeding if we were to get into it, and so we only really take very loosely adherent necrosis. That's part of the reason you never want to do these procedures early in the course of a disease. I always want to wait at least four weeks, and in his case we're eight weeks out, so we've waited a long time and I anticipate the necrosis will be pretty well demarcated. You know, it'll be very clear like what's dead and releases easily and what's alive and we need to avoid. But sort of a second reason we might need to repeat the procedure, do it in more than one, is that, you know, sometimes you can get 80, 90% of the necrosis, but the part that is adherent to the wall is very stuck, and in peeling that off it can be quite friable, and if you start to get into any friable tissue like that it's usually safer to just leave a drain, irrigate the drain for even just a few days, and if you come back to finish the procedure you'll find that the stuff that was very adherent before, after a couple days of irrigation, usually is just sloughed right off. It's very easy, very safe. So, the trade-off is, you're extremely minimally invasive, you have essentially no wound complications, very little inflammatory response to surgery, that's the upside. The downside is, it may require multiple procedures, but if you think about it, this guy's been walking around with a percutaneous drain for eight weeks, so if we have to spend an extra three or four days between what's essentially sort of IR procedures, I don't think that's actually a big loss. I think it's more trying for surgeons than it is actually for patients. So once we've done the debridement then we just want to leave a drain back into the cavity and we'll pull the scope out. We'll place a wire back into the cavity under fluoroscopic guidance, and then once again, under fluoro, just like they would in radiology, we'll replace the drain into the cavity, suture it in place and we're done. Here you can see this persistent necrotic collection with the drain here coming in via his left flank. This has gotten a little bit smaller over the last eight weeks but it's sort of plateaued at this size so that's the reason. And he's still symptomatic, he's having pain, he's having difficulty eating. See, it abuts the stomach. And so that's the reason we're going to pursue debridement. He also has the second drain - here, so it comes in just over the iliac crest, and then I'm scrolling upwards now, tracks cephalad through here. There's some sort of phlegmon. And ultimately it might communicate - here. Not a large burden of necrosis, if any, really, in the lower tract. You can see this also reasonably well in his coronal images. So again, here's the necrosis with the drain in it, in the upper collection. That's the bulk of the necrosis, tracks down a little bit to here. And coming up from below, not a lot of necrosis down low, but it might communicate in here with this tail. This is 4 days before his procedure. Here's some injection of the drain cavity, and here you can see that it's actually filling small bowel, so that's how we know that he has a small bowel fistula into the cavity.
CHAPTER 2
So, for positioning for these cases, you need to have the drains in the field and you need to have them at a point where they're accessible where you can move the instrumentation. So, we're lucky for him the drains are fairly anterior, so we can leave him supine, which is obviously just simplest. It's very common for these cases that the drains come in via a more posterior tract, and if that's the case we - probably 80% of the time, we'll have these patients in some degree of partial decubitus position. And then the drains are prepped in. And these are the two surgical sites, really.
I prepped the entire abdomen, as I mentioned in the sort of pre-op discussion, I prep the entire abdomen just in case of some kind of unanticipated catastrophe, and we're able to convert to a laparotomy if we need to. Never had to do that. But I keep prepping them just to, I guess, appease the gods. And obviously you can see this sort of - purulent fluid coming out of the drains already. These are regular IR drains, I've just already cut them to make them a little less awkward to prep. This is one of these cases where the dirtiest part is actually where you're operating. So again, we're just going to prep the drains right in. We basically do a full laparotomy draping underneath all this and then put this little specialized - it's actually a neurosurgical head drape, which is very good at catching all the irrigation. The first couple ones of these that we did, we turned the operating room into a lake, and now we generally just turn it into like a small pond. Okay, so just a regular laparotomy drape on. Let me move this down a little. These drains are a little far apart, but I think the neurodrape will still cover the distance. So this just says "pouch," so that tells you where the pouch that will collect all of the irrigant is. And I think, yeah, we can cover them both just barely. So - there we go. And then pull that towards you. So everything should just run down into this. I mean it doesn't catch everything, but it's way better than everything else that we've tried. This was Lauren's discovery. Nina's pro tip was wear booties. Yep. Which I just recognized I forgot. Oh, yeah, you'll get a little soggy. Okay, and then, so to try to prevent irrigant from running down under this, we take this little guy and we cut it into some strips. So this is all part of the irrigation management system here. Just to control, we'll use sometimes 30 or 40 L of irrigation during one of these cases so we just want to try to get as much of it into this pouch as possible. You have a dry lap? So just try to get this dry so it sticks as much as possible, and then seal this. We can sort of sluice this down into the collection patch, so - and you don't want to cover the holes down here because then they won't collect, obviously. So I think there are people who take the approach for this procedure that they're just not going to bother to do it for more than like 30 minutes at a time, and they'll just bring the patient back as many times as they need to. Practically speaking, that just doesn't work that well for me because it's really hard to find consecutive days when you can do this. So you guys can go ahead and bag the C-Arm and then come on over here. So we have basically 3 things we need to pass off. We have the camera cord, the continuous irrigation, which essentially you know, if you're making a laparoscopy analogy, replaces the insufflation tubing, and then we have the light cord. This is the rigid nephroscope, I mean, most people doing this procedure are not going to be super familiar with this, I know I was not until I started doing it. The light cord hooks up here, the camera cord hooks up here, gives you in-line visualization down the instrument, and you can use one instrument that comes in through the back here. Put our continuous irrigation here. And this is open, this is closed. I'm going to close it right now, so we don't start pouring liquid everywhere. We'll zoom it in so you can see we got a little narrow aperture there so we want to get something a little more - a little more focused. And then we - can we turn the light source on, please?
CHAPTER 3
Okay, can we take the Amplatz wire, please, and a Kelly and an 11 blade. So first thing we're going to do is just cut the stitch that's holding the drain in. Okay. And then we're going to enlarge the skin incision just so that it will take a 30 French drain.
Is there anyone in the room who is not wearing lead? No. Okay. So can we come a little towards me, we'll just kind of get lined up. Let's try that. So, let's see… Come a little bit more, maybe up a tiny bit and towards me a tiny bit. I just want to see - I usually like to just see the tip of the Kelly. There it is. And then can we sort of straighten it out so we're coming in, yeah, directly from the side? Okay. And actually maybe inferiorly a little bit even though I had you come up. Let's try that. Okay, that should be good. All right, so we can see where it curls and we can see the skin, that's ideal. So now if we could turn the room lights off that would be great.
Like we talked about before, the first step of this is just to dilate this drain tract to 30 French and place a sheath. So this is the sheath and dilating kit. This comes pre-loaded. Depending on the brand, the sheath won't come over the balloon, but you want the sheath over the balloon before you put it into somebody. This little plastic container part is just for shipping, you need to take it off. It's to prevent the balloon, which goes from that little marker back to here, from being damaged during shipping, but the balloon will not expand if that thing is on. So, you can toss that. So we pretty much just want to coil the wire in the tip of a Thal and then Thal comes out, and then we'll advance the sheath to like just behind the pigtail. So he's totally supine. He has pretty anterior drains. 80% of the time these patients will be in some form of decubitus position. You want enough freedom of movement that you can kind of lever the scope around, so if it's close to the table even if you could leave them supine you actually should bump them up a little bit. So this is a super stiff Amplatz wire, it's got a very flexible tip, but the rest of it is stiffer so that's easier for getting the drain to track over it. And we're just going to feed it in here. Is there anyone in the room without lead right now? Yes. Okay. Always good to ask. All right, now is there anyone in the room without lead? All right, so - hold fluoro so that you can see the wire. And we'll get it, and see it kind of taking the curve? Sometimes it'll come out a side hole up there, which is okay.
Okay, so now I'm going to hand you the holder, you take it all the way off the back of the wire. And just control the tail because it's really long, longer than it needs to be for those. You can just hand that back to Andrew. Just hand the - yeah - holder back and take that off the end as well. And now we just need to do a little bit of fluoro, we basically want to make sure that we don't lose wire access as we take the drain out. The drain can come back with the - or the wire can come back with the drain if you're not careful, so. Here comes the drain, I'm just backing it out here, and you can see on the fluoro that the flexible tip is coiled in the cavity. Okay. Now I'm going to lock down the wire at skin level, and Yanek's going to take the drain off the back.
And then Yanek, I'll have you take the balloon here with the sheath loaded over it and just feed that onto the end of the wire. Okay, so now the wire comes up - or balloon comes up, there's this radiopaque marker on the tip, and we'll actually see it. So now I want you to control the wire behind the balloon, and now we're going to introduce it through the skin hole. Here's a little bit of fluoro, you can see that radiopaque marker, and we want to advance it until the tip is kind of in the cavity. And it's a good size for this one, we can see there's just a little bit of balloon out right when we get the tip where we want it. So now I'll take the inflation device with contrast please. Okay. We don't want that, we actually want this thing full of contrast so you can just pull it up into there. And we use a half-strength contrast for this because the balloon will inflate with contrast, which you'll see, but if it's full-strength it can be hard to see the sheath as the sheath goes over the balloon so half-strength allows you to see the sheath a little more clearly. So, this is the inflation device. I'm going to squeeze this yellow thing in, and that's going to be - let me get all of it out, there. So to aspirate, just - these are all different brands but hold this in - aspirate - it's filling with contrast, release. Okay. And then you can just screw it on the inflation port. This is labeled "balloon" and "distal", but you kind of can't go wrong because the wire will always come out the distal one. All right, so we want to make sure the balloon is still in the right position, which it is, a little bit outside, so now I'm going to start by inflating this by hand. So, you can see the fluoro and you can see the balloon here starting to come up. By hand - I'm weak, I can only make it to I don't know, 5 atm. But then I can screw this and get this up to 20, which will make it nice and stiff. And you should be able to see any bend coming out of the balloon on fluoro. Just let it sit there for a minute. Can lay that down.
And now hopefully we made our skin nick big enough. Now I can advance this sheath, again under fluoro, over the balloon. There'll be a little pop in the musculature, there's the pop, and then it should slide fairly easily into the cavity. Can you pull back a tiny bit towards you with the C-Arm? A good couple centimeters. Perfect. Okay, the sheath is maybe right at the black tip there, and now we can deflate the balloon.
So, push this in, aspirate, and you'll see on fluoro that the balloon is kind of deflating and there's the sheath. And then I can take the inflation device off, hand that back, and now we want to back the balloon out over the wire without taking the wire out quite yet. There's the balloon coming out. Now I have the wire at the sheath and Yanek, you can just take the balloon all the way off the wire, hand it back. And so now we've completed sort of stage 1, which is to go from the drain to a 30 French sheath that allows us to work.
And so now, can we back out the C-Arm? I think we'll be done. Now we're going to put the nephroscope in, and once we're convinced we're in the necrotic cavity then we won't need to use any more fluoro, and everyone else can take their lead off. Yes please. So we'll - all right, so we'll open up the fluid and just let all the air bubbles kind of run out. And then in we go. Now when we first put this in, it's really uninspiring because we'll probably just be sitting in a pile of glop. Yep, there's the pile of glop. And it doesn't look like much. What you'll see over the course of the case - and - is that we actually will develop a nice cavity, and it'll be like a real working space, but at the start we're really just kind of like picking at muck because we've just landed this into a necrotic cavity. So, you can go ahead and take the wire out now, right, we found necrosis, so just back it out, just reload it into the holder. And then we'll get these lights off the field.
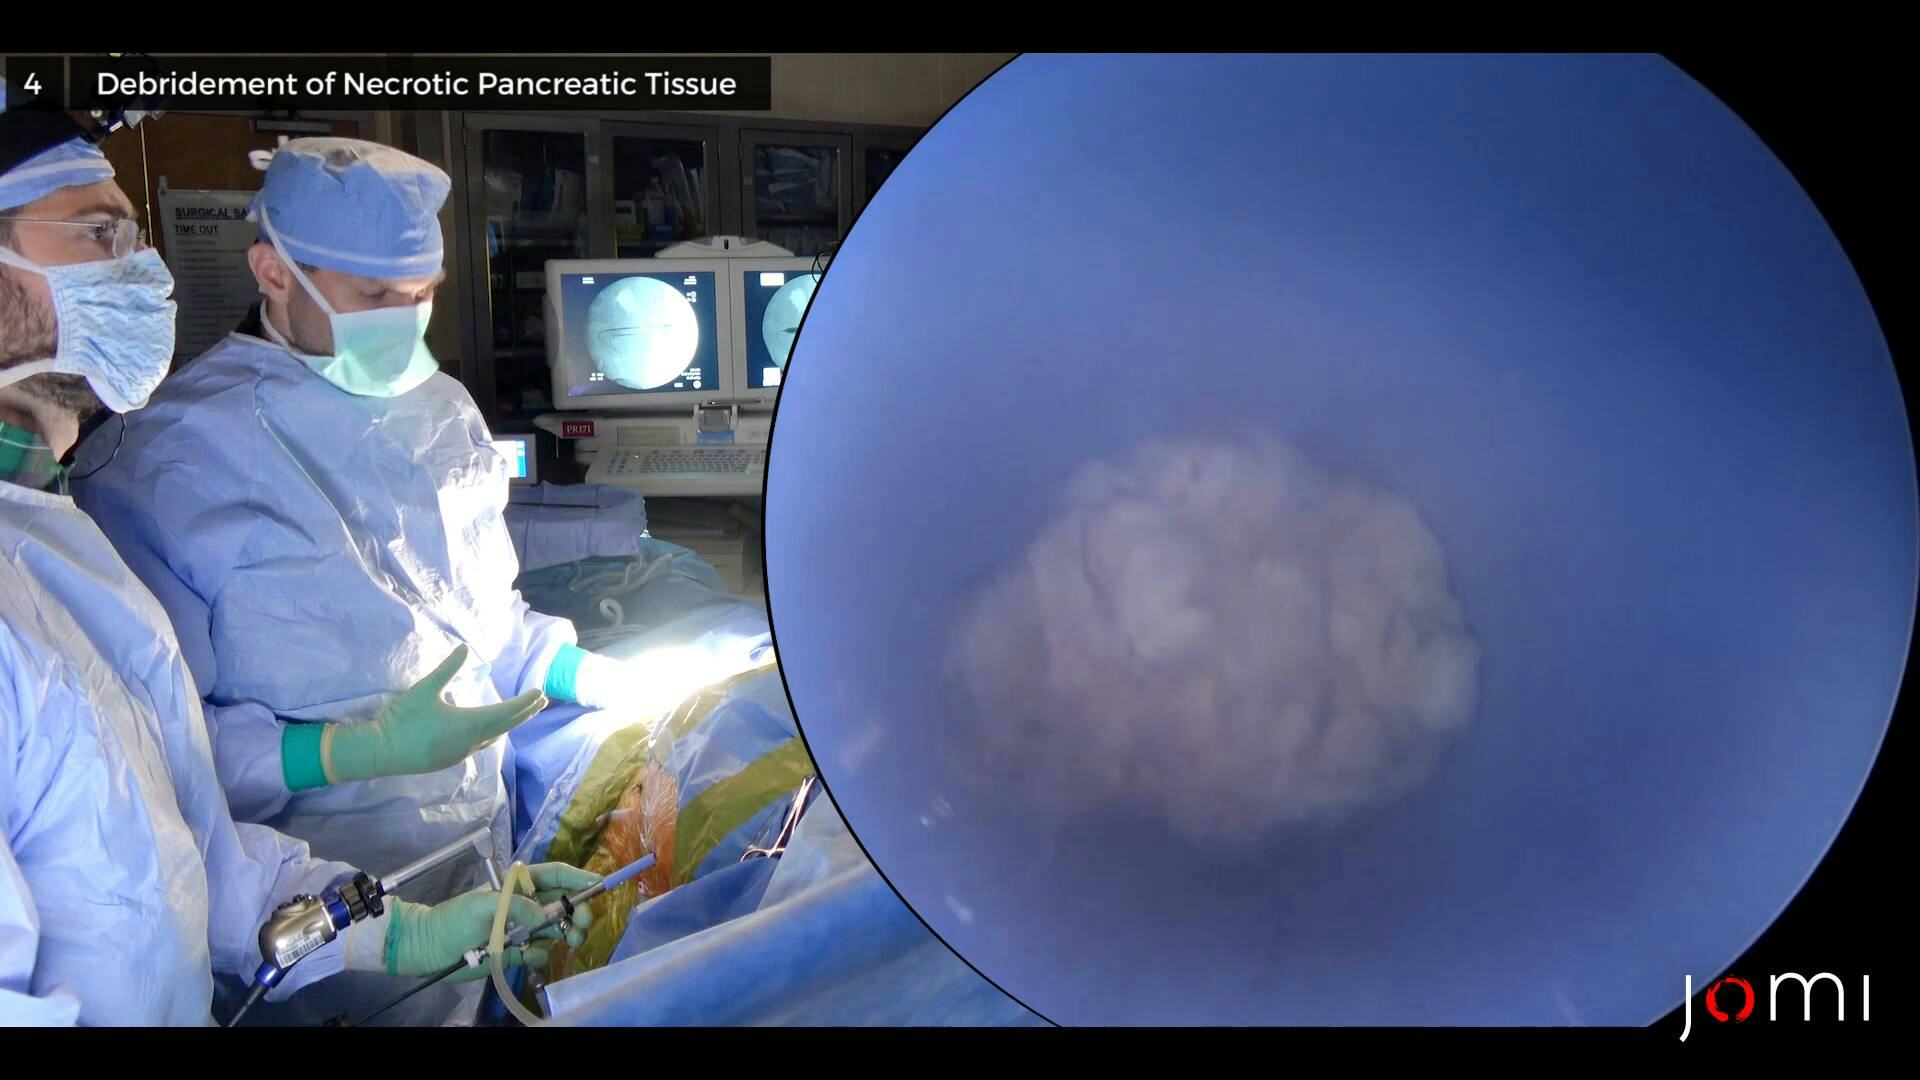
CHAPTER 4
And I'll take the duckbill for starters. You got it. And then this is how we debride. Yep, just take it all the way out. And then, you know, I'll sort of show you how this goes. Yanek, get a little space, and then basically we can go to town. This does not - okay. And then just grab like a little sponge. So you really just want to only take like truly loose tissue, and at the very beginning it can be really hard to tell what's what, but these are the kinds of chunks we can pick out. As you start to develop a little bit of a cavity, and there's like more space, and you can see like what's loose and what's not, then you can be a little bit more aggressive, but especially early on where you just don't know where the walls are, it's just these little ticks, and it starts to get really tempting to try to get bigger and bigger pieces, but especially at the start, just - just get going with these little nips. And I promise you the view gets a lot better relatively quickly. And part of the reason is, you know, you're in a small space now. If you get any oozing or debris it just gets very cloudy in a hurry. When you go in you want to always keep the instrument retracted beyond the tip. So you don't want to go in like this because you're just going to be plunging into the cavity. So have it inside, get to the tip, look for what you want, and then extend the grasper. If you grab - I mean, this is not happening now, but occasionally you'll grab something and you'll kind of pull on it and it just won't come, just let go. Yeah. And one of the keys to this is having waited a long time. You know, he's 8 weeks out, so the stuff that is dead should really come pretty easily at this point. The stuff that is not should separate off it relatively completely. And you can almost see here - I mean, I'm looking for it - but there's some like granulation-looking-y tissue on the top left there. That's probably - that's viable cavity wall or drain tract. You want to focus on this stuff. That's necrotic. That's, you know, a little red. The biggest issue with, you know - I've never had sort of intraoperative bleeding, you know, that you would worry about from a blood loss perspective, but because you're in such a tight space even a little bit of oozing can really hurt your visualization. It just swirls in the irrigant. And so - one little trick for that, which I assume we'll try at some point, I call it Chen technique after Yifei, is: you can just go dry, you can just turn off the irrigation, and you just have to - we'd have to roll them towards us so any fluid drained out. Like right now, right, we're just under water so you have to continuously irrigate. But if you tip it towards us you can actually see necrosis. And it's dry, and if there's a little bit of oozing, it'll just pool at the bottom instead of swirling in the irrigant and causing a bunch of trouble. So, this is it. Pretty tedious. Once you've done it a bunch, we usually take 15-minute turns, but - Okay. So that's a little cavity wall. Yeah, definitely. And so, now you can at least get sort of a feeling of space a little bit - here. Yeah, this is not really pancreatic necrosis, it's all peripancreatic, and so - it's usually, I don't know - you don't get quite the same really nice, juicy chunks that you typically get when you get like pieces of dead pancreas. But you know, he had this traumatic injury, it leaked, and - I mean, you saw the scans, his pancreas looks basically fine. And this is adjacent tissue, which is usually just fat. See, we're now driving around in kind of 20,000 Leagues Under the Sea mode here. And you can get now a little bit more of a feel of space, right? That, I would say, is oozing of the annoying sort, but not the dangerous sort. If you're ever wondering like, hmm, is that a problem? I mean, just remember, we're in this minuscule, highly magnified space. If you can see you don't have like high-volume bleeding, if you have 20 ml or whatever, this - this'll be absolutely full of blood, but… I'm just trying to tease this off the walls a little. Usually you go through this phase where at the beginning you're just buried in glop, you can't see anything, and you're kind of like, what's going on here? Maybe I should've used a different technique, this sucks. You kind of learn not to worry about that phase anymore. Then you get to a period where you start to get a feel for some kind of cavity, and you're like, okay, like now, I'm on easy street. I'm just chunking it out. There we go. And then you get to a point at the end where you're kind of like, you're close to the borders, you're on the walls, you maybe like make a few things ooze, before you realize that perfect is the enemy of good. That's a decent chunk. And then you stop. Okay, so I'm leaving a little bit anteriorly now. The little Babcock can often get you bigger chunks, but it almost reaches beyond what you can see, so you have to be in a little more open space before I'm like comfortable using it. You know, here we're just nipping like what we can see protruding. If you imagine with the Babcock, if you know you've got necrosis here and you know that it's safe beyond it, you can kind of get behind it and pull out bigger pieces, but - because - we don't know where the walls of the cavity are here, I think it's- it's not quite time. This is it. Can you roll him towards us, please? So we're going to tip him towards us, so we have the option of just debriding this dry a little bit. See how that works? You just literally tip it down and empty it out. Yep, it's good. Little bit more. Little bit more. That's good. So - Yeah, I think it's going to be useful for this. Maybe. So this is without irrigation, and again, when it's cloudy sometimes I think this is helpful. What the irrigation does give you is it will distend the cavity a little bit and it will, you know, clear debris. The downside is sometimes you get this - all this swirling particulate matter or a little bit of ooze, and you just can't see what's going on. And this is I think a little more characteristic of peripancreatic necrosis. It's - you get a lot of mush, not as many big chunks. It's a little less satisfying. The lower drain I think is going to be - I don't know, even less satisfying. Not much cavity, but I think we'll see just a lot of like cobwebs that hopefully if we clear out it'll just drain a little bit better. All right, you got the idea? Yes. All right. I'll let you go to it for a little while. Easiest way to hold it is like this. And then - there you go. Okay. And then when you - yeah, and then your thumb can control the irrigation, which - mostly I leave on. Yeah, so go ahead and flip it on. And again don't keep it out front when you go in. Especially your first couple times when you kind of get your bearings. Just go in, find the end of the sheath, look around. Okay. Yep, yep. Grab that white stuff that's flapping in the breeze. Yeah that's the other thing the irrigation gives you, so it distends the cavity, clears out debris, also it kind of will show you when you see that stuff fluttering you know that's not really very adherent, so. And you need to reach out a little bit, until your instrument's a centimeter or so ahead of the tip you actually can't see it, so yeah. Yeah, there's pretty straightforward geometry to this one. You know, it's basically a ball. Sometimes you'll get like a narrow isthmus and a dumbbell-shaped collection and that kind of thing and you have to pay a lot more attention to - I don't know, creating a map in your mind. Here you're just going to get in and then basically look around until you've gotten everything that you can see. Yeah, just get this - pull back. Just this loose stuff right here for starters. Yep. Tease at it, it's sort of enmeshed with more viable-looking stuff. Just see if that'll come easily. The one nice thing about this cavity is we're not in the pancreatic bed, we're not like dissecting the splenic artery, you know, sometimes you're just right on t- you know, you'll see the whole cavity pulsating, you know, you may or may not be able to make out the actual artery, sometimes you can. This is, you know, relatively lower-priced real estate, where this is. Yeah, I would pick at it - I mean, this actually doesn't excite me that much except - except that, you know, we know what his scan looks like, we have not removed a lot of debris from here, and we know he's got like a 7-cm necrotic cavity. I think a lot of what we're seeing holding, you know, gunk on scan, is this stuff, so I would pick at it, just the little flappers. You know, you want to avoid granulation tissue here. You want to avoid granulation tissue over here, just take the loose stuff. And then you know, once you've sort of picked at everything that seems obvious we can go back, take another look at the scan and kind of see, is there an area we need to pursue? But this is a pretty round collection so it's not like there's a lot of hidden pockets that we need to navigate into. And if you find like, oh, this stuff is getting in my way, you can actually just advance the sheath in there and try to like jail out the viable tissue, see if that helps. But yeah, that stuff up higher - yep, good. Yep, good. You can even re-grab it while you're right there, just - just make sure you're not picking up the wall below it. Good. Yeah, there's definitely some more up there. Yep, so it's kind of anterior, up here. Right, there you go. Yep. Grab it. Yep. Just remember the angle - so when you go in you just - go right back to the same spot. Yep. Good, you know there's a little viable stuff under you, but there's plenty of necrosis up here. You can tell when you grab that that there's a decent amount of it behind there. Do you have the Babcock? Yeah. Yeah, I think so. So, this is the other instrument we use a lot for this, it's a Babcock-shaped retractor. Let me go in after this for one sec. Yep, just pull it all the way out. And I think - yeah. So when you look up here - a lot of bubbles, but you get some - probably some slightly larger chunks. Yeah. You want to get the - there you go. If you can get it to bulge into the sheath like that, then - you know, you can feel a little bit better, I think, about how loose it is. And now - just making like multiple small bites here. See what it looks like dry. Yeah, so this is typ- much more typical peripancreatic necrosis, it's just like boogers, you know, it doesn't come out in big pieces, you're almost turning it into a slurry. Yeah. We almost never use it, although I wonder if like power irrigating this would be better than gravity irrigating it. Yeah, and so - when we're looking up right now - it tends to trap air, so looking up is nice for working dry, but if we're getting annoyed by that, you know, we'd want to tip him back the other way - to work with the continuous irrigation. So yeah, I mean this - definitely a lot of what we're seeing on CT is just this, yeah, it just holds air, doesn't come out the drain, right, his drain's been very low-output, but it kind of looks like this, what was in it. Would you ever try a Kittner for like soft stuff, to...? A Kittner... like a peanut? Yeah. Um - that one hasn't crossed my mind, I mean, you can just kind of like even without grabbing it, just poke it and break it up and definitely - on something like here, right, I just sort of mashed it, and now with irrigation a lot of it's just going to flow out. Decent chunk there, yeah. You can - if the consistency of the stuff is just right you can actually - you'd be shocked at how big the sort of biggest things you can pull out - I mean I've pulled out like 15-cm long, like, sausages that look actually wider than the sheath. They sort of compress into the sheath and then spring out. That's rare, but it's great. But it - yeah. All right, into some - material here. And it's almost like the more you get, the more you get, because, you know, once we chew away at whatever looks easy here, you know, a couple of larger-than-prior chunks, you know, then the cavity will look that much bigger and you get that much of a clearer view of like what's takeable. And now we're starting to see some granulation back here, right? So that little pocket looks pretty mined. Let me just - let's take a look dry for just a second. Yep, a bunch of sludge off the bottom. All right, so I just - I kind of go back and forth between the two. Sometimes you can't go dry depending on your angle. The dry angle's really downward. Now, like, this seems pretty obvious, right? It wasn't quite as obvious a second ago, and now we can pull out these chunks. There we go. All right, obviously dead. Yeah, so now you can actually get a feel, right? There's a bunch of stuff here like all along this whole left side, probably some more. And actually - you ever scuba dive? Yes. You know, the more particulate matter is in the water, the less far you can see, I mean here you can't even actually see through the whole thing. So just keep working on all of this. You can go back - this looks a little filmier. Some of this - that's - that's, yeah, that's probably a little chunkier, so you might want to keep with the Babcock, but if you want to go back to the duckbill. And, you know, this is just - just take a little footage, I mean this just - if you think about what this looked like when we started, right, it was just - we were just sitting in muck, there was no sense of space or a cavity at all, and now just by like sort of chipping away, probably here we're back into drain - we're probably back into drain tract here. But down at the end, you know, we're now in a nice round cavity, and you have - you can sort of appreciate the borders. That's definitely where the action remains. And now it gets a little easier to know where to go. All right, go for it, yep. You know, now you can see it. And this is the whole arc of this procedure, almost always, is, you know, I can't see anything, am I really getting it? These pieces are so small. Then, you know, usually you should get to this point where you're like, ah! I see a cavity, I can tell what's what. It's now clear what needs to come out and what can stay. Yeah. Yeah, might not want to go crazy on that. You can pull back a little - yeah, there you go. Show yourself where it's flopping down there. Yeah, I mean that's granulation, right? You don't want to touch any of that pink stuff. Yeah, but these little scraps, right, they're flopping into your port, that's always a nice sign. There may be a little more - even more, you know, cephalad. Or anterior, I should say, not really cephalad. Yep. Yep. Yep, that's stuff I would pick at a little. Can you now roll him away from us? So this - we'll just get rid of this air bubble issue, which is annoying. This looks great. Yeah. I think it's - I think it's done. I don't really s- oh, might be a little - something back here. This is more like attending-level cavity probing, so… Yeah, definitely a little bit back here. Comes a little bit from the scan too, we know there's this little tract that kind of runs down from the inferomedial aspect. When we think we're all done, we'll go give the scan a last look, but that's - I think that's where we are here, so I kind of know to look in this area. So even though this is just mush, and we're not getting a lot of big chunks like that - I mean, sometimes you'll get like chunk after chunk of that - the nice thing is, it is separating pretty easily and not having a lot of heart-stopping like jerks off the cavity wall. So there's that little pocket that I think we've now excavated pretty nicely. That looks like mucosa, so that's probably the fistula. Oh, wow. So this is good for video, but we know there's an enteric fistula into this cavity, so that's… Did you see the...? Yeah, yeah. So that's cool. That tells you it's the end, also, right? Once you've gotten all the way to the fistula, you've probably cleaned that out. Looks pretty clean up here. All right. I think we're pretty good. And you don't have to go trying to jerk all this stuff off, that's probably a recipe for oozing. Okay, so, we are going to need fluoro back. Fluoro. So, I think we're done with this cavity, so we're going to ask - if we could call for fluoro, we'll put the drain back in here and we'll redilate this lower one, which should not take as long.
CHAPTER 5
So once we get fluoro back here, we'll just use the Thal wire - we'll push it in through the scope that way you can just sort of see it, and we'll verify under fluoro, like, okay, I like where it is. So we - is there anyone in the room without lead? No? Okay. So, if we can - let me just X-ray here. Let's see the scope. Um - hm. There we are. Okay, so - can you come a little bit more towards me? Little bit more towards me and higher. Towards the head, yeah, right in there. Okay. That should be good. And just grab a Kelly, I just want to see if we're seeing… Let's see where we are here. Good. Okay. And so, now we can use sort of a combo of these two. This is basically where we want - where we want the drain to end, in the meat of the cavity here. So go ahead and take that drain and just feed it right through the back of the scope. Thread that wire. Yep. And then just watch up on the screen, it'll come out. Go ahead and just… Right there? Yeah, just park it in the cavity there. And then we'll see what that looks like fluoroscopically. Yeah, I might curl it up a little bit there, just so we don't lose purchase. Okay, and now I want to take the scope out while fluoro-ing to make sure we don't lose wire position. And then grab the wire up close, right at the sheath. Okay. Let me give you that little cheater back. Turn off the irrigation. Keep the wire. Turn off the light. And now we can - same thing with the sheath, we just want to back the sheath out, making sure we have the same - wire position. All right, got that at the skin, good. And now we'll take the Thal - I don't think we need side holes, this is not a long cavity and there's not much left, so we'll just basically try to coil this up. This is a Thal catheter, T-H-A-L, or it's actually Thal-Quick, but they're like Lewis and Clark, you know, it's uh - Lewis is much more famous, Thal is much more famous than Quick. Um - And so we're just going to advance this over the wire until it's curled at the cavity, side holes end here, and when this internal stiffener comes out, it'll pigtail up a little bit. So there we go. And now I'm going to back out the stiffener because - I don't want to poke it into the cavity wall. And you can see it sort of curl. And then if you can just grab the stiffener all the way out. And then get the wire. And I like that position. And we are at about 8 cm, so that's - pretty similar to our pre-op position. So, yeah, we can take the wire out. And now we're just going to sew in this drain like any other drain.
CHAPTER 6
So, just grab a 0 silk. Yeah, just 2 drain stitches. And then if we can keep you, we're going to - we're going to, once this is sewn in, we're going to dilate and debride the lower one. And actually, one thing that we can do - we can shoot a quick drain study just to demonstrate that enteric fistula. I think that'll be small bowel. And if you have a suture scis to me? And yeah, try to snug it up, because the drain is - you know, you want to partially, you know, sort of close the skin. Yeah, because the drain's a little bit smaller than - than the opening. Just by way of perspective, you know, not that long ago, this would either be god knows how many more months of percutaneous drainage or a laparotomy. You know like, when I was a resident, that's - that's it. That's - those were the ways we would deal with it, so even though it's kind of tedious to pick these little chunks out, it's a better way to - better way to go. Any drain worth having is worth sewing in twice. So usually in the OR, I'll just put like Foley catheter bags - drainage bags on here. When there's a lot of necrosis, and I'm like going to debride - I know I left some behind, and I'm going to be irrigating with an eye towards like re-debriding - then I never use like a 3-way stopcock because you got this tiny little aperture on it, and I don't think you can break stuff up as well. This is clean. I mean really the thing that's going to determine how long this drain is in now, for him, is the enteric fistula. And now that there's not so much solid gunk between the drain and the fistula, we might see like bilious output that, you know, we didn't really see before. But it's amazing how quickly those close. Yeah, I mean the other option - if it doesn't close quickly, is like an Ovesco clip, like an over-the-scope bear claw. Dave Forcioni has put a couple of those - at least one I can remember in this setting, and you never really know if it's needed because - a lot of them will close anyway, but…
CHAPTER 7
So now if we can take the Christmas tree adapter and then the 35 cc syringe with con - full of contrast. And we'll just do a little drain study. This is optional, but it defines the sort of radiographic anatomy of the cavity a little bit. And we may want to refill after this. Okay. Is there anyone without lead? No. Okay. Here we - here we go. Okay. Here we go. Yep. Right into the small bowel. So that's it, but there's no - there's really no cavity, so - great. No surprise. No, it just - it's right next to it, so there's nothing in between them so it just fills immediately. Yeah. Yeah. Yeah. So you can back it out relatively soon, but - you just want a little space for that - a little time for that cavity to collapse around it. All right. So I'll give you that for now. And let's - let's come on down.
CHAPTER 8
So we're going to use the - we're going to use the Amplatz, the dilating balloon, all of that stuff again. And - actually, let's try, like, there. Why don't you put a - put your - some instrument up to it. Okay. Come towards us a little bit, please? Okay. Good. And - do you have that Christmas tree again? I might just inject this and - and the contrast. This doesn't seal that well, but - we can - nah, that's not gonna seal it all. This - this might work. Here, let me - Yeah, that'll - that'll work. Get an idea of where we're going here. Okay. Can you come - come up a little bit for us? Yeah, it's really feeling that space. Okay, before we do this, let's take another look at the scan. Yep, keep going. Same direction, keep going. Okay, so it's really this. Yeah. And we're seeing that fill. And then come back a couple clicks, the other direction - okay, right there. Another couple clicks back where you were. Yeah. All right. You know what? This is not insignificant. I was kind of blowing this one off, but - and then if you click over here on axials and then just scroll down. The reason I was like, I want to come over and look, is it looked bigger on fluoro than I kind of remembered, but - it all lines up. Keep on coming. So that's what we already debrided. And that's probably the point of fistula to the small bowel. And then here's the drain that we're going to go through. Okay. Come down a couple - actually, can you click where it says six, just to make those things go away, and then come down a few more. Okay. And then can you - if you hover up here, see the ruler? Click on the ruler. Click one end on the skin and then hold down and pull it to like there. Maybe like there, right under my finger. Back - yeah, right there. Okay. All right. What's that say? 8. 79 mm, so… All right, good. Back to action. Yeah, so it's just that one. I think - yeah, I think that - that'll leave you with a tail. And then - and then nick the skin. I think you need just - probably a tiny bit bigger to get the sheath in there. Yeah. And then we'll take the - Always use this as the superior guide, right? Well, it doesn't really matter for this - this is just skin, you know, It's a little different if you're doing a VARD, and you need to dissect down, but… Yeah. That should - that probably will do it. And then we'll take the Amplatz back. Make sure we still like where we are. Yeah. I might need the cheater. Yeah. Okay, so feed the wire in again. Right there, yeah - you're at the end of the drain, so that's probably good. Let me just… Yep, all right, so that's what we got. So, now - you can take the holder off. Or I can do all that for you. I'm going to give you the wire holder in a second here, Andrew. Just pull that all the way off, I'll give you the cheater. So this is low stakes in someone who's had drains in for a long time, but - I did lose one with Sarah Deary where we had to call OSH. Okay. Now go ahead and back the drain out. And we want to do this under fluoro to make sure the wire doesn't come with it. It's very easy to take the wire with you. You want the 20 drain for the lower...? Yeah. Yeah, that's what we'll use ultimately. The wire. Okay. And then we'll take the dilating balloon and sheath back. Okay, so - same as last time. All right, so I have wire behind you now. Do you have wire? Yep, yeah, and then you've got to look at the scope, yep, there you go. Start to - yep, that's probably good. Yeah, that's good. No, I mean you're easily, you know, you're easily over the wire to there. You'll see this is a little - you know, this will feel a little bit different. Now I'll take the inflation device, please. Muscle pop and push? Yeah, you'll feel, you know, a little - you should slide through skin, then you'll feel like a little bit of pop in the abdominal wall. That's - and then it should release in the cavity. You should feel like - not that it's like, there's resistance and it stays there, you should feel like - you know, there should really be a pop and then stop. So you can do the inflation if you want, since you haven't done it, so… Go ahead, take it - I'll hold this. So push in on the yellow, and now - and then that releases the handle. And then push in on the handle. Right, and then see on the screen how bent it is? You're going to have to… And then let go with yellow. Yep. And now tighten it. To 20? Yeah. And you'll see the bend will kind of come out. Yep, that's okay. Oh, you're - you didn't have enough contrast, basically. So here I can - so if you need to take it off, you just lock it. Whoops, sorry. That shouldn't do - oh, that's coming from your end. Sorry. Release that. Now we lock it. Good. And just refill. Yep. Through here? Yeah, put it on the end. Okay. Go ahead. Inject. Squeeze. Yep. Let go - twist. Twist it. Yep, good, should straighten out a bit. 10. 18. Okay. Yep. Keep going to 20? Yep, go for it. So this may be a little - little bit tricky because obviously all this stuff is rigid, and this track is a little curvy. 20. So, why don't you go ahead and try it. If it feels weird or you get a lot of resistance, I can do this one because it's a little less straightforward, but that's good. And then you - without forcing the balloon in, you want to negotiate that bend a little bit. So I'm almost pulling back on the balloon a little bit. There we go. And so… Let's see how that looks. So now we can take the balloon down. Yep, we'll want to keep the wire for this one because obviously it's sort of a - it's a little bit of a less straightforward access. Okay. We'll make sure we're down. Yep. Okay, so this will come back over the wire. Again, I'm making sure I'm keeping the wire. Now lock the wire down. Don't worry so much about the sheath, that won't really come out. There's your inflation device. Okay. We'll get the balloon all the way back, you can just grab the balloon, Andrew, just slide it all the way off. Okay. And then why don't we just bring the wire - let's put you in between Yanek and Andrew. You can just slide right in there. Yep. And - could we back out the fluoro just a little bit? I think we're going to be done with it. That's a kink. Yeah, that's a bend, and - don't lever it, once the scope's in, you can lever. Yep, there you go. All right, go ahead. Looks bloody. Irrigate it a little? Yep, turn it on. Let's see what we got here. Okay, let me drive around here, because - this is a little - it's a little bit unusual, but I think we'll get into it here. Yeah. Yeah, good. I mean, we're in the cavity, such as it is. You drive this way and up, right? Yep. Okay, we can take the - we can take the wire out. If you can take the wire holder and reload.
CHAPTER 9
All right, could we have the duckbill, Andrew? Looks - you know, this looked a little more phlegmonous on - I would say, on imaging, and actually as we're in here, I sort of feel the same way about it. You know what I mean? Not a lot of necrosis in here. It's just a big - it's a big cavity, but not a lot of contents. All right, this whole space is what we were seeing fill under fluoro. And I'm actually way beyond the sheath here, right? There's - there's the sheath. And then if I take the angle I can drive - way up here. But it looks pretty clean. This might be something where - no, no. I mean I didn't think it would be. Eh… I actually wonder how much of this was essentially run down from above, you know what I mean? And - we can like stand here for 10 minutes and look around and break up cobwebs and - run a couple liters through it, you know? But I don't think we have a lot to debride here. I think this is the angle, right? Not much to do here. This is what you were looking at, I agree that that's fat, but - jeez, it doesn't get me super excited. Let me see if - if we get the sheath up there, does it look - a little more like something that wants to be debrided? Not really. I mean - this is the only thing I can see, but it doesn't really look like… Does that drain work? Yeah, I mean it was putting out some sort of - purulent stuff, but I don't have a hard time envisioning that from here. So there's no real necrosis in this one, which is kind of why we started with the other - I didn't think there would be a lot. It's a reasonably big space, but there's nothing to debride in here, I don't think, so… So, we can use the Thal - the Thal wire next for this one. Should we just - just redrain it and call it a day? And so we'll do the same thing, we'll put the 20 French in, we'll suture it in, and then we'll do another drain injection. So we're probably like 15 minutes, and - yeah, well - we can put the wire in through the scope. Yeah, just... Yep, yep. Okay. Sounds good. And you will want lead again.
CHAPTER 10
And go ahead and just - let's see if we can get a - get a view. Ed, we're going to make you glow in the dark soon. Yeah, just - want to just park it up there? Pull back. Cephalad. Yeah. Yeah. I think we'll just park it up there. Can we come back in now with the C-Arm? All right. Ready? Is anyone in the room without lead? Okay, good. Yeah, we're definitely deeper. The other question is whether we want additional side holes on the drain. I don't think we really need it. You want - you want to cut a couple? I mean they were only in to 5 before. The side holes look like, i'm thinking - 1, 2, 3 - up to the 4th tickmark of the scope and the tip. Yeah. How - most of the side holes will be in the... Yeah, the question is whether there's enough space for it to - it may not pigtail. It wasn't really pigtailed before when they had it in there, and then it's a small cavity, it tends not to curl up as much. Let me cut like 2. So I'm just going to cut some extra side holes in the drain so it drains the whole way into the cavity. All right. Go for it. Is this easier with the water on or off? Well, if you want to see, you need the - you need the irrigation, so… So you can pull back a little so you can see - yep. See the wire go into that space. Good. Okay. Let's see - yep. All right. So that fits. So, let me give you the holder back, Andrew. Now you can turn off the irrigation. And basically now you just want to back the scope out, keeping the wire where it is. All right. You have the wire? Yep. Okay, I'll take the scope then. I'm going to give you the little cheater, in case we - we shouldn't need that again, but… Okay. Turn this off. Yep, yep. It's minimal, it's - it's like an IR drain upsize - so we'll give him some local in each of these, and it should be pretty minimal. Sheath out? Yep, so just again, make sure you don't take the wire with you. Toradol is okay with you? What's that? Toradol. Toradol? Yeah, Toradol's fine. Yep. Okay. Then - I got the wire, if you want to load it on, and then you can control it. Okay, I have the wire back here. In you go. Okay, that's pretty - so you're off the screen, right? You're way beyond where you had the wire so you're probably poking with that pointy thing. Yeah, there you go. That's a little more like it. So once you're kinda in here, now, you can see where the wire bends over, that's probably sort of the top of the cavity so you want to go ahead and take out the stiffener. Yeah, and see we're only in to like 5 cm, our side holes are going to be out at this rate, but go ahead and take out the stiffener. It's that whole white thing. Yeah, and now - now is when it may pigtail for us, it should be softer. Okay, yeah, we're in to more like 8, so it should be okay. Okay, and then go ahead and take the wire out. Just resheath it in case we want to do any - and can I come a little bit up towards the head with the C-Arm? Thank you. Okay. That looks pretty good. And let's do a - let's do a drain injection here.
CHAPTER 11
Christmas tree. I think it's going to look pretty similar. We're going to inject, and then I may bring you up towards the head just so we can see how it - how and if it connects with the upper cavity. All right, anyone without lead? No. Okay, here we go. Yeah. So, I think that's connecting up here into - not sure. Not super freely, anyway, but… Okay. But I mean, I think this cavity's well - well-drained by this drain, so, good. All right. We'll just take the silk, and… You got it.
CHAPTER 12
So - this guy, who could be "diet as tolerated," like, treat him like a guy who came in for an IR procedure. Okay. And, you know, he could potentially go home as early as tomorrow. Yeah. And I think we got it all, so I don't think we need to - I think, you know, I'd probably plan to see him - I think I'm in clinic the 18th? I don't know if that's long enough, but - we'll pick a day. Basically have him come back with a CT drain injection, and hopefully get at least one of them out on that day. All right? All right. All right. Yeah, so I'd just put Foley bags on now. Before he goes, we can get him the nice IR setup with a stopcock. I have no problem with a stopcock for this because I don't think there's really any necrosis left. All right. We'll be done in like a couple minutes. And then you can take the C-Arm out. We are totally done. Thank you. What do we use these for, Peter? Are they just to, like, funnel water? So when they put those in in IR and they stick them with a needle, those are the dilators they use for the drain, but since we already have the balloon in and a big hole, we don't - we don't use them. Before I discovered this technique, I was using those dilators and then working my way up to a laparoscopic port, but the problem is that, the ports, they don't go in that smoothly. No, certainly not. They - you know, they're all like, kind of ribbed to hold them in place, but going in it's like, tear, tear, tear, tear! You know? It'd be very interesting to see - I think you'll be surprised that even from the start there may not be a lot of enteric contents from here.
CHAPTER 13
So, we just finished this sinus tract endoscopy debridement. It went well. It's edited, but the operative time's around 2 hours. And hopefully it's pretty obvious just from seeing that and comparing that to other debridement options that it's, you know, very minimally invasive, and that's the main advantage. A couple things to notice: if you refer back to the preoperative CT scan, the upper collection was the bulk of the necrosis, and I think you could see we debrided that completely, and you get all the way back to granulation tissue, all the way around. If you're going to do these procedures, I think you'll also see that when you first start, there's just this - you're - there's no real sense of a cavity, you're just really stuck in a pile of necrosis, and you just need to - the lesson is you just need to persist a little bit and be careful and excavate a little space. And then once you're sort of midway through the procedure you should have a pretty clear sense of where the cavity begins and ends, and how much debridement to do. In this case you could actually see the enteric fistula, so we knew from preoperative radiology that he had fistulae to his small bowel and his stomach, and you could actually see the villi of probably what was the - well, what definitely was the small intestinal connection. We could see that on our fluoroscopic drain injection at the end. One important note for these: these enteric fistulae are not uncommon in patients with long-standing necrotic collections from pancreatitis or from any kind of pancreatic leak. The pancreatic juice will just erode into adjacent structures, and one thing that's important is, you do not need to treat them directly, you do not need to do a laparotomy, you do not need to do a bowel resection. If you can just debride the necrotic cavity, in the vast, vast majority of times, that fistula will close as the cavity collapses and scars down. So you can still treat them by these minimally invasive means even if you see fistulas to the small bowel or colon.