Middle Fossa Approach to Repair Cerebrospinal Fluid Leak
Transcription
PATIENT INTRODUCTION
This patient is a 57-year-old female, who presented with a complaint of fullness and hearing loss in the left ear. On examination she was found to have a middle ear effusion. She underwent a myringotomy with tube placement and subsequently had persistent drainage of clear watery fluid from the left ear canal. She was treated with multiple antibiotics and different topical preparations without improvement, and as a result of the persistence of her symptoms, she had a CT of the temporal bone performed, which revealed a defect in the tegmen overlying the mastoid of the left ear, and consistent with probable CSF leakage into the middle ear and mastoid. And so she presents today down to undergo a middle fossa craniotomy and closure of her CSF leak with a repair of the tegmen from above.
CHAPTER 1
So we're going to start to with a slightly lazy-S-type incision beginning just in front of the ear and right above the tragel area. And we're going to carry this superiorly above the ear and in a vertical line, which is tangential to the external auditory canal, which is - will put us in a good location for getting to the area of the tegmen above the mastoid and middle ear space. Self-retaining retractor. So with my first incision, I've carried this down through the subcutaneous layer to the level of the temporalis fascia. We’ll harvest a fairly large graft of temporalis fascia to divide into two pieces, which we’ll use this to cover the tegmen over the area of the leak. Bipolar please. The superficial temporal vessels are in this region anterior to the ear, so we have to watch out for those. Oftentimes we will end up taking the superficial temporal artery. There is the vein. 15 blade.
And now I'm going to continue this dissection a little bit deeper through this loose areolar connective tissue to expose the underlying temporalis fascia, and inferiorly, I want to feel the root of the zygoma. That's going to be the inferior limit of our dissection. Bovie now. And I can now feel the root of the zygoma. 15. And we’ll now undermine our flap skin flap - provide a little bit better exposure both anterior and posterior. Undermine a little bit more to provide good exposure of this temporalis fascia and the underlying bone for our craniotomy.
So now we have nice exposure of the temporal area here. This is all of our temporalis fascia. Smooth forceps and a 15 blade.
Now we're going to harvest our temporalis fascia graft, and we want a pretty nice size graft of fascia, so that we can divide it into two separate pieces to cover the area of the tegmen. I’m going to need a silastic block in just a minute. So this is our temporalis fascia graft here. You can see this is a pretty nice large size graft. And now a silastic block. And I’m going to lay this graft out on a silastic block just to clean it up and get some of these muscle fibers off the undersurface. I usually will take this graft and dehydrate it after spreading it out thin, and that way I can cut it to shape later on and it - as a dry graft, it's a little bit easier to get it in where we want it and lay it down flat before it gets too wet and starts losing its shape.
So now we have our graft all spread out and nice and thin. Okay, next we’re going to divide the temporalis muscle. Bovie please. Again, I'm going to feel where the root of the zygoma is that's the inferior extent of our dissection. We’ll start down low, and we're going to come right down to bone and bring this incision superiorly in a sort of curvilinear fashion. And I've left a little cuff of temporalis fascia on the edge of the muscle here to make it a little bit easier to re-approximate at the end of the procedure. Can I have an lempert elevator please?
And we're going to elevate this muscle anteriorly as well as posteriorly to expose the temporal cortex here. Bipolar pedal.
CHAPTER 2
Our craniotomy is typically centered approximately 2/3 anterior and 1/3 posterior to the external auditory canal. And we will demarcate where we're going to make our craniotomy site right here. For these cases, usually it’s about a 4 x 4 or 4 x 5 cm craniotomy opening - a little bit smaller than what you would use if you were doing this for say a tumor removal case. Okay - much better. Alright. Whenever you guys are ready, we'll take the drill, and I need a 10 suction irrigator.
So for craniotomy, we're going to use a just a regular drill with a cutting burr followed by a diamond burr. The other option would be to use a craniotome to raise the bone flap. Water on. And then we're going to kind of get through most of this cortical bone until we get the bone pretty thin - usually inferiorly - and anteriorly the bone tends to be a little bit thinner, and then once we're down to sort of eggshell thin bone, we’ll switch to a diamond burr.
Okay, diamond burr now - and a bulb irrigator.
And I'm going to continue going around, and I'm basically taking this bone down to the level of the dura now. We can use the diamond to kinda stop any of these small bridges - veins from bleeding.
Now we - we - nah, this will work - nah, it looks more curved, smaller - but this will work. And now we’re going to elevate with flap from the underlying dura. Okay - here’s our bone flap. She has a relatively thin skull. Bulb irrigator now and a bipolar. Want the water off? Yeah, thank you. And then we're going to go to a 7. Do you have the Fukushima suction? Bipolar. And we’ll control the dural bleeding vessels with a little bipolar cautery. And I’m going to need a Freer or a J dissector.
CHAPTER 3
Fukushima suction - actually you know what, let me keep this for just a moment in case we drill off a little bit more. A J - or a Freer.
So now I'm going to start elevating our dura, and I'm looking for the floor of the middle fossa plate. So I want to feel and actually get down, and I'm feeling - I'm touching the floor now, so there's still a little bit of bone here that we can take back to improve our exposure.
But at this point we're going to go ahead and switch over and go to the microscope. And you can see, there are little translucent areas where the bone is very thin. Can I have the drill now? And Marcetta, I'm going to have you - just with a little hand irrigator - do you have like a 20 cc syringe that we can irrigate with? I’m going to have you just drip some water in here while I irrigate. If you can just irrigate for me a little bit. Yeah that's perfect - just like that. Little bit more. This is just going to just improve our exposure a little bit more. Freer and now the drill one more time. Okay, now bipolar. That's a big suction. Bi-pole.
You can see, these are a little arachnoid granulations here. We’re going to just cauterize these little areas. That does tighten up this dura and allows it to shrink back a little bit. And now let's go back to the Freer.
And I'm going to continue now our dissection along the floor of the tegmen. Posteriorly here, you can see these little almost translucent areas where it gets very very thin, and as we dissect the dura, we want to work from posterior to anterior. So posteriorly here I'm working back towards the petrous ridge. Drill for a moment. It's okay. You don't have to drill. And I'm going to control some of this bleeding here with the drill.
Okay. And as we go back, I'm starting - there's a - there's a sizable opening right here. You can see this hole in the tegmen right over the mastoid area. It’s a relatively good-sized hole too. Continue dissecting this back towards the petrous ridge. Here I'm at the level of the ridge. And she has another small area here with a little bit of a small tiny little encephalocele going down in through there. Anteriorly, we're working - this is to - heading towards the middle meningeal artery and foramen spinosum. We’re not quite there yet, but you can see these small little diploic veins here. Bipole. Okay, good. Do you have a little bit of bone wax? Some bone wax and do you have- and a cottonoid? And now the cotton pledget. Okay. Take that. We’re going to need a 1 x 1 duragen also please.
And there is a small little area here with an encephalocele. We're going to come across that in just a moment. Can I have another cottonoid? Big - large one - largest one you have. With this kinda get that blood out of our way a little bit. Maybe actually too small. Here is where her large opening is, and this is all an encephalocele that we're seeing medially here. Bipolar. And that's where she's got her big opening. That may be. Okay, bipole. And we’re going to just cauterize this dural tissue - basically, come right across here. Big opening. Okay. Freer now.
I'm going to keep working my way back here. I'm on bone, and now we are all the way around it. Here we've come to the - another cottonoid. And I’m going to need a ruler in a minute. This is the arcuate eminence. Can you lower her head just a little bit? Yep.
So this ridge here of white bone, we're seeing, is the arcuate eminence. And you can see her defect is this area just in front - can I have some irrigation now? Bulb irrigator. And so here is our area of defect. We have a little encephalocele here, and we have a hole going into the - through the mastoid tegmen just lateral to us. This white, red bone is the arcuate eminence, so we're lateral to the arcuate eminence just overlying the mastoid area. So can I have that ruler now?
CHAPTER 4
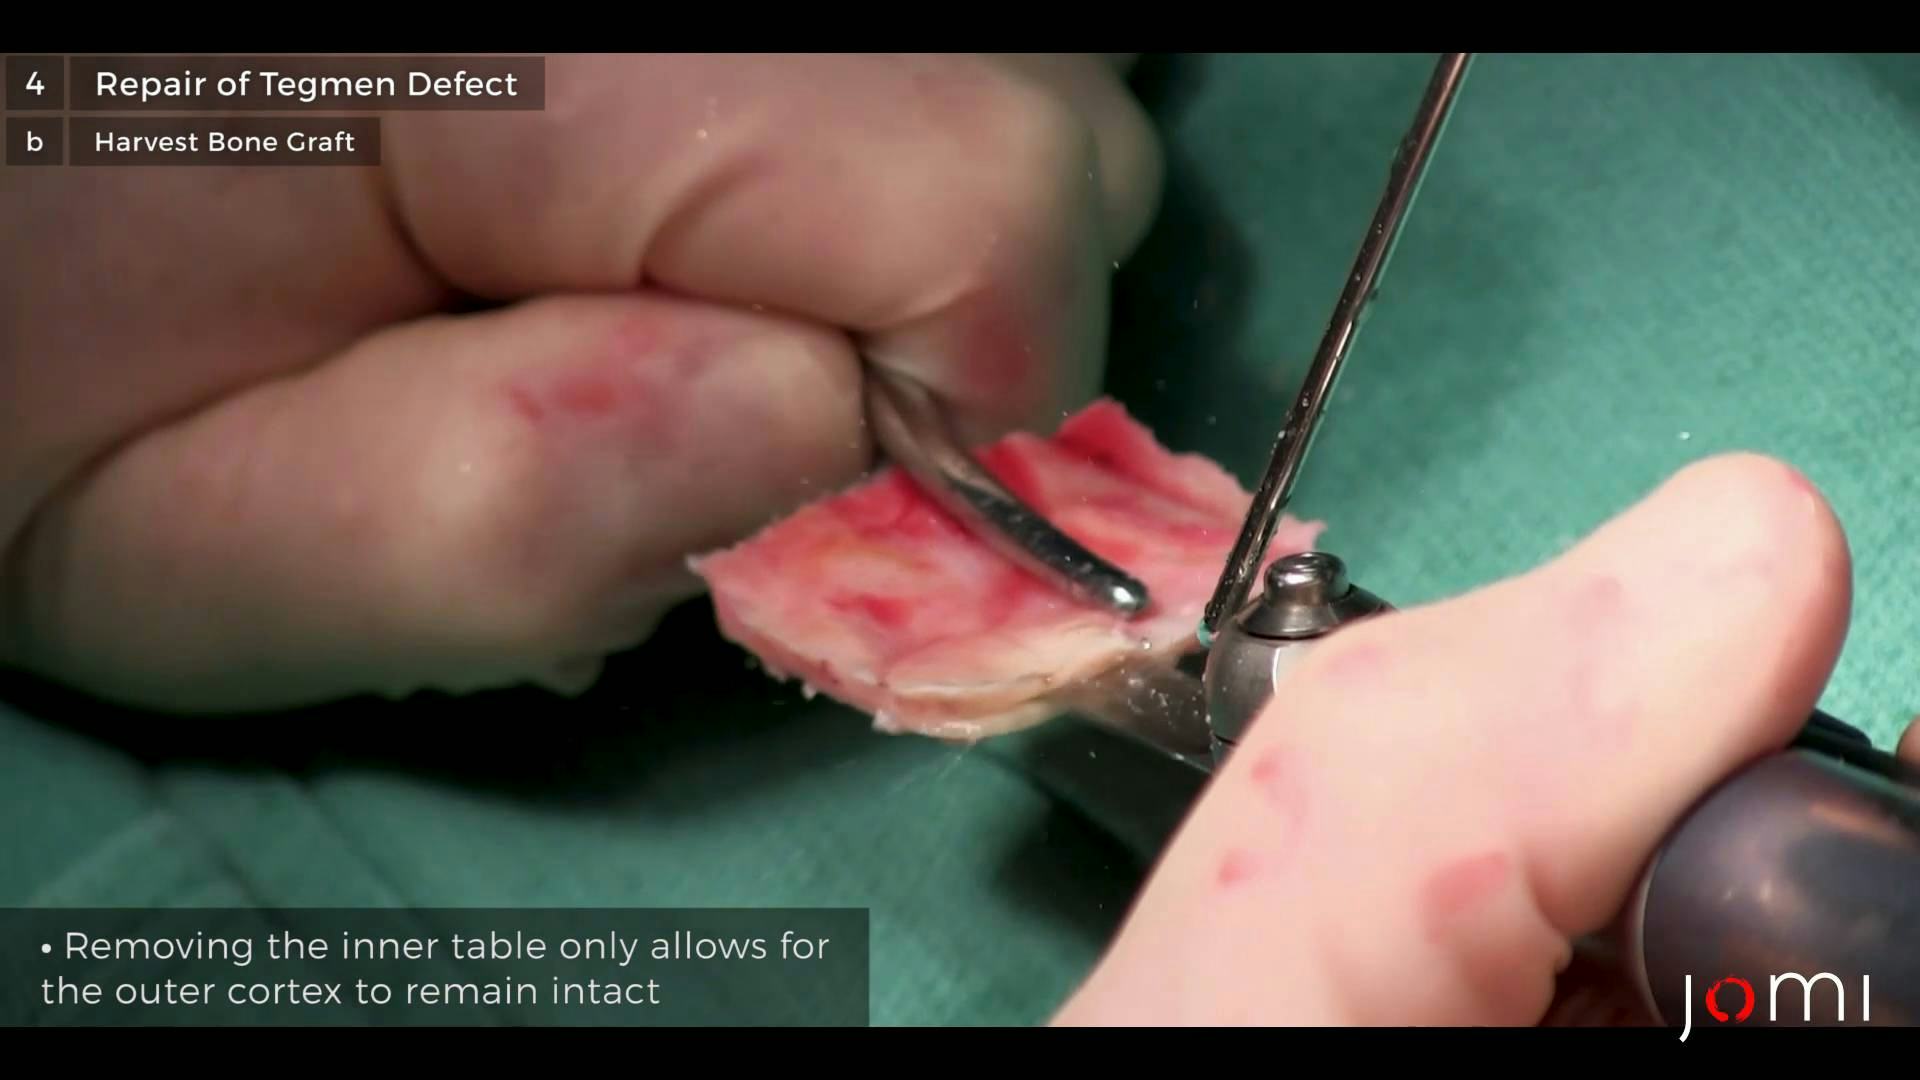
Let’s have a pair of straights - scissors - iris scissors. It’s okay, these will work. And we’re just going to cut this about 2 cm. So now I'm going to get a - I just measure just to get an idea of how long we want our bone graft to be. Okay, I'll take that - that measure now. So this is 2 cm. This defect is probably a little over a centimeter. So maybe about a centimeter and a half, a centimeter and a quarter should be good to cover this area. Okay. Let’s now have the overhead lights.
Okay, that's working. Alright, so now we're going to take a small graft from the inner table of the bone flap. She has a relatively thin skull, but if we get about a centimeter and a half, we should be good. Okay. So you want to grasp this with something like a Kelly Clamp, so it's very stable. And I'm going to have you irrigate. And so I'm going to go in and take the inner cortex of our bone flap here. More water. That’s pretty thin. I want you to come… Okay now let's have a - let's have a Freer.
So now we have our bone graft. We’ll save that. Can I have my eye shields off and a mosquito?
Now we're going to shape our graft. We want it to be smooth on all the edges, and also we’ll have to contour it a little bit for the surface of the tegmen. Mosquito and now the diamond burr. And again, I'm going to have - Marcetta if you don't mind, I'm going to have you just irrigate a little bit. More irrigation.
Okay, now let’s just check it. We’re going to go back to our surgical field. Now a GK or the bipolars. And this little graft is going to sit down in here. Maybe a little bit - still a little bit too long and too wide. Okay, bipolar for a second. Let me have that. I’m gonna need that drill back in just a moment.
Now let's have the mosquito again and the drill. We're going to shape our graft a little bit more. I'm going to kind of bevel these edges, smooth them down so when it lays flat, there's no edges - sharp edges - pointing upward into the dura. Okay.
And this tissue - this encephalocele will eventually just shrink up and get reabsorbed. And now the bipole. Okay. So our graft is going to sit… It’s still a little bit… It may actually sit better like… More like that… And that’s probably a little better.
Now the - next I need the fascia graft. And a - do you have a sponge Marcetta? Do you have like some of those Fukushima forceps - those long forceps? And some straight iris scissors. Without teeth? Yes. This has been under a drying lamp. That way we can now trim it the way we want. I'm just going to clean up some of the loose edges on it, so we don't have a lot of frayed edges that we're struggling with. Unfortunately, it got a little wet there.
And I’m now going to divide this into two pieces. One piece we we’ll put down first, and the second piece we’ll place over the bone graft to kind of secure it and sandwich it in place. Now a - those bayonet forceps.
My graft is going to lay in here like that. Just like that. Now before we put lay the graph down, first I’m going to lay a sheet of fascia down. Let's have our fascia graft. So we’ll put one layer of fashion down first. Get that laying flat in here. Can I have that little J dissector now? And can I have some irrigation? And I'm just going to wet this, so we can get it to lay down flat. J dissector. So we have a fascia graft, and we’ll spread this out - lay down, covering everything. That's our first layer. Now, can I have the bayonet? Now we're going to lay our bone graft in place. Move to this area like so.
Once this is in place, we're now going to take our second graft and just put it in the - yep, perfect. Now we're going to cover this bone graft with our second fascia graft. Can I have now a - that dissector again - actually, a little bit of irrigation? Now the J dissector. Now I'm going to advance this upper fascia graft back a little bit, so we get good coverage of the bone graft as well as the - the tegmen medial to our bone graft. And that looks very good. And that is pretty much our repair. Now, is there - do you have that duragen? So - what I’d like you to do Marcetta is take the duragen and place it in a fascia press and press it. You able to see that well, Scott? Press the whole thing flat Marcetta. And then divide it in two Marcetta - length - lengthwise with some straight scissors, and then hand me one of those pieces with a - yeah, I guess - actually like a smooth bayonet. Where’d it go? And we’ll also put a little duragen over this to kind of help support this repair.
Okay, take that. Now bayonets again. Get these out of here without pulling out everything. Okay, that’s one. And two. Okay, and that is it. Now - let’s see that other - that duragen - that other piece. I'm just going to have some scissors. What’s the time, Scott? Okay. Alright, the bone flap now. And can I have some eye shields?
CHAPTER 5
And that is our three layer repair of fascia, bone, and fascia. Can I have plates please? And I’ll take a screw. Okay. Now a screw - what’d you think? Another one. Alright, some - a little bit of pickups and a little gel foam. Now the - I just want - let’s have a - do you have a dry sponge? We’ll need to press that out. Some larger ones are good. I don't know if it matters Scott, but I tend to - I like to put a little gel foam where you've got a bigger gap in dura sitting right there, so there's just some layer between the muscle and the dura. And like I said, it probably doesn't really make a big difference but... What’s that? Yeah. Everywhere - I mean in the rest of the flap, it's pretty close - bone-on-bone - but we - we drill off a little more down low, so I think it just offers a little - a little protection there.
Okay. Now the stitch. And a pair of pickups.
CHAPTER 6
Now let's bring the table - you can airplane her back towards me.
CHAPTER 7
Can I get a - like a 5 suction - regular ear suction? Do you have a ear speculum over there? Wow, a lot of CSF in her ear. Of course a lot of that’s probably now irrigation fluid. She does still have a PE tube in play. Can I have a right angle hook?
So here is the original tube this patient had placed - well, maybe… Can’t tell if that’s an Armstrong or a she-he - does not come out easy. Do you - hold that - do you have that next size up hook? And a 3 suction. So Scott these - these are - I… Yeah, and just for - just a side - I don’t ever use these Armstrongs for a plastic tube cause they are - for that reason there - they are a - a bear to get out if you have to take them out. And they - they don’t fall. I mean it’s good in some kids if you don't want it to fall out, but they don't fall out that easy, and then, you know, if they don't come out, then you - you risk getting perfs. Yeah - no, no - that’s a she-he, fluoroplastic. No, the Armstrong has a bevel. They do come out a lot easier. I just don't like fluoroplastic tubes. I don't like - I like silastic tubes. But see how there's kind of granulation, and it's bleeding a little bit? That's good cause it'll - it'll help this to heal up. So just kind of clean around it and make sure we don't see any kind of stuff in the ear. Okay, can I now have - did we make a paper patch? Do we have a paper patch?
Gosh is that the... I think we just use this. Let’s have a pair of curved iris scissors. And now a - like a little pair of alligators. Still a little bit big. And I’m going to then put a little few pieces of gel foam over the top of it. We don't have floxin there, do we? Is there any in the room? Now that footplate hook. Okay. Floxin. Can I have a gimmick? It’s okay. I’m not putting that much more in - just enough to pack that - just to hold it down on there. Suction. Do you have another dry sponge? Press that a little bit more. She probably won't like that her ear is all plugged up, but it won't be running after today. Okay, that’s it.