Less Invasive Stabilization System (LISS) for Distal Femur Fracture Repair
Transcription
CHAPTER 1
My name is Michael Weaver. I'm an orthopedic trauma surgeon here at the Brigham and Women's hospital. This next patient's an 81-year-old gentleman with a displaced intra-articular distal femur fracture or a supracondylar femur fracture. This is a fairly common injury, and we're seeing a lot more of these as the population ages. Fragility fractures are becoming more common.
These fractures offer a few unique issues. Bone quality is often poor, so it's a little bit more difficult to get to stabilization. And the poor bone quality also leads to more fracture comminution, and that can make, you know, getting the reduction a little bit more challenging as well.
The surgical plan today is going to be to perform an open reduction and internal fixation. Because this is an intra-articular fracture, we're going to use an anterolateral approach to the distal femur. That's going to let us really see the joint surface and obtain an anatomic reduction of the articular surface, which is critical to a good outcome, and then we're going to use a percutaneously placed lateral lock plate that will allow us to bridge the area of comminution while restoring length, alignment, and rotation to hopefully allow for biologic fixation that allows the bone to heal well.
CHAPTER 2
Incision.
I think this is a great approach for - for all distal femurs. And it's something to be really familiar with, because if it is in the joint, this is - this allows you to see it and reduce it, and if you're not here, it can really hurt you. I think it's - a lot of people will say, "Oh, it's not in the joint," and it's in the joint. With this one, I think - you know, you look at the x-rays, and it's pretty subtle. So it would be easy to think that this is extra-articular. And that would be a surprise. You don't want a surprise.
Make sure you leave a cut.
You do more of a straight as opposed to a round?
Absolutely.
Just remember, you're not doing a knee, you know, so you don't want to get into the cartilage.
Like that? That - that bleeding? And then you like to come straight up?
Try not to use the cutting so much.
Just right, straight in line with this.
So you’ve just got to be careful, or you're going to hurt the cartilage. And let's just open that up proximally a little bit more.
So this is called the Henry approach, and it allows you pretty extensile approach to the distal femur. Although, you do have to split the muscle to use it, so that's the one downside with it. And as you can see, it gives you great access to the joint.
So, we need a little bit more. So just finish that arthrotomy distally. Good. And now you can see that fat pad's in our way, so you're going to have to divide that as 2. No, you're not going to take it out. You're just going to cut it. And what you want to do is not cut the meniscus.
Yep.
Okay, keep going through. Good.
Alright, so you can see we got all the way across. So let's suck in there. Irrigation, please?
So there's our split. You can see it, we're looking right at it. So, I think this is going to be enough for us today, but you know, if you got a widely displacement, and you go up a little further, you can really see it.
So there's the fracture. This is a pretty simple split. So I'm - I think our plan today is just going to be to clamp it and pin it, and then we're going try to ignore it. See now, as long as you have compression with your clamp when you put your screws in, it'll maintain that compression. Other people would use independent lag screws, but I don't. I think for this - for this type of situation, I don't think it's needed.
You’ve got to get rid of that. It's not going to be good for the knee to have that there. It's just a little bit of a trochlea.
The nerve tissue's down there, so you just got to be a little bit careful of that, and you see - you can see all the way across, down into the notch, which is completely nondisplaced. See that? So this has a split, but it's really not displaced, and the cartilage is in fact intact over the fracture. So I think this is - it'll merely be enough to squeeze it there.
And this piece of bone here, that's a tiny bit of the trochlea, but it's a free fragment. And I don't think it's going to be that useful. We'll see what happens, but I've got a feeling in the end it's not going to be there. His bone quality is not the greatest. We can try using a large clamp, but we'll see. Do you have a large - do you have that regular large or just this open?
Just this at the moment, do you want?
Alright, no, this could be fine.
CHAPTER 3
Alright, do you have the pad?
Yep, be careful, it's sharp when you poke it through.
This is called a periarticular clamp. Alright, so suck in there. You see that squeezed the fracture line nicely. There's just a little bit of blood there but, the fracture itself is all reduced. So really, just to do one more adjustment, I want to get that really back behind the knee.
There you can see the bone quality is not very good.
Another pad.
No, I'm okay.
So I think that's all we're going to get today. You can see that's - that's reduced real nicely. Can I get the K-wire, please? And this is going to be away -
Away from our plate line here?
From where we're going to put our plate. One more K-wire, please. And a lot of people would put a couple of lag screws in the same position, but like I said, I don't think that's necessary for him.
And now we're going to take this off, and hopefully that'll maintain the reduction. He does not have very good bone, though, that's for sure.
Alright, good, so that's holding it - good. Alright, and what we're going to do now is flex the knee up. Good, our notch is still good. You know, a lot of times you got to really look at that notch to help your reduction, but if there's comminutia in your notch, you got to be careful you don't close it down too much.
Alright, let's come in for some shots, make sure we're happy with our joint. And I think we're thinking 7. Schnidt, please.
X-ray there. Come up proximally, please. X-ray there.
Good, so I think that's enough of a gap between the other implant. You know, you don't - you definitely don't want them right next to each other. If it was much closer than that, then I'd say it might be worth going longer and putting a cerclage in so you've got one thing.
Alright, so that's there. That's good. Alright.
Alright, so let's come distally for me one more time. Focus up at the knee. X-ray.
Can you get your wire driver and just back those up like 1 cm? I want them sticking out the other side, but just not a lot. Back it out a centimeter, please. That's it. X-ray.
So that's your AP view, alright? But it's important to check this view as well. And this is your notch view. X-ray there.
So that gives you a really nice sense that we've - that we've got a good reduction at the notch. And the other thing that this view will show you is if your screws are out medially. So - having medial screw penetration is a big problem for a lot of patients because it hurts them. You know, that's a real subcutaneous area, and the screw tips there can bother people. And radiographically, it'll look like you're in when you're out. So you got to either get a notch view, or the other view to get is this. You know, if you think of the - the - you know, distal femur as a trapezoid, you want to - if you internally rotate it, then you're - looking down the medial face.
X-ray.
So, something like that'll show you if you're out medial, and so we'll do that later. X-ray there. X-ray there.
So this is pretty comminuted and short. If we go like this - X-ray - then we're going to get it pretty well reduced, I think.
You know, so for these real comminuted ones, I think it's okay to accept a little bit of shortening, because I think it actually helps with the healing. But, you know, these are a real challenge. The nonunion rate of this is really high. But there are a lot of other things that factor in: your working length of your plate, the, you know, fracture comminution, and how close to the plate - the bone is, locking / non-locking screws, screw pattern.
Come proximal, please. X-ray.
Good. And then if I go like that - X-ray. Here it's sucking. And it looks pretty good there. So that's probably going to be our final reduction. X-ray. With just a little bit of - there. Alright. Good. Now, let's go to a lateral.
I really think of this case in terms of relative stability. You know, we're doing a bridge plate. That's relative stability. You're restoring length, alignment, and rotation. So as you do the case, you just want to think, what am I setting at each step, right?
X-ray.
That's bad.
X-ray.
X-ray.
So you can see just moving that bump around, just even a little bit - X-ray - can make a big difference.
X-ray.
X-ray.
And that's probably actually - X-ray - where we're going to want it in the end.
X-ray.
X-ray.
X-ray.
X-ray.
Yep, alright. Good. Back up to an AP.
So I like to check that lateral. One, is it shows you a rough estimate of your reduction when you're starting. Right? You don't need your reduction now, but it shows you kind of where you're starting from. And it also shows your articular reduction. This one was pretty straightforward. We just had to put that clamp across it to squeeze down a little nondisplaced - split, or minimally displaced split, but if you have one that's really displaced, you can get the rotation of the condyles off, and so you want to be able to see that you can get a good lateral and that those are lined up. You know, you can - one can be flexed or extended pretty easily.
All right, so, you can see we went into the knee joint. Now we're going to get out of the knee joint, okay?
CHAPTER 4
So what you're doing here is, you went into the knee joint to look at your reduction, but you want to be extrasynovial with your plate. So we open the synovium over the lateral condyle. You know, we're pretty far from the lateral femoral upper condyle, but it's down there. And the one thing you don't want to do is Bovie on bone, because if you're doing that, then you're stripping off the LCL, and you don't want to do that.
Alright. And that's it. We have a place. Alright. Do you have the plate?
Alright, so this is the plate we're going to use today. There are a bunch of different versions of this, and it's essentially a percutaneously placed locking plate. So the plate fits on, and then you've got little guides to get your proximal screws. So you slide that in there. Good. Good, and as you're doing that, I want you to feel the femur a little bit. So you feel femur, feel femur, feel femur. Good.
And then the other thing is, this plate - remember, the femur's a trapezoid, right? So it's going to sit up. So, the weight of the guide is going to force your hand down. You want to keep that guide up. So let's guess where we're going to put it and put a K-wire in there.
Right, because this is your A-hole, so you're going to use that to set your alignment.
Good.
I think we're in valgus. Alright, so - back that wire out. And you can see we could be a little bit more distal with our plate too. Can you tilt more towards the head? That's a little bit of a notch view, so we've got to change our X-ray to get the right view. If it's in valgus, we've got to go this way.
X-ray.
X-ray.
Try it now.
X-ray.
Little bit more.
Good. X-ray.
Almost there - we're still in a little bit of valgus there, and what we're looking for is not the alignment of the knee, but really the proximal distal placement of the plate and that the guidewire is parallel to the joint.
There you go.
Let's actually put him in a little bit of varus. That may help. X-ray.
X-ray.
Try that. X-ray.
Okay.
X-ray.
That's better. X-ray.
Alright, I think we're probably close enough now to keep going, and then we can always adjust a little bit.
So I like our plate placement on that view. Looks like all of our screws are going to be good screws. So this guidewire has started to set our alignment. It hasn't really set it yet. This next pin's really important because that now sets two things.
No, it was the seventh.
Do you have the sharp one?
So, the best way of doing this - these are really sharp - yeah. These things are sharp, so what you want to do is get this in here like this. And then you pop it in. Yeah, and - You pop it in. Look, this goes right in because it's sharp. In fact, you don't even need use a Schnidt because that's a sharp instrument. And now, that should thread in.
What this is doing is creating a box.
Why don't you give that a pretty good tug there?
Stop. X-ray.
So your plate's way anterior or posterior because you can see it's overlapping the femur, right? X-ray.
Come proximally for me.
X-ray there.
You're pulling pretty hard? Good. Go ahead.
Go in cortex only.
Good.
X-ray.
And now if you relax - X-ray - we don't lose that length, right? So we have that length now. So now let's swing around to a lateral.
So that - so now that we have two pins, we've set length and rotation. And we've started to sync coronal plane alignment. We've started to set sagittal plane alignment. So in each of these things, you just want to be iterating, making sure you're happy, but at each step, it's also one thing that you’ve got to focus on - or two things you’ve got to focus on.
Good.
Alright, so I like the plate placement there. That looks really good. So let's come proximal. X-ray there.
Alright, you can see we're a little anterior. X-ray there.
So we're going to have to just drop that plate a little bit, so you're back on - on pulling patrol. And we can actually do this under C-arm here because we're just going to pull it out and I'm going to swing it back, and you'll put it back in.
X-ray.
There it is.
Good. X-ray.
Good. And so that's sitting a little anteriorly, but you're going to see - X-ray - it's actually centered on the bone. Alright, X-ray. Or it's aiming at the center of the bone, I should say. Come distally for me.
X-ray there.
X-ray there.
That's that posterior reduction, and I think we're extended a little bit, but not bad. X-ray there. And in the front, we're not - we're definitely not bad. X-ray. You can see there's a lot of comminution. X-ray there. So let's see if we can adjust that if I just move this here. X-ray.
X-ray.
So that fixed that. I think - if anything - X-ray - and the other thing I can do is just even - I can twist here. X-ray. That's flexing it more. X-ray.
X-ray.
X-ray.
That's not bad. Good. Do you have another guidewire?
X-ray there.
Alright, so, can you drive this in for me? And then, with one hand - before you do that, just hold that up a little bit so we get that view. X-ray there.
Do you have a Cobb?
X-ray.
X-ray.
X-ray.
Alright, I think that's pretty good. Go ahead.
X-ray.
Whoops. That was a little far.
Just be careful, there's an artery back there. X-ray.
X-ray.
Good, so that's holding that pretty good. And then let's look at the anterior reduction again. X-ray.
X-ray.
Think you just push that down a tiny bit. X-ray.
So I'm pretty happy there. X-ray. So there's the back reduction. X-ray. There's some comminution there, but I think we've restored - restored our alignment, which is what we're shooting for.
Alright, good. Alright, back up to an AP. Alright, clamp. Periarticular clamp.
Alright, so now we're here.
Alright, can you tighten that down for me? Good.
Good. X-ray there.
Nice. So you can see we're in a little bit of valgus, right? But part of that's because our plate's sitting off the bone, and I think if we bring the plate over, then we should straighten it out. Now, we're going to get a little bit of what's called a hockey stick deformity by doing that, and that's because we'll shorten him some. And he's kind of a larger man. So the - right now, the shaft is centered on the metaphysis, and as we pull it over, we're going to restore our alignment, but it's going to swing it over. And that's okay.
X-ray.
X-ray.
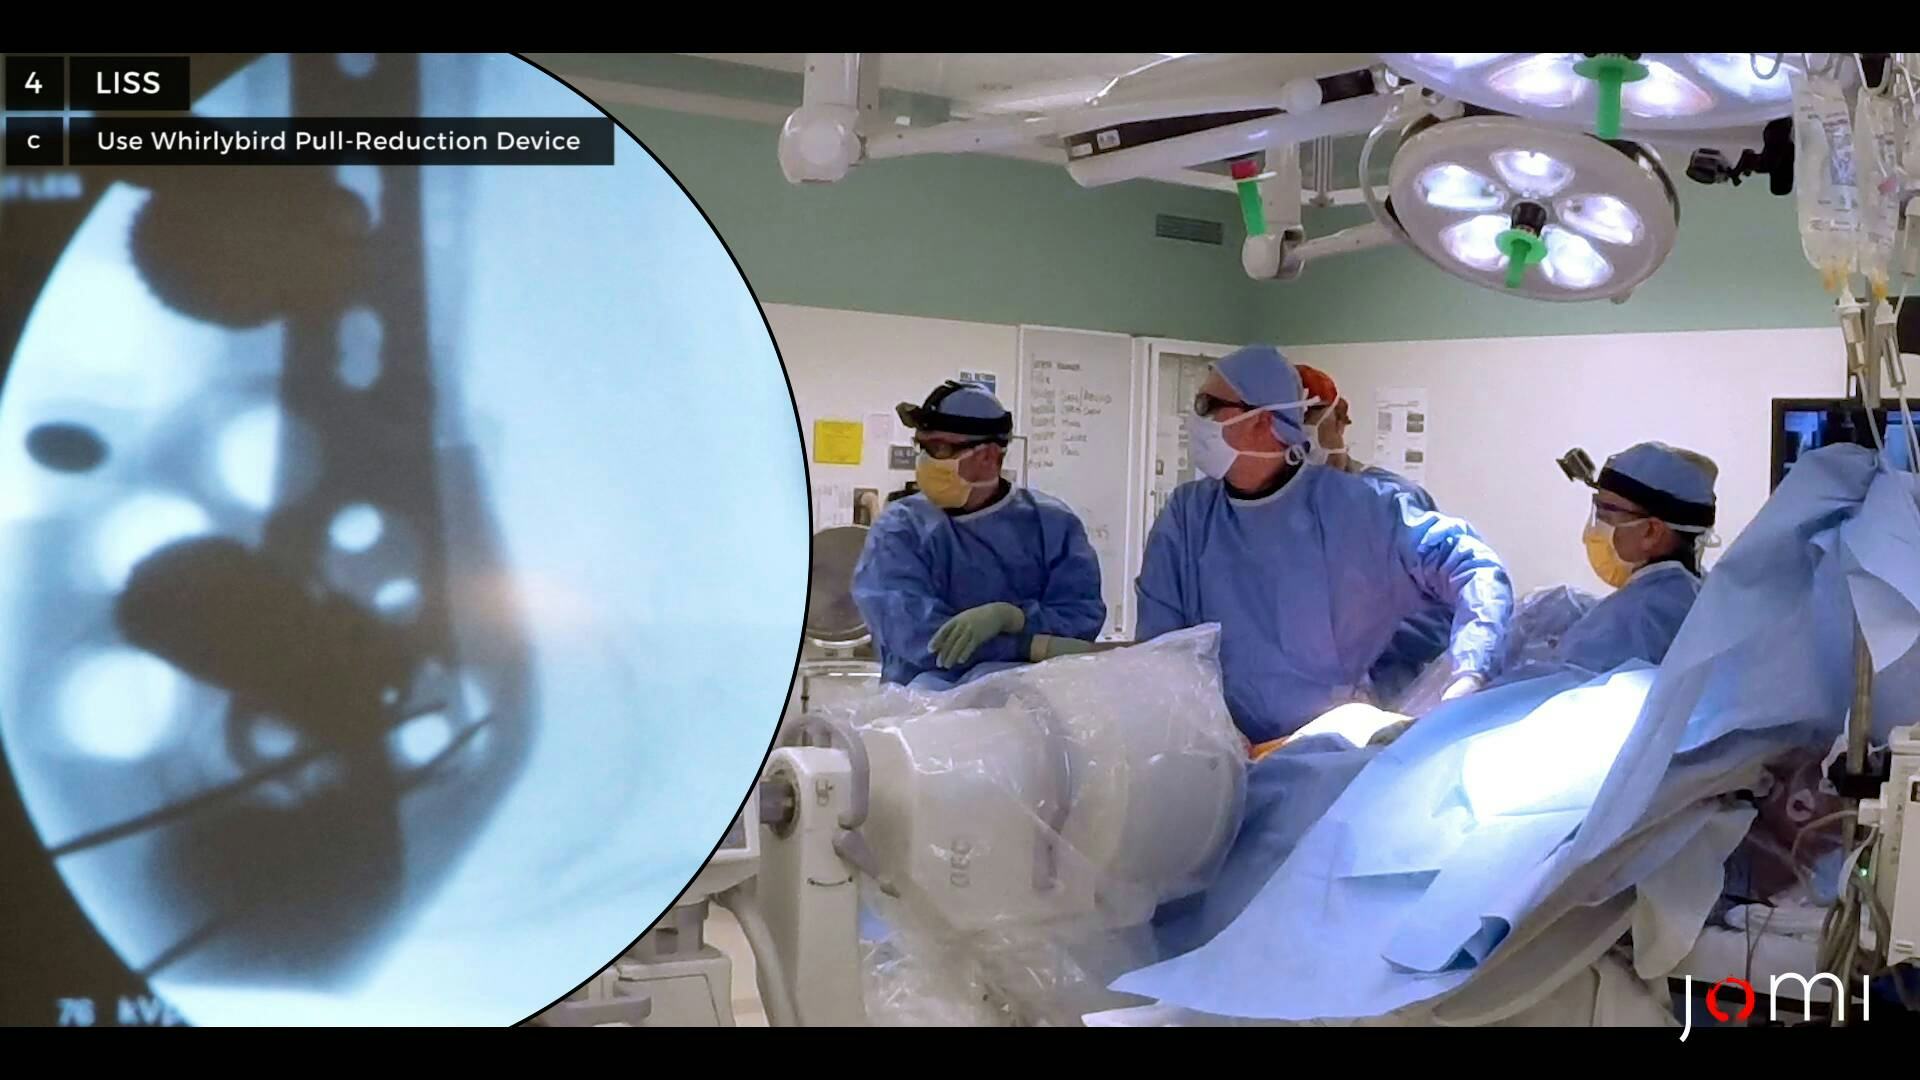
So I think just manipulating it like that and then bringing it over a little bit will be good. Whirlybird?
So Whirlybird is just one of the devices that this plate has. It's just like a non-lock screw. So, I think - X-ray. So that's going to be above our fracture. So get your mallet. There we go. So this is going to act just like a non-lock screw. It's going to pull the plate down to the bone. Whirlybird. So distally, we have clamped the plate to the bone, right? But proximally, there's nothing to hold that plate on.
X-ray.
X-ray.
X-ray.
Alright, go ahead.
Stop. X-ray.
Keep going a little bit more.
Stop. X-ray.
Good. And then this is just like you're tightening a screw, and what that's going to do is pull the bone to the plate, or push the bone against the plate, depending on your perspective. X-ray. And so that - see how that pulls that down just by turning that? You've got to be really careful with someone like this, because his bone sucks. If you use this, you're just going to go pop, and it'll rip it right out.
X-ray. Good.
So, I think we're getting there. You can see there's that little step medially, but that's kind of what we were expecting because we're shortening him.
X-ray.
X-ray.
And that makes that step worse. If I go like this - X-ray - that step's better, right? But then you're putting him in a lot of valgus, and so I'm kind of accepting that we're shortening him a little bit because of all the comminution so there's good bone contact.
X-ray.
But I need - the most important thing is alignment, so we've got to get that alignment right. So now that you have that, now we're ready to check our lateral, and if we're happy with our lateral, then we're going to start putting in our fixation. In this case I want to start distally, because this is well fixed, whereas distally, it's not, and so I want to get that part keyed in first.
X-ray.
Yeah, so, we're ever so slightly extended, but that deformity is in the plane of the joint. So I think that's a tolerable amount, and - I don't think that we're going to be able to really correct that unless we were to bring him fully out to length. And I don't want to do that because - otherwise - because then you'd be distracting the fracture, and, you know, he's already probably a high risk of non-union. X-ray.
X-ray.
So that's one problem that we're going to have to correct. So we have to take this Whirlybird out, and you can see that, as we put that in, now the - there's a - it's a little angled. And our plate's sitting too posterior on the shaft at the distal part, alright? So we're just going to have to take that out and push down on that so it's centered a little bit better. You know, normally there's a little bit of offset between the top of the trochlea and the femoral shaft, and here it's almost the opposite problem. You follow that line, and you're running into the patella.
I didn't push hard. You were stripping it.
Okay.
X-ray.
That's better.
X-ray.
Good.
X-ray.
Come up proximally, just a little bit.
X-ray.
X-ray.
X-ray.
I like where we are proximally. Our plate is probably sitting a little bit posteriorly. So let's adjust that. We'll bring that up. So take that out.
Good pull.
Okay.
Yep.
X-ray.
Yeah, so that's a very different hole. X-ray.
X-ray.
Yeah, I like that position a little bit better. X-ray. Our reduction in that plane is still really nice, so we're still good there. And now you can see this is sitting a bit better. So if I push there a little - now let's go ahead and put that Whirlybird in. So, I'm just going to barely finger-tight.
X-ray.
X-ray.
Alright, so I like that reduction there.
X-ray.
X-ray.
X-ray.
I like that in the front now. X-ray.
See, that's a better contour. Now there's anterior offset.
Good. And then you can see, also, our plate is a little bit more centered along the way, which is kind of a good sign. Alright, good. AP. When your plate's sitting more posteriorly, because of that trapezoid shape, it tends to give you more of that hockey stick deformity because it runs into that lateral - epicondyle and pushes it over. X-ray there.
Good. So we still have a nice reduction there. If anything, we're in a little bit of valgus. You know, traditionally, problems have been with varus, but I think with the new plates, it's almost hard to put people in varus. It's, like, easier to put them in valgus. Would you mind? So I tend to really work on - making sure that my alignment's good. Alright.
Good. X-ray there. Good. So you can see how much I'm able to bend that wire. So that's why that wire kind of sets your direction, but doesn't really.
X-ray there.
So that's in AP. X-ray.
And I think I like that alignment. That looks good. You know, once again, we're shortened a little bit, so we have that little step, but that's okay. Our plate's sitting nicely against the bone.
CHAPTER 5
Okay, so now let's put our first screw. So, the first one we're going to do is the E-hole, and that's because this is the most distal screw. Right? And it's the easiest to tell if you're parallel to the joint. It's the screw that has to be parallel to the joint. If the screw's parallel to the joint and the plate is against the bone, then you're in 7° of valgus with this system. So that's why that wire being kind of close is what's important.
X-ray there.
X-ray.
X-ray.
And you can see that's parallel to the joint. So I'm happy with our - I'm happy with our alignment.
X-ray. I think you're actually through it. Yep.
So what's that measuring? 70.
Do not drive that all the way in.
X-ray.
So just put one in C or something like that.
Good. X-ray.
X-ray.
Make sure to hold that over. Good.
X-ray.
Good. It's parallel to that screw, so we're doing something right.
Okay. 70.
Good.
And then I'll stop holding it so hard. High speed until you get it down. Now you just slow at the end. And stop. So you don't want to push too hard on this or you'll strip it. You want to just turn it - until it clicks. It's hard. There you go.
Shot.
That's good. Physiologically, his alignment looks good too, which is important. So it's probably this skin here. So make sure that you're... X-ray.
X-ray.
Okay. Go ahead. X-ray.
Yep. Do there. 75.
75. Actually, give us an 80 for that one. You know, his bone is so poor. You know, there's really not much in the middle. Like, let's just get - That's the advantage of these screws, is they're pretty blunt. So I think if they stick through there a little bit, it's okay. The original LISS screws are self-drilling and they've got a very sharp point. Still, I think that, you know, a lot of different companies make these. This is kind of the first generation of percutaneous plates, and so there's a lot of kind of newer plates that have got lots of bells and whistles. But I think, in general, when you use them, you just think of the same principles every time. When I say I don't want you pushing hard, if you push hard, you're going to strip through the bone. You've got to twist hard enough that it engages the locking screw.
X-ray.
So that looks pretty good. So I'm going to try relaxing and see what happens.
So when I look at the leg, it's good alignment. X-ray.
X-ray.
That looks like a pretty decent reduction to me. I'm pretty happy there. Let's go to a lateral and just see where we are. X-ray.
X-ray.
X-ray.
So again, that's pretty good. I'm pretty happy there. X-ray. And then we'll look at the front. X-ray there.
X-ray there.
That looks nice in the front too. Good. Come up to an AP, please.
So I think I felt something give, and this is loose now. So I wonder if, you know, that was a really weak - the Whirlybird was really weak, and then hopefully it's - still grabbing something, but - X-ray there. Yeah, so that's still doing okay, but I think we should get our fixation - X-ray there - before we go too much further. So let's - yeah. So let's plan our screw spread.
You know - typically, I'll only use 3 or 4 screws. You know, his bone is not good. We'll start with 4 in him and see. You know, to be honest, if he has failure of fixation, it's probably not going to be proximally, though. Even in someone with osteoporosis, that shaft bone's pretty good. The distal part is where they've got problems - for these really osteoporotic people. I think if you're not really careful - you know, this is one of these cases where if you mess up one step, then that gets magnified later. So like - I like to really make sure my plate's in the right position. I like to make sure I'm - you know, I'm happy with that distally. Happy with it proximally. And you know, just kind of iterate on it. Some people will start putting screws in and then use it as a reduction aid. I tend to - do it differently, I like to have my reduction done before we start putting screws in.
So it looks like we're going to be about a - X-ray. Looks like we're going to be about a 36. So I'll say 38 because I'm always off. 38.
Stop for a second. X-ray.
Keep going. I want it to stick out, yeah.
Shot.
Yeah, I'm happy with that. Until it stops. X-ray.
X-ray.
X-ray.
Yeah, I think our reduction's pretty good on the medial side. I think that's a little piece of comminution.
So I think, overall, we're pretty good. I like that screw length. You know, I want it to stick out a little bit. Pretty happy there. Alright, good.
So let's get some more. Like I said, we may be shortening him ever so slightly, but - better short than long for a comminuted geriatric.
X-ray.
40 for this one, yep.
Do you prefer to take this down first or take out your -
So you can't - this is the last thing in the universe that you're going to take out because you want to maintain your box. So if you want to take out the Whirlybird, now's the time to do that.
Yep. I like to redrill that hole anyway, though.
And that'll be it.
X-ray.
That'll be a 44. You have to go so slow that it rotates it until it falls in, and then you go slow - and I'm pushing a tiny, tiny, tiny, tiny bit so it keeps it engaged, but not enough that it strips it.
46.
Try to give it a little push here - see what happens.
X-ray.
So let's do another 38. I think - I think we're going to do 5 screws. You know, his bone is just so crummy. So crummy. Normally I hate to put a lot of screws, but - you know, you don't really need it, and I think it adds a lot of stiffness. You know here, titanium, his bone is so soft. I don't think stiffness is going to be the - is going to be the problem.
Yes, please.
So those look sharp, but watch this. Ready? X-ray. So you can see, we've got - that's exactly the length I'm looking for because the tap is just sitting out. and you can see it's really easy to be fooled. You know - X-ray. You know, you look there, and you say, "Oh, the - you know, it's not quite all the way through." But here, definitely better longer than shorter, I think.
Let's finish it up this way here.
So we've got - 3 - 3 screws together.
You like to do all of them?
For him, absolutely. You know, normally, I'd..., but him, I think you have to.
I couldn't even feel the cortex.
I know. So, you just - you pretend like it's there. X-ray.
X-ray.
What's that measuring?
Cortex, there.
So that looks like 65 to me. You have to let the - you have to use the instruments to do the work. Like, if you manhandle osteoporotic bone, it falls apart. So you use the drill. You've got to be real careful getting the screws in because, you know, it's like a ti - each screw gets a tiny little bite, but you add all that together and you get something.
Here, I want you do F. So, I'll hold this out of the way for you so you can get it down. Good. X-ray. That looks good. Yep. X-ray. 80. I don't care if you go out a little bit. It's good for it. But this is a good one to see, so watch this. So, you see that there? So, watch it. X-ray. Look how far away that screw is, right? And then if I go X-ray here - X-ray there, you can see it's actually flush with the cortex.
X-ray there.
Save that. So that's that - because of the trapezoidal shape. That's true of the proximal tibia too. I've seen a lot of times, you'll do a tibial plateau fracture, and you put the screws in radiographically, it looks great on your fluoro. They come back to clinic, the knee's rotated slightly, they're sticking out a centimeter, and they're like, "Doc, what's this bump? It hurts."
Real gentle. Until - You've got to turn it until it's in there. There you go. Good.
Shot.
Yeah. X-ray.
There we go. See, that's just sticking out. That's perfect.
So if they wouldn't be too osteoporotic, you would do maybe 3 proximally, right?
3 or 4 proximally, yeah.
X-ray.
X-ray.
So we'll do another 70, please. Yep.
When was this developed? Like, about 10 years ago, right?
A little longer than that. It was the nineties, yeah. Mid to late nineties is when the LISS came out.
So now, what I want you to do is - we take these wires out. Do you have a Schnidt?
So I'm going to show you a little trick here. A technical pearl.
A technical pearl?
A technical pearl. This is a technical pearl with this system.
So, with this system, you always need to have the box. If you lose the box, then it can be hard to do things. So one way of maintaining the box when you put your last screw is to use your screwdriver. So - So I lock this in here. And now I'm just - I just - Now you would take this out. Yep. Now you never want to take that wire out until - No, until - you loosen this. So you've got to get your Whirlybird and take that off, right? Because that - what happens is, this one's not too bad, it's pretty straight, but you can imagine if the plate's on the bone at an angle when you put this wire in, when you straighten it out with a Whirlybird or something, what happens is it kinks that wire. And then when you - take this out, it shears it off because this is real tight little space. When you back this off - you don't even have to take it out, but just back it off like that. Now there's - now it's not constrained. So now it can, like, kind of flop around a little bit. And there are plenty of X-rays out there with little wires broken off in the femur, so - X - can you come proximal a little bit, please? X-ray.
Let's keep this 38 going. I like the 38s.
In which cases would you try to lag across the joint?
Good bone. Here, a lag screw's not going to do anything.
Do you have a Tommy Bar? Do you have that locking tool? Hold on, one second. You don't need that. There you go.
Good. Drill.
Final screw.
When do you know it's going to be?
Yeah, it's going to be up here.
So drill right into there. Be bold!
So - 75.
I've done a distal femoral replacement for these before, but the question is, is that - is it worth it? Because if you fix something where they're not going to walk, and they can't walk, and they need their leg, you know, a distal femoral replacement is a big surgery, and you're committing him. You know, like - you know, if it goes bad, it's an amputation. But, it's immediately weight-bearing.
You can see our joint reduction's right there. So suck there. So that looks good.
Alright, good. So, stable varus / valgus. You know, flexion to 90. I don't want to push on him just because I don't know what his preop motion is. He's kind of arthritic, and it's kind of marginal.
Alright, come on in. Table up, please. Good. X-ray there.
X-ray there.
Come up north now.
X-ray there.
And this is to look again at that gap, and so we got plenty of gap there. So I'm happy with that.
Come south. Much closer than that and I'd want to actually span that. X-ray there.
X-ray there.
X-ray there.
X-ray.
See, our screws are parallel to the joint. You know, he's got a little - it's almost a little funny-looking, his - tibia looks to be in a little bit of - varus, and his femur looks to be in valgus, but overall, I think the effect is that we've got a good alignment.
Now give me a notch view, so tilt down this way. All our screws there look the right length, right? But we're going to see now that a few of those are sticking out, I bet. Or closer, at least. X-ray.
And now come square up.
So once again, if this was a really bad intra-articular one, that's a really important view to make sure that you haven't over-reduced the notch. X-ray there. That just shows that, you know, our screws are close but okay. X-ray.
Alright, let's go to a lateral.
Good. X-ray.
Go live for a second.
Stop there. So you can see we're at maybe 5° of extension there, or it may just be some comminution, but I'm pretty happy otherwise. X-ray there.
That's that anterior reduction, and that looks really nice. And you can see all our screws are safe, as well, on that view. So that looks nice. And then come up proximally just a little bit. X-ray there. And you can see that ghost of where we moved. I'm really glad we changed that. Now our plate's centered right where we want it.
Alright, thank you! I like it.
CHAPTER 6
Irrigation. Irrigation.
Number 1s, please.
Good, and see - like, this is what I love about this, right? Biologic. The only manipulation of the fracture that I did was I stuck a little Cobb in there to tip this up a little bit. You know, like - all that soft tissue's intact. You know, there's no bone visible, it's all attached to pieces of - you know, it's biologic.
Some people, younger people, have had problems with pain over the plate just because of the iliotibial band. It's right there. So, you do have to take it out sometimes, but - And I think we let wounds desiccate too much, you know? Like a calcaneus, especially - something like that, I'm always irrigating, and - Especially with a tourniquet, you know, because the blood normally keeps stuff kind of moist, but when you - So you see, the anatomy of this approach is really nice. I really like it. I love this case, this was a fun case.
But the key to it is really breaking it down to your principles, right? It's - absolute stabil - or, sorry, it's relative stability. And so length, alignment, and rotation, and when... So I put my first guidewire in. I - I'm working on alignment. But I'm not really setting, I'm just working on it. And then when I put my second guidewire in, all of a sudden, I've done a lot. Right? It seems like you haven't done much, but now you've got length and rotation done. You can't change them. And then, pretty soon, you've got a Whirlybird and one more pin - That's it. The rest of the case is adding screws.
CHAPTER 7
So things went basically as we planned, but - you know, this is a challenging case, primarily because of his bone quality, you know, he's - really osteopenic, and the bone quality was not very good. You know, we started with the plan of bridging this while - across the metaphyseal segment while compressing the joint, and that's what we did. We got our compression with the periarticular clamps, made sure we had the joint reduced first, and then worked on bridging the articular segment to the shaft.
The - you know, the trick is with the bone quality - you know, the screw fixation's really poor, and so you've got to be real careful. And, when you're using bridge technique, you really want to focus on that length, alignment, and rotation. And, I think as you saw, you go back and forth on each of these things and check with your X-rays to make sure that you're achieving what you want. And then once you have your alignment and everything's set, you start filling it up with screws and you can hold everything pretty nicely. So in the end, I think things went okay, but, you've just got to be real careful with that poor bone.