Open Reduction and Internal Fixation of a Diaphyseal Periprosthetic Humeral Fracture
Transcription
CHAPTER 1
I'm Mike Weaver. I'm one of the orthopedic trauma surgeons here at the Brigham and Women's Hospital. Today we have a 57-year-old woman who sustained a fall, and she has a distal third humeral shaft fracture. Previously, she had a failed shoulder replacement and so had this revision to a reverse total shoulder prosthesis. It's hard to see on the x-ray, but there is a cement mantle that goes down - and you can see the cement restrictor here. So kind of as expected, you have the stiff construct, and so you have a fracture below it. This make things a little bit tricky. She has a radial nerve palsy. She isn’t tolerating a splinting very well, and she's a little bit larger body habitus. And so those combination of things are pushing us to fix it for pain control and function. So the plan today is gonna be to do a posterior approach. The approach I use for this is a little bit different. I don't split the triceps, but it's more of a posterolateral approach - so a posterior skin incision and then come around. What I'm looking for is the brachial cutaneous nerve, and that's gonna take me to the radial nerve, which is really the key to this case. You know, a lot of people have anxiety operating on the humerus for the risk of radial nerve palsy, and so I think you want to find it and protect it every single time. So this approach allows you to see the radial nerve very well. We're gonna dissect out the whole thing in the posterior aspect of the arm to look for a direct entry, although the vast majority of the time in a situation like this it’s just a neuropraxia from a bruise. So we'll come around the radial side of the triceps, expose our fracture site. It's a relatively simple fracture pattern, so I'm expecting that we should be able to achieve absolute stability. We're gonna use a couple lag screws and then neutralize with a long plate. Here traditionally in the humerus, people use large fragment fixation. However, you can use small fragment fixation. And the plate that we're gonna use today is a Synthes product, although all of the other companies make these. It's a thicker small fragment plate, so even though you're using 3.5 screws, you're getting a thicker plate, which is gonna give you a little bit more support for the humerus. That plate comes all the way down distally, so we’ll get plenty of fixation here. And then proximally, we're either gonna get screws around the stem, which is pretty small, so hopefully we can get some screws around it through the cement mantel. If that fails, we do have the periprosthetic set available to us, so we can put cerclage cables at the top. Cerclage in the humerus is a little bit tricky, but if you're looking at the radial nerve, that's the thing you’re worried about - and so we should be okay. So, should be all right.
CHAPTER 2
Here, I'll switch with you.
All right so, there you go. So you got midline incision - maybe slightly radial - and now we're just gonna come over here and look for that little thing. So this is all triceps. So what I want you to do is dissect up here using your Metz. And it'll be right up here. Hold on - let’s just dissect down here a little bit more there. And then switch this cuz I think this will be a better retractor up high. So the skin incision is posterior, but really, the deep dissection is lateral cuz what we're gonna do is protect - preserve the entire triceps. I'll be right with you. I think you've got it here. No, you don't want to get under the muscle - it's more like - what you want to do is get in this plane. So you want to elevate off the triceps. So you want to look. Like this. Because this is the intermuscular septum. So that’s her humerus, or... Yeah. So that’s humerus. Yeah, feel there. See there’s bone now. That's bone there. That’s fractured. This is the radial column of the humerus - all the way down here - so our plates going to sit all the way down here, coming up. And so you know that the - the triceps inserts along the entire face of the humerus, but we're gonna preserve everything else. And you can feel - if you feel with your finger up there, you can feel the fracture way up there. I need a new glove, Paul. Right side, please. And so there you can start - there’s our - there’s what we're looking for, right? So... We’re not going through the triceps; we just come around it. So, this is the triceps here when you start, like that. That's triceps, so we're just going around it. That's lateral edge of triceps. And then that just takes you right down to the bone. Yep. And then you just elevate it off the bone.
All right, so we found that. And we’re at the fracture, but we can't do anything more without being proximal. So - but I think we found the nerve, so I think we're okay to let our tourniquet down. So you know ideally, you know - someone that's thinner - you can get the tourniquet up here - do the whole thing without a tourniquet. Her’s - you - I - I figured we’d have to let it down to get the very proximal exposure cuz it’s - you know, it’s a pretty high fracture to be doing from the back, but... This makes me much happier - you know, we're gonna be looking right at the nerve. Plate will be under it. Yeah, that’s good. I don't care about getting every last bit of skin; I just want it for the bulk of the bacteria. All right, here you go. So the fracture’s here. We’re gonna need to be up probably about to there. Skin knife, please? Yes, sir. Thank you. Mike, I will always come up this way to give you stuff. Okay, sounds good. Just so you don’t have to turn and look for me. Nice and straight right above there. Yep. Good. Tourniquet is good for the surgeon, bad for the patient. Got it? So here - see this is - I would just split that with your fingers. See that loose areolar tissue? So this is what I did down below. See that? It just goes right back. And then we are up on here. See now we’re up on humerus again - way up there. Way up - way, way, way… The hard part is that we got to do both sides of that. That’ll do it. Oh yeah, actually, I like those better don’t I - the wider ones. Thank you. So everytime I put one of these on, I want to be really careful cuz of that nerve. So we're looking right at the nerve. That's not on the nerve; it’s holding it back. So that's the proximal piece. You can see a split in it that I saw on the - right there - that we're gonna have to deal with - that I saw on the scout film - you know, our C-arm image, but not on the plain film. So that, you know, makes it a little bit more tricky, but like I said, I think we’re gonna be okay. There’s that. Thank you very much. That’s good. That’s good. That’s good. All right so, you can see this real nicely. So there’s proximal fragment, distal fragment. There’s the fracture - and then right over the fracture, right by that spike of bone.
So let’s get the hematoma. Let me get a Schnidt and pull that little clot out. Yep. Oh beautiful. Now let’s switch sucker tips, and I want you to clean out that fracture. I find the Frazier tip to be the best - best cleaning device cuz it sucks it and it's like - it's like a curette at the same time. So it's... This is the stuff you want to get out right there. That's the move. There’s a little bit of clotting right here. I guess I’l angle at that like this. Good. Good, and now let’s work on that piece. I’m gonna take this, and now I’m under that piece there. So you see here, this is the clot we’ve got to rid of right here. So whenever I'm cleaning a clot in a long bone, I try to work through the fracture. You know, so if you look at the bone, it’s still covered in pink periosteum. You know, we haven't devitalized it. Oh look at that. Oh - makes me feel better. And then let’s work above the nerve there. So go all the way up to the apex. See - I want to see the apex up there. Yep, there it is. Unfortunate. So, do you have a Cobb elevator? Yeah. Can you hold that for me for one second? Small or large? Small, please. All right, so now I just want make a path for our plate. You know, we're not going to deal with the top of our plate for a little while, but we know we have to be up there to put a - to put a cable on it. And that’s going to be the hardest part of the case. I think it’d be way up there. Way up there. Oh boy. Okay, here we go. All right, let’s redo it - let’s reduce it. What do you want? Large - or the small fracture reducing forceps, please. Yep.
CHAPTER 3
Let’s see where we are at here. This is gonna be where it’s two-handed. So why don’t you just give it a little pull? Just give it a little pull first, and then you’re gonna key that spike in. Good, and be ultra-mindful of that other tine. See that there? Yeah. You’re right behind - underneath it. Good, that’s it. That’s all you need. Good. One click is all you need. So now what you've done is establish length. Now, let’s look up here. Do you have that Weitlaner back? Yeah. The bigger or the smaller? The bigger of the two, yep. Do you have a Freer? Oh no, it’s just that we have to key it in there. So here, this is the spike. It’s right over here. It’s behind your finger there. I think I got it. No, it’s right there. See that? So release here. Bone. I think that’s a better vector there. I just want to see the apex. The apex is keyed in right there. See that? So we have anatomic reduction of of that apex. Good. All right, suck in there. Do you think maybe a vector a little more distal? Well I think it’s - can I see the pointed? It’s more A to P. This is - let’s hold that there. I think I’m not gonna be able to do it from that side of the nerve. I’ll have to do it under the nerve, and I think it’s more of this kind of vector here.
All right, so... What's what? That radiopath - the dot? Stable? Oh yeah, that’s something that we didn’t move. X-ray there. Yeah so, we look like we have an anatomic reduction there. X-ray. So that looks good. All right, good. Thank you. Normally, you want to check in two planes. To check a lateral here, you have to twist the arm, and we don’t have that great of clamps - and we don’t need to cuz we are looking at it.
Weitlaner. Oh boy. Doing this - just take this down. Yeah. The way to think of this is as if you're doing a olecranon osteotomy on this side. And then you can follow that same path down all the way to the ulna if you wanted. I’m on bone there. Good. So then we just need to clear that. Do you have another - the smaller of the Weitlaners? Yep. And the Freer? So here we just need to release a little bit of that muscle off the bone. Right there. Good, and then just to show you, that’s the olecranon fossa right there. See that? So we probably have to go a touch more distal - cuz this plate, you know, that we are using today goes pretty distal. Kinda aim back towards here. Good. There you go. Good. Good. So there’s the main part of the radial nerve down there. Because this is the - that’s the main radial nerve right there. This is that little nerve. Yeah, so that's the main one right there. Yeah. Oh, we lost that. This clamp’s not holding anything. Hold that. I'm gonna try one clamp in the middle this time. That’s close - less than ideal. Just a little bit up. Can you hold that there? Hold that in with like your sucker. Can I see the Bennett? Can you hold this back for me? Right about like that. That’s better. And there we go. Can I go work on the side? Yeah. I think we're good. So we can see it at the top, we can see it at the bottom, so I think we’re ready for our lag. Here's anterior apex? Yeah. There's the nerve and then - hiding underneath it is the real nerve cuz that's the radial nerve right there. That's good there. Yeah, so I think we're gonna have one here that's gonna be kinda with your hand flat like this, and then this one's going to be more A to P.
So, you know, every different set has different things, but these are the two radial column plates that are in the Synthes set. So you can see that the top plate here is very thin. This is pretty malleable; you can bend it in your fingers. This is really stout. So even though this takes small fragments screws, the plate itself is a lot more rigid so can support a little bit more load. So this is our - we're gonna need plate benders as well, but they can be the ones - in there.
CHAPTER 4
Why don't we - why don’t we drill for the screw? All right, so is that what... So where do you want your first lag screw? I'm going to go through that and then come out. Where’s the Bovie? So start it like this, and then come like that. And you want to push that back in there and come around. I am just going to move this up a micron. There’s the nerve right there. Freer. Freer. So I just wanted to move that tine up a tiny bit because, you know, the tip of the fracture is right here, so I think you’d have to be pretty angled right up against that tine. Okay. Go ahead. And I’m heading out like this, right? But I would be a little bit closer to that tine - not so close that the head won't go down but a tiny bit closer. Oh my - there you go - just like that. Give her that? And then as you - once you’re starting, I'm gonna drop your hand a little bit like - now stop for a second. There you go. Good. That’s it. Okay, come on out - all right. You can come right out. It’s not going to go anywhere. Good. I want you to stop the drill when it goes through. There have been cases of wrapping up the nerve in the drill bit on the far side. Here, the nerve shouldn't be there, but… We may countersink before you depth gauge because it changes the length.
Thank you. So, we just use a slightly smaller countersink for a 2.7 screw. A little bit more. Remember your angle looks like that. Good. It's important hold that angle because, if you think about it, the bone that you want to remove is that bone back there. So that when the screw head engages, it's going to be the same shape as the countersink. There we go. So there we - now I'm happy.
Depth gauge. Could be short. 24. 24 please. 24? Yep.
2-4's here. Get it? Yeah. Will you be doing another? Just - just twist it. I want to be super gentle here. Yes, one more just like that. Angle just a little bit more like that. There you go. It's not going to bite. It's two fingers. It’s more just tapping into the far cortex there. Give that a little bit more. That’s actually down there.
Hold on. That’s - that’s - you got the nerve. You've got the nerve there. Can I get the Freer? Yes sir. So that areolar tissue - you get that under the drill and just going to wrap it right up. So see that stuff right there? So we just need to make sure that’s totally away. Good, and your angle is going to be like that. And then down. Going to be right by the radial nerve. Hope I don’t have to take this one out. There you go. Good. Good. Doesn’t need as much on this because it's not as oblique as the - see that? Your circumferential. That's all you need. Depth gauge. 22. Pardon? 22. 22. Good, that's nice. Good, all right. So now we have it reduced. The nerve is out of the way. Right there. All right, now it’s time to put a plate on. All right, so... Freer? That clamp, I think, can stay there. This clamp can come off, but to be honest, it’d be nice to leave it if we can because it's kind of just protecting this. So why don’t we see if we can slide it up and up. All right, plate?
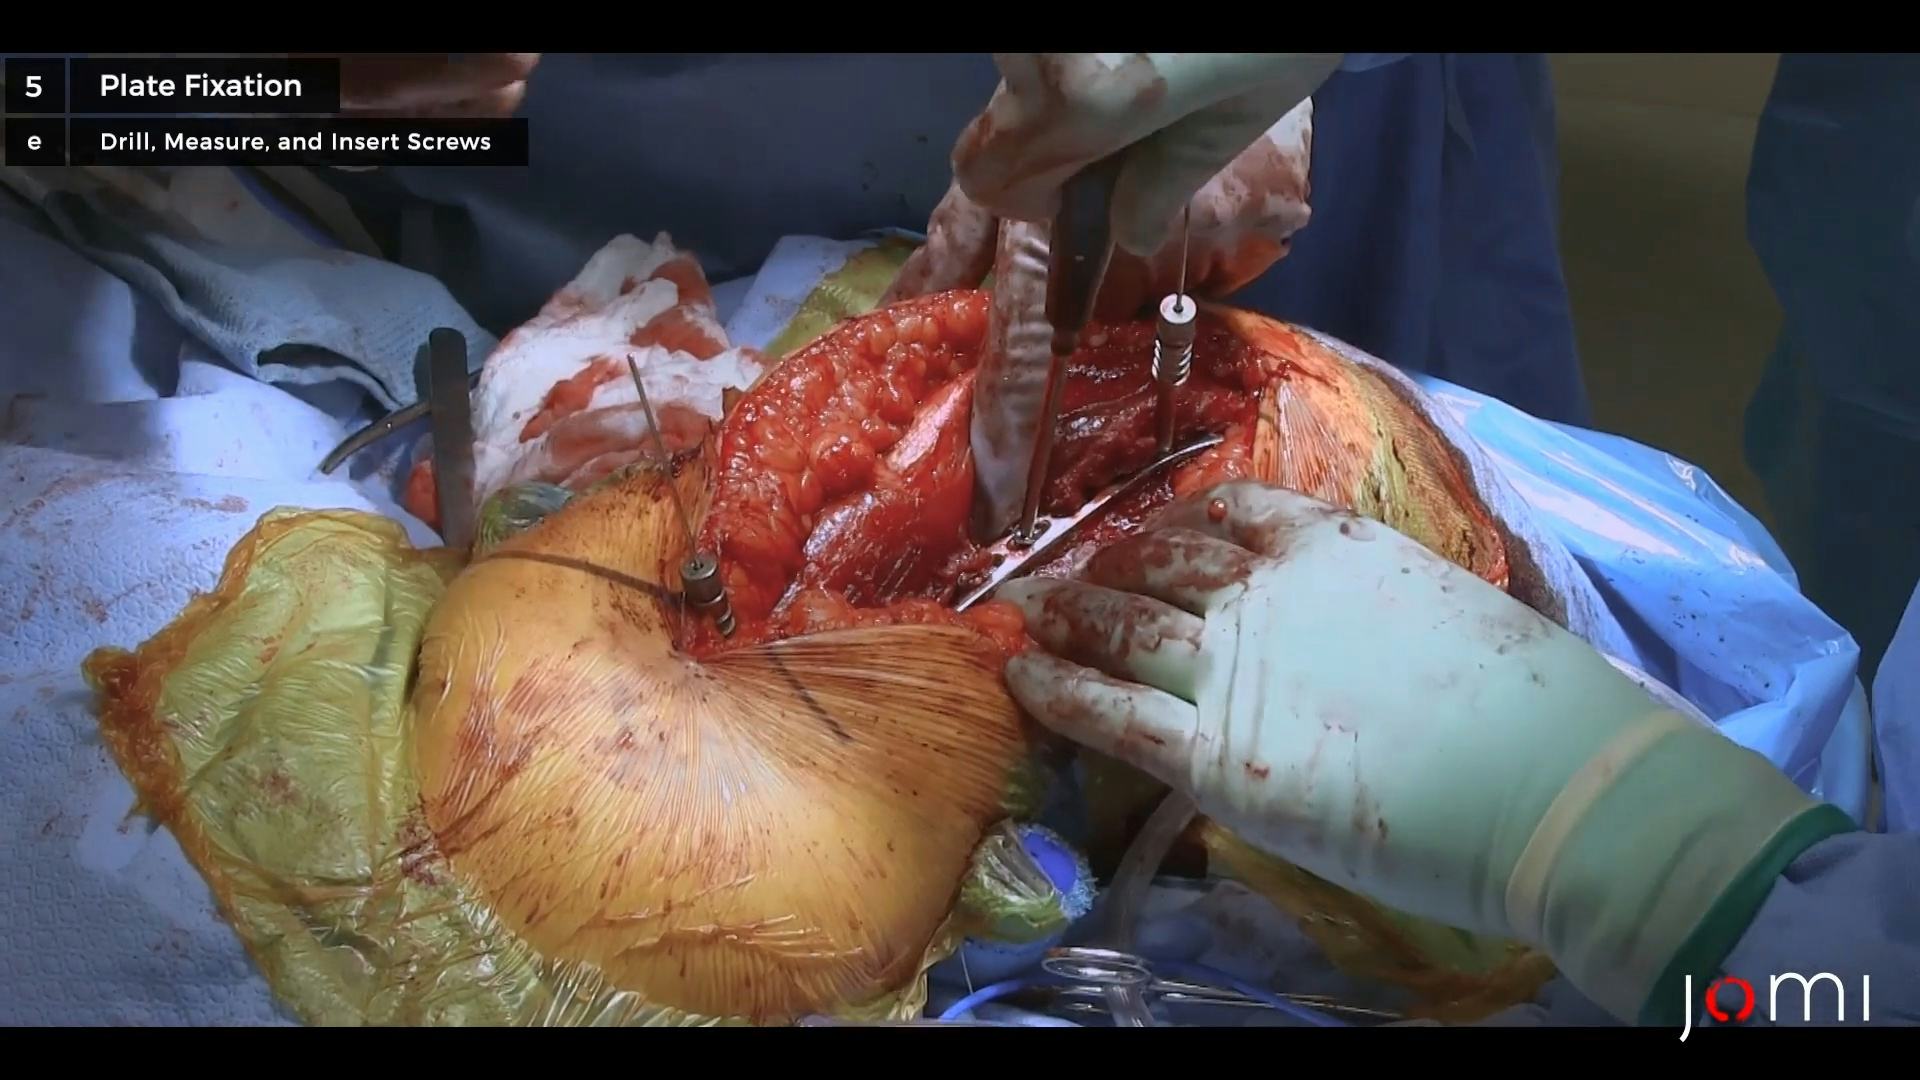
CHAPTER 5
That's the one you had chosen - the 10 hole. I think this is the one that’s got to go. So you see it doesn’t fit perfect. That’s because no one is built like the models. Actually, it fits pretty good. Oh - no, it doesn’t. See that? See that rock there? So we have to give it a little bit of a bend in the middle portion right where the radial nerve is. See that? See that? Yeah. But I like that distally. Why don’t we - can I see - come in for a shot, please. What I want to do is see that I'm happy distally, and if that's right where we want it, which I think it is, then we'll bend it up at the top.
Yep. Shot. All right, we're definitely high enough with the plate. And... Where - I don't even see the problem. It’s - it’s under all those clamps. Distally, we’re not going to see it. All right, good. And I don’t want to… X-ray there. X-ray there. X-ray there. Good, so you can see we are distal enough with the plate. So now let’s mark where we’re going to bend it. We’re going to bend it right about - just look. See, that’s the bend right at the radial nerve. Yeah. So that’s the radial nerve fold right there. So keep your finger there. Keep your finger - so right there. That’s the hole. Okay.
Plate benders. Give it a contour there. Here you go. Give it a contour. It’s a - you want to bend it that way. I'm going on like this so I want to bend it like... Well, it's gonna sit this way, so you want to bend it down. You want to be out of the way - the other way - the other way. That way, yep. That's it. That sound good or what? Yeah, that sounds good. Can you suck that for me? Right here, please. I’d say we’re halfway there. No one’s humerus is actually straight. It does have a little bit of bow in it in the AP plane. So if you look here - so there’s a narrow and a big. So you got to make it into the opposite, so that one's na- big and then narrow. That’s towards you - to get a - yep, there you go. You feel it give? A little bit. Yeah, it looks like it - looks like it bent more. You know, it’s a hard - it’s something you feel like - you know, you feel like, oh, it’s no longer being - you know, elastic and deformed - it’s elastic. That’s pretty good. Maybe a tiny, tiny, tiny, tiny, tiny, tiny - try a tiny bit more. Nah, it’s like flexing on to it, so it’s fine. All right, good. Locking tower, please. So put a locking tower right up there by my index finger.
We’re going to do 1-6 K-wires now. Okay. Do you want inserts for that? Yes. So this is a technique I use a lot - using locking towers, inserts, K-wires to hold the plate exactly where I want, and then when I’m happy, I fill it up. It wants to live there. Alright, K-wire. All right. Now these distal ones are unicortical, locking. They’re ending right at the capitulum. Usually, it’s only the distal one or two that are like that. Good. Now, can I see a Freer? So here we got to feel - are we really centered on the bone? It feels pretty damn good. It looks pretty damn good, so why don’t we just try it - see what it looks like? One cortex only. Be gentle. Good, that’s it. Just little bites. All right, good. Alright, come on in. Ohh, right there. All right, so let’s get rid of some of this stuff so we can interpret our X-rays a little better. Shot there. All right, so you can see proximally, we’re a little ulnar, and distally, we’re a little bit radial. So all we have to do is center up the plate some. All right, back out for a second. It feels like that too, so let’s start up here. So we just need to move it towards you a tiny bit. Watch out. Come up. Come off, please. All right, come on in. So that sits a little bit better too. Now it’s sitting. Shot there. Yeah, that’s a lot better. So - we’re centered at the top there - I like that - and then distally, that’s the hardest part. X-ray. X-ray. We have to be even more - ever so slightly more radial. I think maybe, actually, if we do that, it will be okay. X-ray. This is really annoying. X-ray. Yeah. If we could be just 1 or 2 mm more ulnar. Watch out. Come out. I’m going to change it to there, so it gets a new hole. I’m going to move it more my way. Okay. Good. Come on in. All right, so I think that’s going to be good. If we like that - shot there. So we’re centered all the way up, which is really nice, and then just to see that last bit - x-ray. That’s good. And when you actually put the plate on the bone - x-ray. X-ray. It’s sitting right where we want it, so that’s nice. Good. If anything, it looks like we could be more - I think we need to move it more over. So - because I think we are off the bone here a little bit. See that? That’s just going to be - we need to move it over. This - I think this clamp was blocking us. All right, sorry - wire driver. Let's take that off. Normally, I hate having that clamp off. You know, I like to have a clamp over my fracture. There you go. Real gentle, please. You’re pushing really hard. Be gentle, please. Good. There - now it’s sitting on the bone. Don’t take it too far, please. Yep.
Okay, so I'll just go right here. Now remember, you’re not - just right in the middle - right there. And then just remember you’re not - you’re not centered on the bone. You’re on the radial side of it. It’s a radial column plate. So you have to aim - you have to aim a little over here. Good. Good. Depth gauge. Now I’m thinking to myself, that was a nice boomp-boomp. You know, so you’re pretty centered on the bone, so your angle must have been pretty good. 24, please. So what I want is a good two screws distally, two screws proximally. And then we can check an AP and a lateral, and then we'll fill it up. Okay. This one I wouldn’t get all the way super snug - just down. All right, and now let’s work up here. Again, that plate is sitting nice on the bone, so you did a nice job contouring it. Looks perfect. Thanks. Okay. Right at that hole. Yep, parallel to this guide. Here you're centered. Yep. Here you are centered. You’re not going to get a cortex here, I don’t think. Cement or plastic. Keep going. Plastic. Now that’s going to be the far cortex. Good. Depth gauge. Yep. Some of the arthroplasty surgeons really frown on it, but I think drilling through cement gives you the best bite you’ll ever get. 24 maybe. It’s off the bone a touch. Ready? There you go. Just get it down. Suck in there. Suck over here. Good. Why don’t you do another non-locker? Yeah... You know, looking at your x-ray - you know, this one here should be fine. This one here is fine too. So why don’t you just put this one in because that’s - that’ll be a better bite. I got the screw driver. Can you give us the drill? I’m giving an angle. Right there. Right at the top of the hole, please. Yep, there - like that. Remember your angle over the top like that. There you go. Here you go. Good. Depth gauge. 24, please. One thing you want to make sure of is that you're not in the olecranon fossa, which we’re not because we’re looking at it, but you want to be able to extend your arm. All right. Ready? What was - is that a - what - what screws have we put in so far? Just 24s. All right, awesome. I actually want to take a picture before we put in the next screw because I don’t know where we are up here with respect to the stem. And I think we want to do some locking screws, so I want to figure out if there’s room to get a locking screw in that area. That should be a little bit better. That - yeah, that’s better than this one was. Yep. Shot there. So that is right at the tip. It looks like... X-ray there. The tip of implant is in locking hole right adjacent to where we are. Yeah - okay. So I think what we can do there is - x-ray there. That’s not so hot. x-ray there. X-ray there. Yeah, so I think we can miss the implant with some screws. You know, it will be close, but I think we can do it. X-ray again. So that would be this way, so that’s going to be missing this side of it. X-ray. X-ray. Or - x-ray there. Well, you can’t miss it with locking screws. X-ray again. Well, you did a good job of centering it. It’s like too centered. Okay, all right. Back out for a second. Alright, I think we're going to have to put one here. A 2-5 drill. Yeah. Yeah. Do you have a Weitlaner first - and then a baby Bennett? Sure. Yep. There - just like that. We don’t need it very far. That’s plenty. Depth gauge. Okay, so those two long screws... Do you need a unicortical from the pericostal to here? No, those are large frag. And I don’t - I don’t believe in those reducing the stress riser effect anyway. They’re good for periprosthetic femur fractures but not so good for these. Hold on, I'll... Let me come out with this. Can I get another Bennett? Yeah. Okay. Top part of the hole. Guide all the way down. Guide all the way down. It’s not down yet. There you go. And then try like that. Yep. Try to be as AP as you can. Yeah, that will work. Good. All right. All right. Make sure you get your angle. There you go. It’s a little bit more towards me. There you go. I don’t think we’re going to use - we may get away without cables, Paul. Sure thing. All right, can you suck in there for me? Hold this for a second. Yes, sir. Can you hold those apart? So this is why it’s so important to me to have your drill guide down because, if it’s not down, the head of the screw engages on the side of the plate before it gets down. Okay. And then you got to get past that to really be down. See, now it’s sitting in the hole. Okay, good. Wire driver. All right, 2-5 drill. Yep. That will work. That will work. There we go. You know, that one we didn’t need to do that for, but since we have to anyway, I figure... There we go. All the way down with the drill guide. This is going to be pretty close to an AP. It's going to be like that. Cement. That’s fine. That’s cement. And that’s good. Yep. You can feel a difference - pinching that as you go through there. Thank you. All right, that’s tight. All right. All right, do you want to call that good, proximally? Can I see that screwdriver back? You know - I want to do one more. The reason is there was that non-displaced crack here. So those two screws are really kind of - a little bit compromised. Okay. We only have two screws really above that. So why don't we - why don’t we just do another here? A couple of non-locking screws is not going to break the bank. That time you’re skidding across the implant, you hear that? Titanium is even better bite than... Here you go. We’re going to switch to non - or to locking here. Okay, thank you. So it gets harder, then easier, then harder again. Yeah, that’s the - a lot of people leave those screws loose, and that’s a big - you can’t do that. All right. So let’s pick our pattern. Out of convention, I always like the last hole filled. And this is going to be like a kind of funny angle. It’s is going to be like that. So extending into the capitulum - like that. Okay. And then, probably that one. 2-8. 2-7. 2-7 2-8. 2-8. So then we’ll go 1, 2, 3, and that way we’ll have five on either side. This will be bicortical. Do you have a wire driver? You can drill that one. This will be unicortical. Should I drill? That's fine. Do you have a wire driver? Yeah, and then we’ll just drill them all, and we’ll be done drilling. Sure. Can we get a gram of vanco powder? Yeah, I don’t think we need a drain because it’s pretty dry. This is the scary thing to me. See, that’s not even the nerve - like, right? That’s just... That’s the one where... That’s the brachial cutaneous nerve, and then you see it’s hiding there. This is the time when I would say we don't need to use a cable. This is a 2-6 coming next. That’s correct. We’re going to take our pictures, and unless something looks really screwy, we’re done. So one of the things I always document in the operative report is the location of the nerve. So in this - and I - you know, usually, I try not to put a screw head under it. So here I’ll document it as under the - you know, under the - it’s between the most proximal lag screw and the most distal plate screw. Really, it’s under that. You know, when the - when the muscle folds back, it’s right over that screw. And why - why do you do that? In case you have to take it out? Because you want - if you’re the one who has to take it out, you want to know where it is. Taking these plates out is one of the hardest things. The distal part here is prominent. I would consider even cutting the plate instead of risking the nerve. I think, you know, dissecting out the nerve - you know, it’s - it would be cool to get the whole plate out, but I think - you know, if it was bothering her, I would just cut the end of the plate off because that way you don’t have to worry about it. All right, so we got end of plate - can I see that screwdriver? Yep. Excellent. All right. So this is a really satisfying surgery because, like, these people are miserable, and when they wake up, they’re still miserable - but a few days later, they’re not miserable - you know, because their arm works. All right. Come on in.
Right there. Shot-sky. Shot. X-ray there. So there’s our plate. I like where it sits distally. Can you make that straight up and down for us? X-ray there. Can you now flip it upside down? Like upside down or... Shot there. X-ray there. X-ray there. And now, x-ray there. X-ray there. So you can see we are square up there, so that looks really good. X-ray. X-ray. X-ray. X-ray. X-ray. X-ray. X-ray. X-ray. That’s the cement restrictor. X-ray. X-ray there. And now go over the top. No - actually, let me try this. X-ray there. X-ray. Here you can see - you know, that there is a slight bow to the humerus, but we have an anatomic reduction. So that looks really good. All right, thank you. Save that. Yep. So this - this is the brachial cutaneous nerve. All right? So we found that at the intermuscular septum and traced that back to the radial nerve right here. And so the radial nerve is a little bit hard to see, and I don't want to fully dissect it out because I don't want to devitalize it, but underneath this you can see there's the radial nerve. It starts up here and courses down and then down all the way. So we have a nice view of it all the way from down distally away from the humerus, through the spiral groove, over the plate, and then back now up here, proximally. All right. Nice work.
CHAPTER 6
Get her done. Alright, we'll take the stuff. Magic powder, please. Yes, sir. And the nice thing is that this is a true internervous point - I mean, we didn't disrupt any muscle. So this - the people love this. Well, I shouldn't say love it, but they - you know, they recover pretty quickly from this. They tolerate it. You know, I would much rather have someone larger this way than larger this way. All right, so... A 20-year-old dude who spends too much time at Gold's Gym is harder than this. With a body mass index of negative 3 or whatever it is. Okay.
CHAPTER 7
The surgical treatment of humerus fractures is a little bit contentious. Up until the mid-to-late 80s, the vast majority of these were treated non-operatively, and still, a lot of people use functional bracing as their primary mode of treating humerus fractures. And in fact, most of the patients that I see, I try to recommend non-operative management before deciding to fix it. In this particular case, the patient was obese, and she had a - a functional problem. She - with her lower extremity. She had ataxia from gentamicin toxicity years ago, and so she really needs her - her upper extremities. So given the - the pain control issues that she had and difficulty with bracing, she elected to have this fixed. The other kind of thing that's evolved overtime is the thinning of the radial nerve. So she had a radial nerve palsy. There was a time when people used radial nerve palsy as an indication for surgery. However, now, I think that's - that's pretty much irrelevant except in the case of an open fracture. The big indication for me is an open fracture, so all open fractures I'm going to treat operatively. I think if you're there and you're debriding it, then you should stabilize it at the same time. Pathologic fractures, again, are a time when fixing the humerus makes more sense. And then the other big indication for me is polytrauma. So a lot of times people have other extremity injuries, they need to use their arm - and especially in a young, fit person with good bone quality, you're going to let them be full weight-bearing after fixing your humerus, and so it allows them to get up and walk, so... So poly trauma, open fractures, and pathologic fractures are my three main indications. So similar to other extremity things, really, you know, we're looking for function. The big issue is going to be radial nerve. So she had a radial nerve palsy to begin with, and so the recovery of the radial nerve is really going to affect how she does. Otherwise, we're looking for, you know, motion of the shoulder and the elbow joint, which - you know, I think fixing it gives you an advantage because you're going to start moving it early. But then again, you have to deal with the - the problems of surgery, scar tissue, and things like that. The techniques that we used are pretty standard, right? It's - you know, absolute stability - so lag screw fixation and a neutralization plate. The particular plate that we used today I really like, and like we talked about during the surgery, there a lot of different companies that make this same style of plate. And it's essentially a small fragment plate, using small fragment screws, but it's much thicker. So it has the thickness of a large fragment plate. So in the humerus, you want a little bit extra support and a standard small fragment plate - probably not strong enough - whereas a plate like this I think gives you that extra support. Treating humeral shaft fracture surgically is extremely rewarding to patients if you don't get a radial nerve palsy. I think that's why we don't do it more often - is this big fear of the radial nerve. You know, patients that have humeral shaft fractures acutely are miserable. It's very hard to deal with the brace, it's very painful, it's hard to get around - and surgery fixes that, so they feel immediately better. So it's really rewarding on that side, but you do have to accept this risk of a radial nerve palsy. And although most of them get better, some of them don't. And so that would be the big worry. So I think with this technique and when you're treating periarticular fractures in general, you know, there - you can get into trouble if you rely too much on your hardware. So, you know, all the implant companies have done a fantastic job of designing periarticular plates that fit the average person, but no one's average. And so like you saw in this case, you know, we're able to get a really nice reduction and use the lag screws to fix it. If we put the plate on without further contouring it, it would have just ripped that reduction apart, right? Because the humerus wasn't perfectly straight - there was a little bit of a bow to it. And so I think - just like in any other periarticular situation, if you take your time and really make sure things fit - sometimes it takes a little work to contour the plates - it ends up working a little bit better. As far as plating humeral fractures, I think really the - you know, there have been a lot of advances with variable angle plates and screws, so I think the implant technology is pretty good. I do think there's some work that can be done though for periprosthetic fractures. So this fracture was a little bit unique in that there was a stem above it, and, you know, really, we have three options. One is putting screws through the cement mantle, and in this case that worked out pretty well, but sometimes you can't do that. If you can't do that, you're left with short locking screws or cerclage cables - both of which are kind of cumbersome to use. The short locking screws are easy to put in, but they don't really work very well. They're pretty weak, and the cerclage cables - particularly around the humerus - are very challenging and, you know, fraught with risk. So I think, you know, fixation around periprosthetic fractures in both the humerus and also the lower extremity are - are something we need to work on. Postoperatively, I just use a sling. So the patient wakes up in an ACE wrap. They are in a sling. They come out of it right away for motion. And I typically limit a geriatric patient to 5 or 10 pounds, and then younger patients have no restrictions. And that's just simply a matter of bone quality, and I'm worried a little bit about the fixation. As far as the radial nerve is concerned, I put people in a cock-up wrist splint. And then they work with occupational therapy to maintain their motion, and we expect that it should get better. If there's no improvement at 3 months, we'll get an EMG, but there's really no indication to do it before that. We saw the radial nerve. We know it's intact. It's just a matter of it waking up.